My Favorite Scones

Adjustments.jpeg

Happy 2020!
Once again heading into the Christmas season I went MIA from the blog, there’s just too much to be done, eaten, seen, and experienced!

I closed out 2019 by getting to show my husband America for the first time ever, and more importantly, my hometown! It was a blast traveling home for Christmas, and busy. Every year it seems to get a little bit harder to say goodbye.

2020 started out completely uneventful, we were flying somewhere over the Atlantic Ocean and we don’t know when or where we were when the new year happened. It just did. I think 2020 is going to be a good year, though, if nothing else, it’s a great number, right?

I must confess, I was a bit nonplussed at the seeming coincidence of seeing photos of not one, not two, but several 20’s or Gatsby themed New Year’s parties. The movie came out several years ago, guys, why the big comeback? … It took seeing someone’s post on fb about entering the roaring 20’s again for it to click for me. I can’t help it, guys, I’m just not always the brightest bulb in the case.

However, our vision is 2020 and it is roaring and all those good things, so let’s get rolling. Rolling scones. I mean, these scones don’t have to be rolled, it just sounds like the band…;)

Now. This scone recipe is not just any recipe I am about to share with you, no no no. This is my favorite scone recipe, and I like/use several different scone recipes, so this is saying something.

Like these coconut scones, which are pretty darn delicious.
And these Orange Chocolate Chip Scones. YUM.

But. This scone recipe to beat all scone recipes (opinion) is so versatile, you can make just about any flavor you can think up! It’s also quite forgiving, which makes your scones turn out great every single time. Pictured are cranberry orange scones, but I will give you more flavor ideas and a launch pad to create your own flavors after the basic recipe!

I know, I know, calm down, this is all a lot to take in. The best scone recipe ever PLUS so many different flavors?? What is it, Christmas or something? No, but I decided to start the year off right with one of my favorites recipes (and I’m not even talking just in the scone category! Gasp.) and extending an olive branch for having ignored the inter webs for a bit longer than intended. (It was the eggnog, you guys!)

Ok, scones, let’s go!

This post may contain affiliate links. If you make a purchase using these links, Jennyblogs may receive a small commission, at no extra cost to you. This helps to support Jennyblogs. For further information see the privacy policy. Grazie!

Recipe adapted from allrecipes


My Favorite Scones

Makes 12 scones

Adjustments.jpeg

Ingredients:

For the Scones

  • 1 cup / 225g plain yogurt

  • 1 tsp baking soda

  • 4 cups / 480g all-purpose flour

  • 1 cup / 200g sugar

  • 2 tsp baking powder

  • 1 tsp salt

  • 3/4 cup / 169g oil

  • 1 egg

  • 1 cup flavorings, 1 tsp extract, 1 Tbsp zest, etc. (see below)

For the Glaze

  • 1 cup / 120g powdered sugar

  • 1-2 Tbsp / 15-30g milk

Directions:

Make the Scones

Oven 350°F / 177°C. Baking sheet lined with parchment paper or silpat.

  1. In a small bowl, combine yogurt and baking soda; set aside.

  2. In a large bowl, whisk together flour, sugar, baking powder, and salt.

  3. Add oil to flour mixture, mixing until coarse crumbs form.

  4. Stir in egg, yogurt mixture, and any add-ins just until barely moistened.

  5. Turn the dough out onto a generously floured surface. Knead briefly, about 4-8 turns, then press into an even 1-inch thick circle.

  6. Cut the circle into 12 triangular shaped scones, and place on prepared baking sheet.

  7. Bake for 12-15 minutes or until the centers look set, the scones have cracked slightly, and/or the bottoms or a light golden brown.

Make the Glaze

  1. Stir together powdered sugar and 1 Tbsp milk. Continue adding milk, a tsp at a time, until a thick but drizzleable glaze is achieved. Drizzle over cooled scones.

Scone Flavors:

Use one of these ideas (they’re all tried and true!) or create your own!

Adjustments.jpeg
  • Lemon Scones: 1 tsp lemon extract, 1 Tbsp lemon zest; use lemon juice to make the glaze. Use lemon yogurt if available.

  • Orange Coconut Scones: 1 tsp orange extract, 1 Tbsp orange zest, optional 1/2 tsp coconut extract, 3/4 cup coconut; use orange juice to make the glaze. Use orange or coconut yogurt if available.

  • Chocolate Chip Scones: 1 cup mini chocolate chips, 1 tsp vanilla extract. Make the simple glaze as in the basic recipe or melt more chocolate chips and drizzle over scones.

  • Chestnut Chocolate Chip Scones: 1 cup mini chocolate chips, 1 tsp vanilla extract, replace 1/4 cup of the yogurt with 1/4 cup chestnut purée. Glaze as in basic recipe.

  • Cherry Maple Scones: 1 cup dried cherries; use maple syrup to make the glaze.

  • Strawberry Scones: 1/2 cup diced fresh strawberries; use strawberry yogurt. Use basic glaze, sprinkle with demarara sugar before baking, or spread strawberry jam over the top while the scones are still warm.

  • Cranberry Orange Scones: 1 tsp orange extract, 1 Tbsp orange zest, 1 cup fresh (or frozen and thawed/drained) cranberries; use orange juice to make the glaze. Use orange yogurt if available.

  • Gingerbread Scones: replace 1/4 cup of the oil with 1/4 cup molasses, add 1 tsp cinnamon, 1 tsp ginger, 1/2 tsp cloves; use basic glaze or make a cream cheese drizzle by beating 4oz softened cream cheese with 1/4 cup powdered sugar until smooth, then adding milk 1 Tbsp at a time until mixture is thin enough to be drizzled.

Jenny’s Notes

  • In place of the plain yogurt you can also use sour cream or even mascarpone if you have leftovers from say, making tiramisu. You can also easily use Greek yogurt, or sweetened vanilla yogurt. If you use a sweetened yogurt, cut sugar in the recipe by 1/3 cup / 67g. You can also use a flavored yogurt to boost the scones flavor. For example, in the cranberry orange recipe above you could use orange yogurt.

  • If you accidentally make your glaze too thick or too thin, it’s a super easy fix. For a too-thick glaze, keep adding more milk (or whichever liquid you are using) gradually until desired consistency is achieved. Likewise, for a too-thin glaze, keeping adding a bit more powdered sugar until thick enough.

Best scone recipe, Scone base, teatime
Breakfast, Brunch
British
Yield: 12
Author:
Jenny

Jenny's Favorite Scones

If I had to make one scone recipe for the rest of my life this, would be it: the perfect base to add any fill-ins and flavorings you wish. Perfectly moist, a sweet glaze, and pairs perfectly with a good book and a cup of tea!
prep time: 25 Mcook time: 15 Mtotal time: 40 M

ingredients:

For the Scones
  • 1 cup / 225g plain yogurt
  • 1 tsp baking soda
  • 4 cups / 480g all-purpose flour
  • 1 cup / 200g sugar
  • 2 tsp baking powder
  • 1 tsp salt
  • 3/4 cup / 169g oil
  • 1 egg
  • 1 cup flavorings, 1 tsp extract, 1 Tbsp zest, etc. (see below)
For the Glaze
  • 1 cup / 120g powdered sugar
  • 1-2 Tbsp / 15-30g milk
Scone Flavor Ideas
  • Lemon Scones: 1 tsp lemon extract, 1 Tbsp lemon zest; use lemon juice to make the glaze. Use lemon yogurt if available.
  • Orange Coconut Scones: 1 tsp orange extract, 1 Tbsp orange zest, optional 1/2 tsp coconut extract, 3/4 cup coconut; use orange juice to make the glaze. Use orange or coconut yogurt if available.
  • Chocolate Chip Scones: 1 cup mini chocolate chips, 1 tsp vanilla extract. Make the simple glaze as in the basic recipe or melt more chocolate chips and drizzle over scones.
  • Chestnut Chocolate Chip Scones: 1 cup mini chocolate chips, 1 tsp vanilla extract, replace 1/4 cup of the yogurt with 1/4 cup chestnut purée. Glaze as in basic recipe.
  • Cherry Maple Scones: 1 cup dried cherries; use maple syrup to make the glaze.
  • Strawberry Scones: 1/2 cup diced fresh strawberries; use strawberry yogurt. Use basic glaze, sprinkle with demarara sugar before baking, or spread strawberry jam over the top while the scones are still warm.
  • Cranberry Orange Scones: 1 tsp orange extract, 1 Tbsp orange zest, 1 cup fresh (or frozen and thawed/drained) cranberries; use orange juice to make the glaze. Use orange yogurt if available.
  • Gingerbread Scones: replace 1/4 cup of the oil with 1/4 cup molasses, add 1 tsp cinnamon, 1 tsp ginger, 1/2 tsp cloves; use basic glaze or make a cream cheese drizzle by beating 4oz softened cream cheese with 1/4 cup powdered sugar until smooth, then adding milk 1 Tbsp at a time until mixture is thin enough to be drizzled.

instructions:

How to cook Jenny's Favorite Scones

Make the Scones
  1. Oven 350°F / 177°C. Baking sheet lined with parchment paper or silpat.
  2. In a small bowl, combine yogurt and baking soda; set aside.
  3. In a large bowl, whisk together flour, sugar, baking powder, and salt.
  4. Add oil to flour mixture, mixing until coarse crumbs form.
  5. Stir in egg, yogurt mixture, and any add-ins just until barely moistened.
  6. Turn the dough out onto a generously floured surface. Knead briefly, about 4-8 turns, then press into an even 1-inch thick circle.
  7. Cut the circle into 12 triangular shaped scones, and place on prepared baking sheet.
  8. Bake for 12-15 minutes or until the centers look set, the scones have cracked slightly, and/or the bottoms or a light golden brown.
Make the Glaze
  1. Stir together powdered sugar and 1 Tbsp milk. Continue adding milk, a tsp at a time, until a thick but drizzleable glaze is achieved. Drizzle over cooled scones.

NOTES:

In place of the plain yogurt you can also use sour cream or even mascarpone if you have leftovers from say, making tiramisu. You can also easily use Greek yogurt, or sweetened vanilla yogurt. If you use a sweetened yogurt, cut sugar in the recipe by 1/3 cup / 67g. You can also use a flavored yogurt to boost the scones flavor. For example, in the cranberry orange recipe above you could use orange yogurt. If you accidentally make your glaze too thick or too thin, it’s a super easy fix. For a too-thick glaze, keep adding more milk (or whichever liquid you are using) gradually until desired consistency is achieved. Likewise, for a too-thin glaze, keeping adding a bit more powdered sugar until thick enough.

Calories

397.79

Fat (grams)

15.22

Sat. Fat (grams)

1.33

Carbs (grams)

60.11

Fiber (grams)

1.47

Net carbs

58.64

Sugar (grams)

28.27

Protein (grams)

5.78

Sodium (milligrams)

401.65

Cholesterol (grams)

16.82
Nutritional information is approximate. Based on 12 servings of cranberry orange scones.
Did you make this recipe?
Tag @jenevamorris on instagram and hashtag it #jennyblogs
Created using The Recipes Generator

Ganache Coconut Cream Pie Bars

Not mashed potatoes...:)

Not mashed potatoes...:)

Oh my gosh! Ganache. Yes, coconut cream pie is delicious.  So are Almond Joys and Mounds.  So why not put them together, add a shortbread crust, put them in the slightly less formidable to cut bar form instead of pie, and voila: Ganache Coconut Cream Pie Bars. 

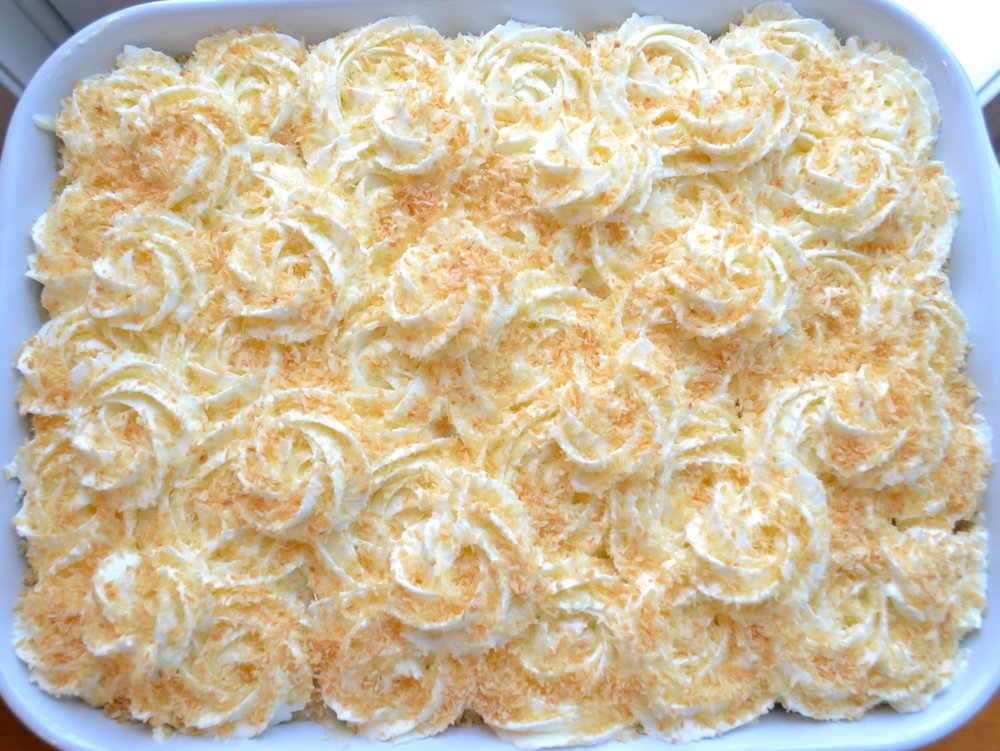
These bars are slightly involved, but the end product is very worthwhile.  Not to mention, you can make an 8x8 pan worth of bars, or 9x13!  I almost always go the 9x13 route.  This has become a favorite for Christmas, my mom's birthday, and just about any occasion that a little creamy coconut and chocolate is welcome.  As what seems to be turning into a trend, I failed to get any kind of decent photo of the inside, so for now, (or maybe forever...once these are cut into you'll understand why photos never get taken) please enjoy the photos of the whipped cream and toasted coconut topping.  If you'd like an idea of what bliss you're getting in to, take a peak over at Willow Bird Baking, from whom I adapted the recipe, and see her beautiful photos! 


Ganache Coconut Cream Pie Bars

Makes about 20 servings

Ingredients:

For the Shortbread Crust

  • 1 cup (2 sticks) / 226g cold butter

  • 2 cups / 240g all-purpose flour

  • 1/2 cup / 100g sugar

For the Ganache

  • 1/4 cup + 2 Tbsp / 87g heavy whipping cream

  • 6 oz (1 cup) / 175g bittersweet or semisweet chocolate, chopped, or chips

For the Coconut Cream Filling

  • 6 cups / 1,422g unsweetened coconut milk or milk of choice

  • 4 eggs

  • 1 1/2 cups / 300g sugar

  • 2/3 cup / 73g cornstarch

  • 1/2 tsp / 2.5g salt

  • 1 1/2 cups / 150g flaked unsweetened coconut

  • 1/2 tsp / 2.5g coconut extract

  • 1/2 tsp / 2.5g vanilla extract

For the Whipped Cream Topping

  • 2 cups / 464g heavy whipping cream

  • 1/2 cup / 100g sugar

  • 1 tsp / 5g vanilla extract

  • 1/2 cup / 50g flaked unsweetened coconut, toasted (see below)

Directions:

Oven 350°F / 177°C.  Ungreased 9x13in / 23x33cm baking dish.

Make the Shortbread Crust

  1. Cut the butter into flour and sugar using a fork, pastry cutter, or in a food processor.  Once the mixture resembles coarse sand and the butter chunks are no larger than small peas, press mixture evenly into bottom prepared pan. 

  2. Bake for 18-22 minutes until lightly golden-brown.  Set aside to cool.  Leave oven on for toasting the coconut.

Make the Ganache

  1. While the crust is baking, prepare the ganache.  Place the chocolate in a medium bowl and the cream in a small saucepan.  Over medium-low heat, bring the cream to a simmer.  You can also use the microwave, 30 seconds-1 minute or until cream is just simmering, but not boiling.  

  2. Pour the cream over the chocolate and let sit for 1-2 minutes to melt the chocolate.  Whisk until completely smooth.  

  3. Once the crust is finished and partly cooled, pour ganache evenly over crust.  Place in fridge to set.   

Toast the Coconut

Place the 1/2 cup coconut for the topping in a shallow baking dish.  Place in oven and stir every 1-2 minutes, making sure it doesn't over-brown, for a total of 5-10 minutes.  Remove and let cool.

Make the Coconut Cream Filling

2017-12-23 15.25.34.jpg
  1. Combine milk, eggs, sugar, cornstarch, and salt in a large saucepan. 

  2. Place over medium heat, whisking constantly, until mixture begins to thicken and comes to a boil.  This can take anywhere from 15-35 minutes, depending on your stove.

  3. Once thickened, remove from heat and stir in coconut and vanilla extracts.  

  4. Remove crust from fridge and pour filling over crust.  Place back in fridge to set, 2-4 hours.  

Make the Whipped Cream Topping

  1. Whip the cream and sugar in the bowl of a stand mixer or with a handheld mixer until stiff peaks form.

  2. Spoon over chilled bars, or pipe.  Finish with toasted coconut.  Store in fridge.  

Jenny's Notes:

  • Because the ganache in this recipe is not decorative, you can easily substitute coconut milk or another kind for the heavy whipping cream. I prefer using coconut milk, reducing the amount of fat/calories. Save those for when you need the high-shine perfect ganache!

  • If you only have sweetened coconut milk or sweetened flaked coconut on hand, go ahead and use those. Simply reduce the sugar by about 1/4-1/2 cup / 50-100g in the filling, if you wish. I prefer to have unsweetened coconut on hand so I can control how much sugar I'm adding to breakfasts, desserts, etc., plus I like the smaller size of flaked and grated coconut vs. shredded.

  • For toasting coconut, and every use really, I highly recommend Le Creuset pans. My toasted coconut used to always come out in various shades, but since using Le Creuset it always turns out a beautiful even, golden-brown. They conduct heat evenly and beautifully.

  • If a 9x13 pan of cream coconut heaven seems daunting to you, it's super easy to halve this recipe for a 8x8 or 9x9in pan!

  • These bars should ideally be eaten within 3-4 days. Otherwise the whipped cream starts to separate and the crust gets soggy.

Coconut Cream pie, bars, shortbread, chocolate ganache, fresh whipped cream, toasted coconut
Dessert, Pie, bars
American
Yield: 20
Author: Jennyblogs
Print
Ganache Coconut Cream Pie Bars

Ganache Coconut Cream Pie Bars

Shortbread crust, a thin layer of ganache, classic coconut cream pie filling, all topped with fresh whipped cream and toasted coconut.
Prep time: 1 H & 45 MCook time: 32 MTotal time: 1 H & 77 M

Ingredients:

For the Shortbread Crust
  • 1 cup (2 sticks) / 226g cold butter
  • 2 cups / 240g all-purpose flour
  • 1/2 cup / 100g sugar
For the Ganache
  • 1/4 cup + 2 Tbsp / 87g heavy whipping cream
  • 6 oz (1 cup) / 175g bittersweet or semisweet chocolate, chopped, or chips
For the Coconut Cream Filling
  • 6 cups / 1,422g unsweetened coconut milk or milk of choice
  • 4 eggs
  • 1 1/2 cups / 300g sugar
  • 2/3 cup / 73g cornstarch
  • 1/2 tsp / 2.5g salt
  • 1 1/2 cups / 150g flaked unsweetened coconut
  • 1/2 tsp / 2.5g coconut extract
  • 1/2 tsp / 2.5g vanilla extract
For the Whipped Cream Topping
  • 2 cups / 464g heavy whipping cream
  • 1/2 cup / 100g sugar
  • 1 tsp / 5g vanilla extract
  • 1/2 cup / 50g flaked unsweetened coconut, toasted (see below)

Instructions:

Make the Shortbread Crust
  1. Oven 350°F / 177°C. Ungreased 9x13in / 23x33cm baking dish.
  2. Cut the butter into flour and sugar using a fork, pastry cutter, or in a food processor. Once the mixture resembles coarse sand and the butter chunks are no larger than small peas, press mixture evenly into bottom prepared pan.
  3. Bake for 18-22 minutes until lightly golden-brown. Set aside to cool. Leave oven on for toasting the coconut.
Make the Ganache
  1. While the crust is baking, prepare the ganache. Place the chocolate in a medium bowl and the cream in a small saucepan. Over medium-low heat, bring the cream to a simmer. You can also use the microwave, 30 seconds-1 minute or until cream is just simmering, but not boiling.
  2. Pour the cream over the chocolate and let sit for 1-2 minutes to melt the chocolate. Whisk until completely smooth.
  3. Once the crust is finished and partly cooled, pour ganache evenly over crust. Place in fridge to set.
Toast the Coconut
  1. Place the 1/2 cup coconut for the topping in a shallow baking dish. Place in oven and stir every 1-2 minutes, making sure it doesn't over-brown, for a total of 5-10 minutes. Remove and let cool.
Make the Coconut Cream Filling
  1. Combine milk, eggs, sugar, cornstarch, and salt in a large saucepan.
  2. Place over medium heat, whisking constantly, until mixture begins to thicken and comes to a boil. This can take anywhere from 15-35 minutes, depending on your stove.
  3. Once thickened, remove from heat and stir in coconut and vanilla extracts.
  4. Remove crust from fridge and pour filling over crust. Place back in fridge to set, 2-4 hours.
Make the Whipped Cream Topping
  1. Whip the cream and sugar in the bowl of a stand mixer or with a handheld mixer until stiff peaks form.
  2. Spoon over chilled bars, or pipe. Finish with toasted coconut. Store in fridge.

Notes:

Because the ganache in this recipe is not decorative, you can easily substitute coconut milk or another kind for the heavy whipping cream. I prefer using coconut milk, reducing the amount of fat/calories. Save those for when you need the high-shine perfect ganache! If you only have sweetened coconut milk or sweetened flaked coconut on hand, go ahead and use those. Simply reduce the sugar by about 1/4-1/2 cup / 50-100g in the filling, if you wish. I prefer to have unsweetened coconut on hand so I can control how much sugar I'm adding to breakfasts, desserts, etc., plus I like the smaller size of flaked and grated coconut vs. shredded. For toasting coconut, and every use really, I highly recommend Le Creuset pans. My toasted coconut used to always come out in various shades, but since using Le Creuset it always turns out a beautiful even, golden-brown. They conduct heat evenly and beautifully. If a 9x13 pan of cream coconut heaven seems daunting to you, it's super easy to halve this recipe for an 8x8 or 9x9in pan! These bars should ideally be eaten within 3-4 days. Otherwise the whipped cream starts to separate and the crust gets soggy.

Calories

446.04

Fat (grams)

30.59

Sat. Fat (grams)

21.07

Carbs (grams)

41.54

Fiber (grams)

2.52

Net carbs

39.02

Sugar (grams)

26.41

Protein (grams)

4.58

Sodium (milligrams)

152.00

Cholesterol (grams)

92.63
Nutritional information is approximate. Based on 20 servings.
Did you make this recipe?
Tag @jenevamorris on instagram and hashtag it #jennyblogs
Created using The Recipes Generator
2017-12-23 15.25.10.jpg

Semlor (Swedish Cardamom Buns)

Shout out to all my Swedish friends, here's an ode to Semlor!  Do I even know any Swedish people? Do I even know any Swedish-Americans?  Hmmm.  Well, if you know one, or are one, let me know would ya?  I think the most I know about Sweden is what I learned from the American Girl doll Kirsten as a child, they have a pretty blue and yellow flag, and that these buns are delicious.  They take a bit of time to make, unless you have a bread machine, but honestly I love working food with my hands and would take the extra time to mix and knead over a bread machine any day.  However, sometimes practicality or time saving takes place over the therapeutic sensation of kneading bread.  Your call.  But if you choose the bread machine route, you're on your own because I've never operated one.  Sorry 'bout ya.  My roommate used to have one and she made it look so easy that I'm sure you could translate this recipe for a bread recipe easily without my help.  

These buns, as I've read, are traditionally associated with Lent and eaten on Shrove Tuesday, or Fat Tuesday.  You could think of them as the equivalent to Polish paczki.  If you're thinking, "Wow, thanks, that helps me so much - WHAT is a paczki??" It's similar to a jelly filled doughnut traditionally eaten on Shrove Tuesday and pronounced poonch-key.  Also delicious.  There is quite a large Polish population near where I grew up, including an annual Polka Fest!  Plenty of polka-ing and beer to go around.  Anyway, Semlor is also eaten in various forms and under other names in other Nordic countries such as Finland, Estonia, Norway, Denmark, Lithuania, Latvia, Iceland, and the Faroe Islands.  Let's stick to Swedish Semlor, shall we? 

This post may contain affiliate links. If you buy something using these links, Jennyblogs may receive a small commission, at no extra cost to you. This helps to support Jennyblogs. For further information see the privacy policy. Grazie!

Recipe adapted from LondonEats


Semlor

Makes 10 buns

Ingredients:

For the Cardamom Buns

  • 1 cup / 237g milk

  • 7 Tbsp / 100g butter

  • 2 tsp / 6.3g instant yeast

  • 1/4 tsp / 1g salt

  • 1/3 cup / 40g sugar

  • 1/2 tsp / 1g ground cardamom

  • 2 eggs

  • 3 1/2 cups / 450g all-purpose flour or bread flour

  • 1 tsp / 5g water, milk, or heavy cream

For the Marzipan Filling

  • insides of the buns

  • 7 oz / 200g marzipan (make your own marzipan here!)

  • generous 3/4 cup / 195g milk

  • generous 3/4 cup / 195g heavy whipping cream

  • powdered sugar, for dusting

Directions:

Make the Cardamom Buns

Oven 390°F / 200°C. 2 baking sheets lined with parchment paper or silpat.

  1. Place milk in a small saucepan and heat until milk just begins to simmer.  Remove from heat and add butter, stirring to melt.  Once butter is completely melted and integrated, allow mixture to sit until lukewarm.  

  2. Place milk mixture, yeast, salt, sugar, cardamom, and 1 egg in the bowl of a stand mixer fitted with a paddle.  Beat until all ingredients are incorporated.  Switch to the dough hook and add flour slowly on medium-low speed until a soft dough forms.  Continue to beat for several minutes on medium speed.  You should hear the dough slapping the sides of the bowl, sticking only to the bottom.  If the dough is sticking to the sides, add flour gradually until dough no longer sticks.  

  3. Turn out onto a lightly floured surface and knead 1-2 minutes more.  Divide dough into 10 equal portions and roll into balls.  Place evenly prepared baking sheets. Cover with a cloth and let rise in a warm place until doubled in size, about 1 hour.   

  4. Beat the second egg with the water and use a pastry brush or your hands to evenly brush the buns.

  5. Bake for about 15 minutes until golden brown or when internal temperature registers 185-190°F / 85-88°C.  

  6. Transfer buns to a cooling rack, cover with a towel, and allow to cool.  

Make the Marzipan Filling

Your filling may look like baby spit-up, too. And that's ok.

Your filling may look like baby spit-up, too. And that's ok.

  1. Once the buns are cool enough to handle, cut out a lid from the top using a small serrated knife. Set the lids aside.  Using a fork, scoop out the inside of each bun and place in a medium bowl.  Crumble/tear with your fingers as best you can.  Add marzipan and milk and work into a smooth paste using your hands or a fork.  

  2. In the bowl of a stand mixer fitted with the whisk attachment, whip the cream until stiff peaks from.  

Assembly

  1. Fill the buns evenly with the marzipan mixture. Pipe whipped cream over the filling using a large star tip (1M) or a spoon.  

  2. Place the tops on the whipped cream, then dust tops with powdered sugar using a small sieve.  

Jenny's Notes:

  • I always knead my dough by hand for a bit after kneading it in a machine. The machine doesn't always do a perfect job and I've had instances before where I kneaded solely in the machine and had a strange dough rise as a result. A few rounds of kneading by hand fixed the problem; the yeast hadn't been distributed evenly when kneaded only by machine.

  • If you have a scale you can ensure your buns will be all the same size. Weigh the dough mass, then divide this number by 10. This will give you an idea how much each of the 10 buns should weigh. You don't have to be exact down to the gram, of course, but I would stay within 5 or so grams of this number. Divide the dough mass in 2, then divide each half into 5 equal parts. Then weigh each piece to see how accurate your eye was.

  • When you "crumble" the filling into pieces you may notice the dough is moist and hard to crumble, but tear it as best you can into small chunks. When you add the milk and marzipan the pieces will absorb the liquid and eventually come together into a smoothish mass.

  • I made my own marzipan for this recipe and used rose water. Rose is a very strong flavor, so go light, but I thought it made for a very unique pairing with almond and cardamom and very "European" tasting. Or, leave out the rose if you're skeptical and you'll still have a lovely cardamom/almond combination.

  • "Semlor" is plural, so if you would like to eat only one bun, ask for a "Semla."

semla,semlor,cardamom buns,marzipan filling,swedish buns, yeasted bread, sweet buns
bread, breakfast, dessert
Nordic
Yield: 10
Author: Jennyblogs
Print
Semlor (Swedish Cardamom Buns)

Semlor (Swedish Cardamom Buns)

Sweet, yeasted cardamom buns with a creamy marzipan filling and whipped cream topping.
Prep time: 1 H & 20 MCook time: 15 Mininactive time: 1 HourTotal time: 2 H & 35 M

Ingredients:

For the Cardamom Buns
  • 1 cup / 237g milk
  • 7 Tbsp / 100g butter
  • 2 tsp / 6.3g instant yeast
  • 1/4 tsp / 1g salt
  • 1/3 cup / 40g sugar
  • 1/2 tsp / 1g ground cardamom
  • 2 eggs
  • 3 1/2 cups / 450g all-purpose flour or bread flour
  • 1 tsp / 5g water, milk, or heavy cream
For the Marzipan Filling
  • insides of the buns
  • 7 oz / 200g marzipan (make your own marzipan here!)
  • generous 3/4 cup / 195g milk
  • generous 3/4 cup / 195g heavy whipping cream
  • powdered sugar, for dusting

Instructions:

Make the Cardamom Buns
  1. Oven 390°F / 200°C. 2 baking sheets lined with parchment paper or silpat.
  2. Place milk in a small saucepan and heat until milk just begins to simmer. Remove from heat and add butter, stirring to melt. Once butter is completely melted and integrated, allow mixture to sit until lukewarm.
  3. Place milk mixture, yeast, salt, sugar, cardamom, and 1 egg in the bowl of a stand mixer fitted with a paddle. Beat until all ingredients are incorporated. Switch to the dough hook and add flour slowly on medium-low speed until a soft dough forms. Continue to beat for several minutes on medium speed. You should hear the dough slapping the sides of the bowl, sticking only to the bottom. If the dough is sticking to the sides, add flour gradually until dough no longer sticks.
  4. Turn out onto a lightly floured surface and knead 1-2 minutes more. Divide dough into 10 equal portions and roll into balls. Place evenly prepared baking sheets. Cover with a cloth and let rise in a warm place until doubled in size, about 1 hour.
  5. Beat the second egg with the water and use a pastry brush or your hands to evenly brush the buns.
  6. Bake for about 15 minutes until golden brown or when internal temperature registers 185-190°F / 85-88°C.
  7. Transfer buns to a cooling rack, cover with a towel, and allow to cool.
Make the Marzipan Filling
  1. Once the buns are cool enough to handle, cut out a lid from the top using a small serrated knife. Set the lids aside. Using a fork, scoop out the inside of each bun and place in a medium bowl. Crumble/tear with your fingers as best you can. Add marzipan and milk and work into a smooth paste using your hands or a fork.
  2. In the bowl of a stand mixer fitted with the whisk attachment, whip the cream until stiff peaks from.
Assembly
  1. Fill the buns evenly with the marzipan mixture. Pipe whipped cream over the filling using a large star tip (1M) or a spoon.
  2. Place the tops on the whipped cream, then dust tops with powdered sugar using a small sieve.

Notes:

I always knead my dough by hand for a bit after kneading it in a machine. The machine doesn't always do a perfect job and I've had instances before where I kneaded solely in the machine and had a strange dough rise as a result. A few rounds of kneading by hand fixed the problem; the yeast hadn't been distributed evenly when kneaded only by machine. If you have a scale you can ensure your buns will be all the same size. Weigh the dough mass, then divide this number by 10. This will give you an idea how much each of the 10 buns should weigh. You don't have to be exact down to the gram, of course, but I would stay within 5 or so grams of this number. Divide the dough mass in 2, then divide each half into 5 equal parts. Then weigh each piece to see how accurate your eye was. When you "crumble" the filling into pieces you may notice the dough is moist and hard to crumble, but tear it as best you can into small chunks. When you add the milk and marzipan the pieces will absorb the liquid and eventually come together into a smoothish mass. I made my own marzipan for this recipe and used rose water. Rose is a very strong flavor, so go light, but I thought it made for a very unique pairing with almond and cardamom and very "European" tasting. Or, leave out the rose if you're skeptical and you'll still have a lovely cardamom/almond combination.

Calories

436.24

Fat (grams)

19.78

Sat. Fat (grams)

10.76

Carbs (grams)

56.25

Fiber (grams)

1.82

Net carbs

54.43

Sugar (grams)

18.41

Protein (grams)

9.08

Sodium (milligrams)

149.19

Cholesterol (grams)

84.19
Nutritional information is approximate. Based on one semla.
Did you make this recipe?
Tag @jennyblogsandbakes on instagram and hashtag it #jennyblogs
Created using The Recipes Generator