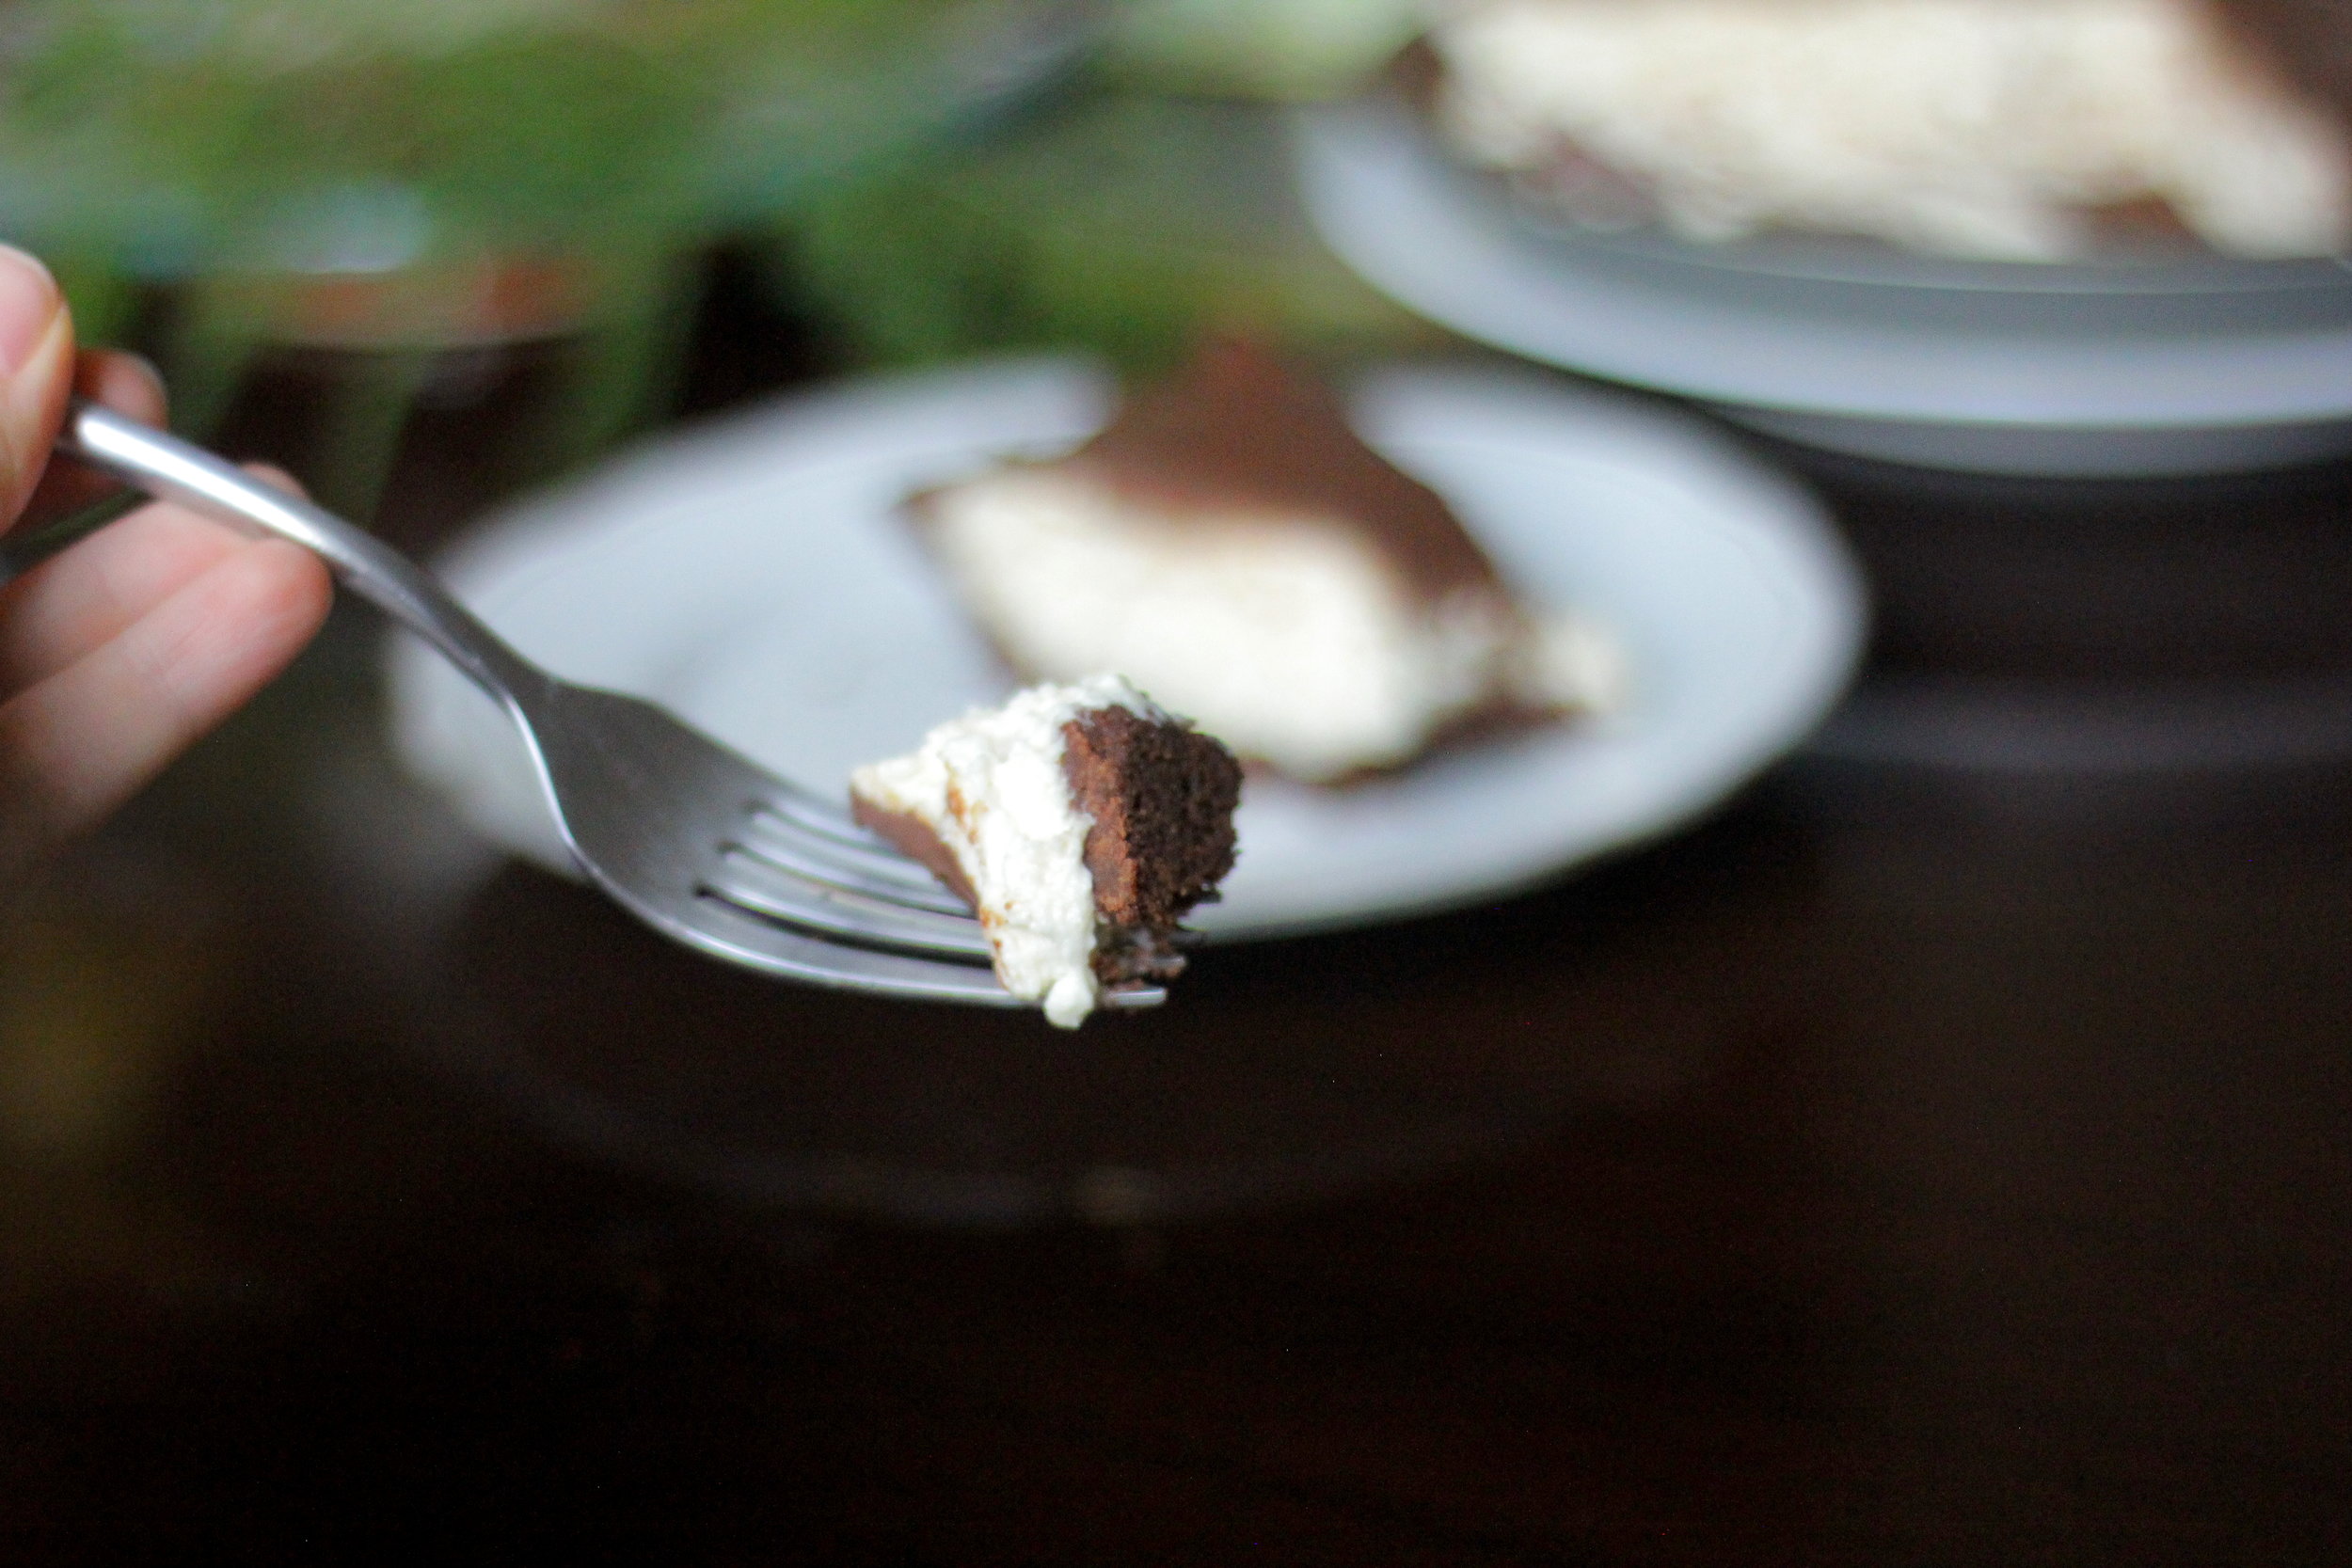
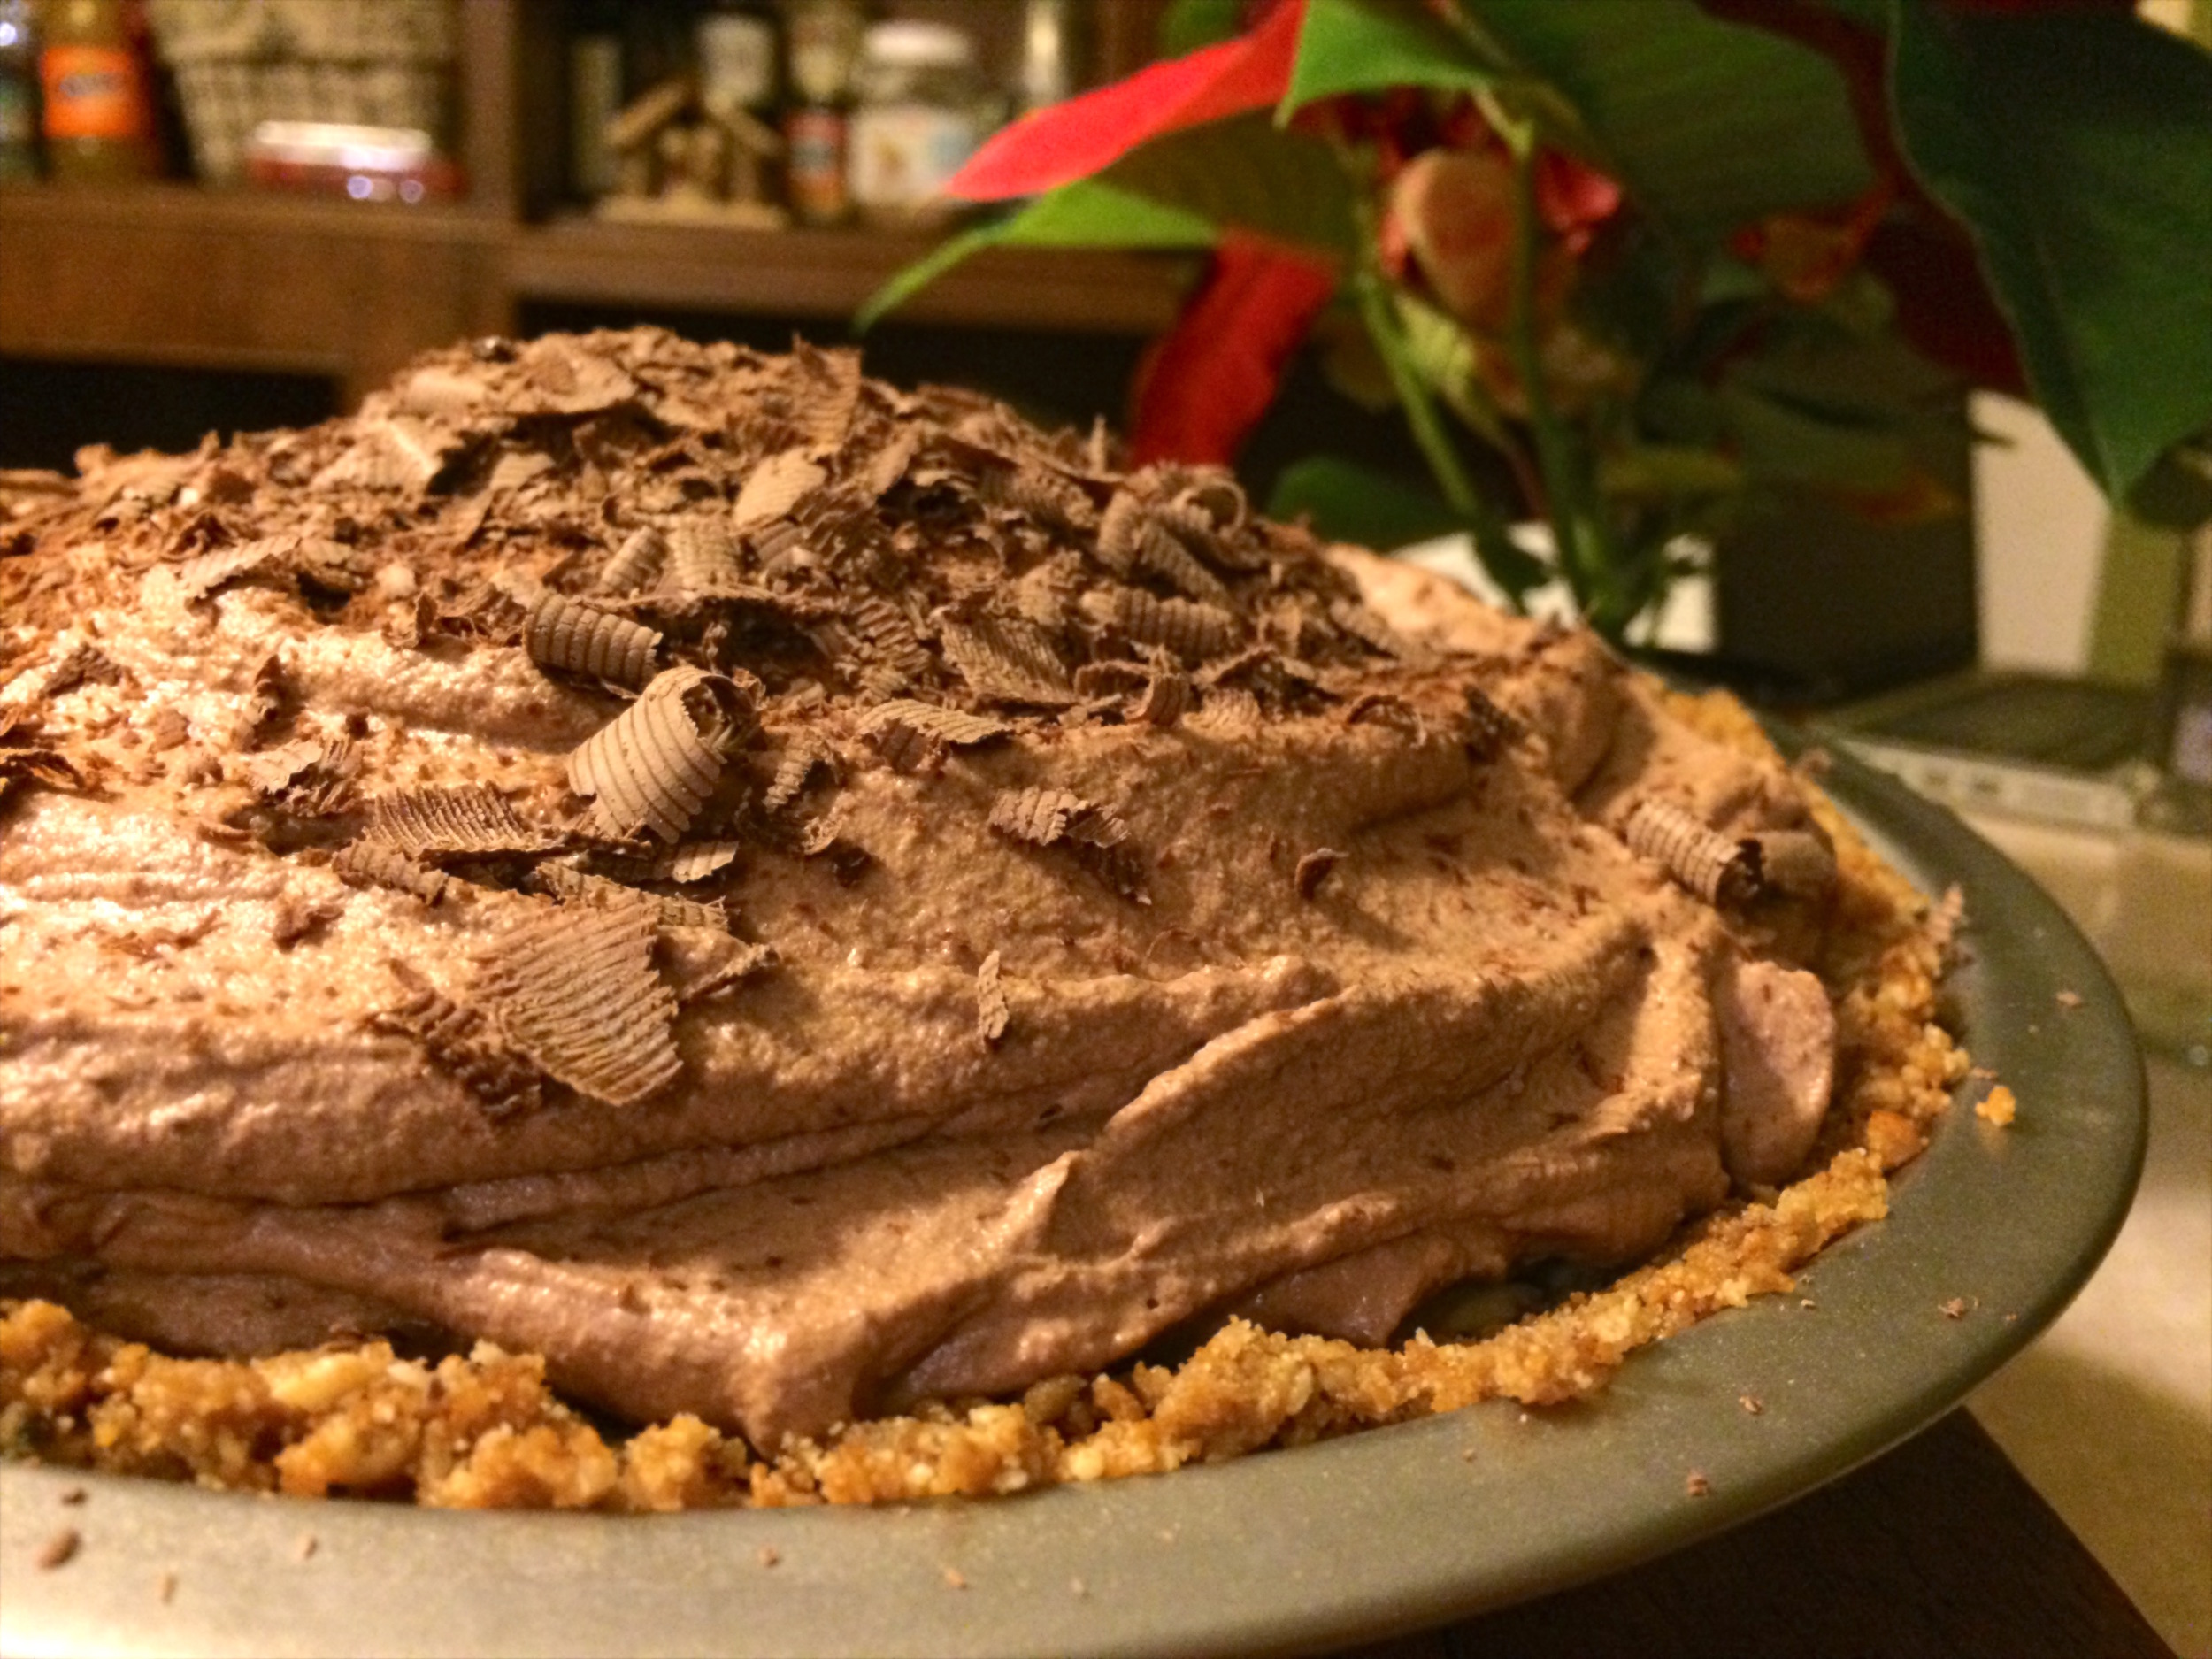
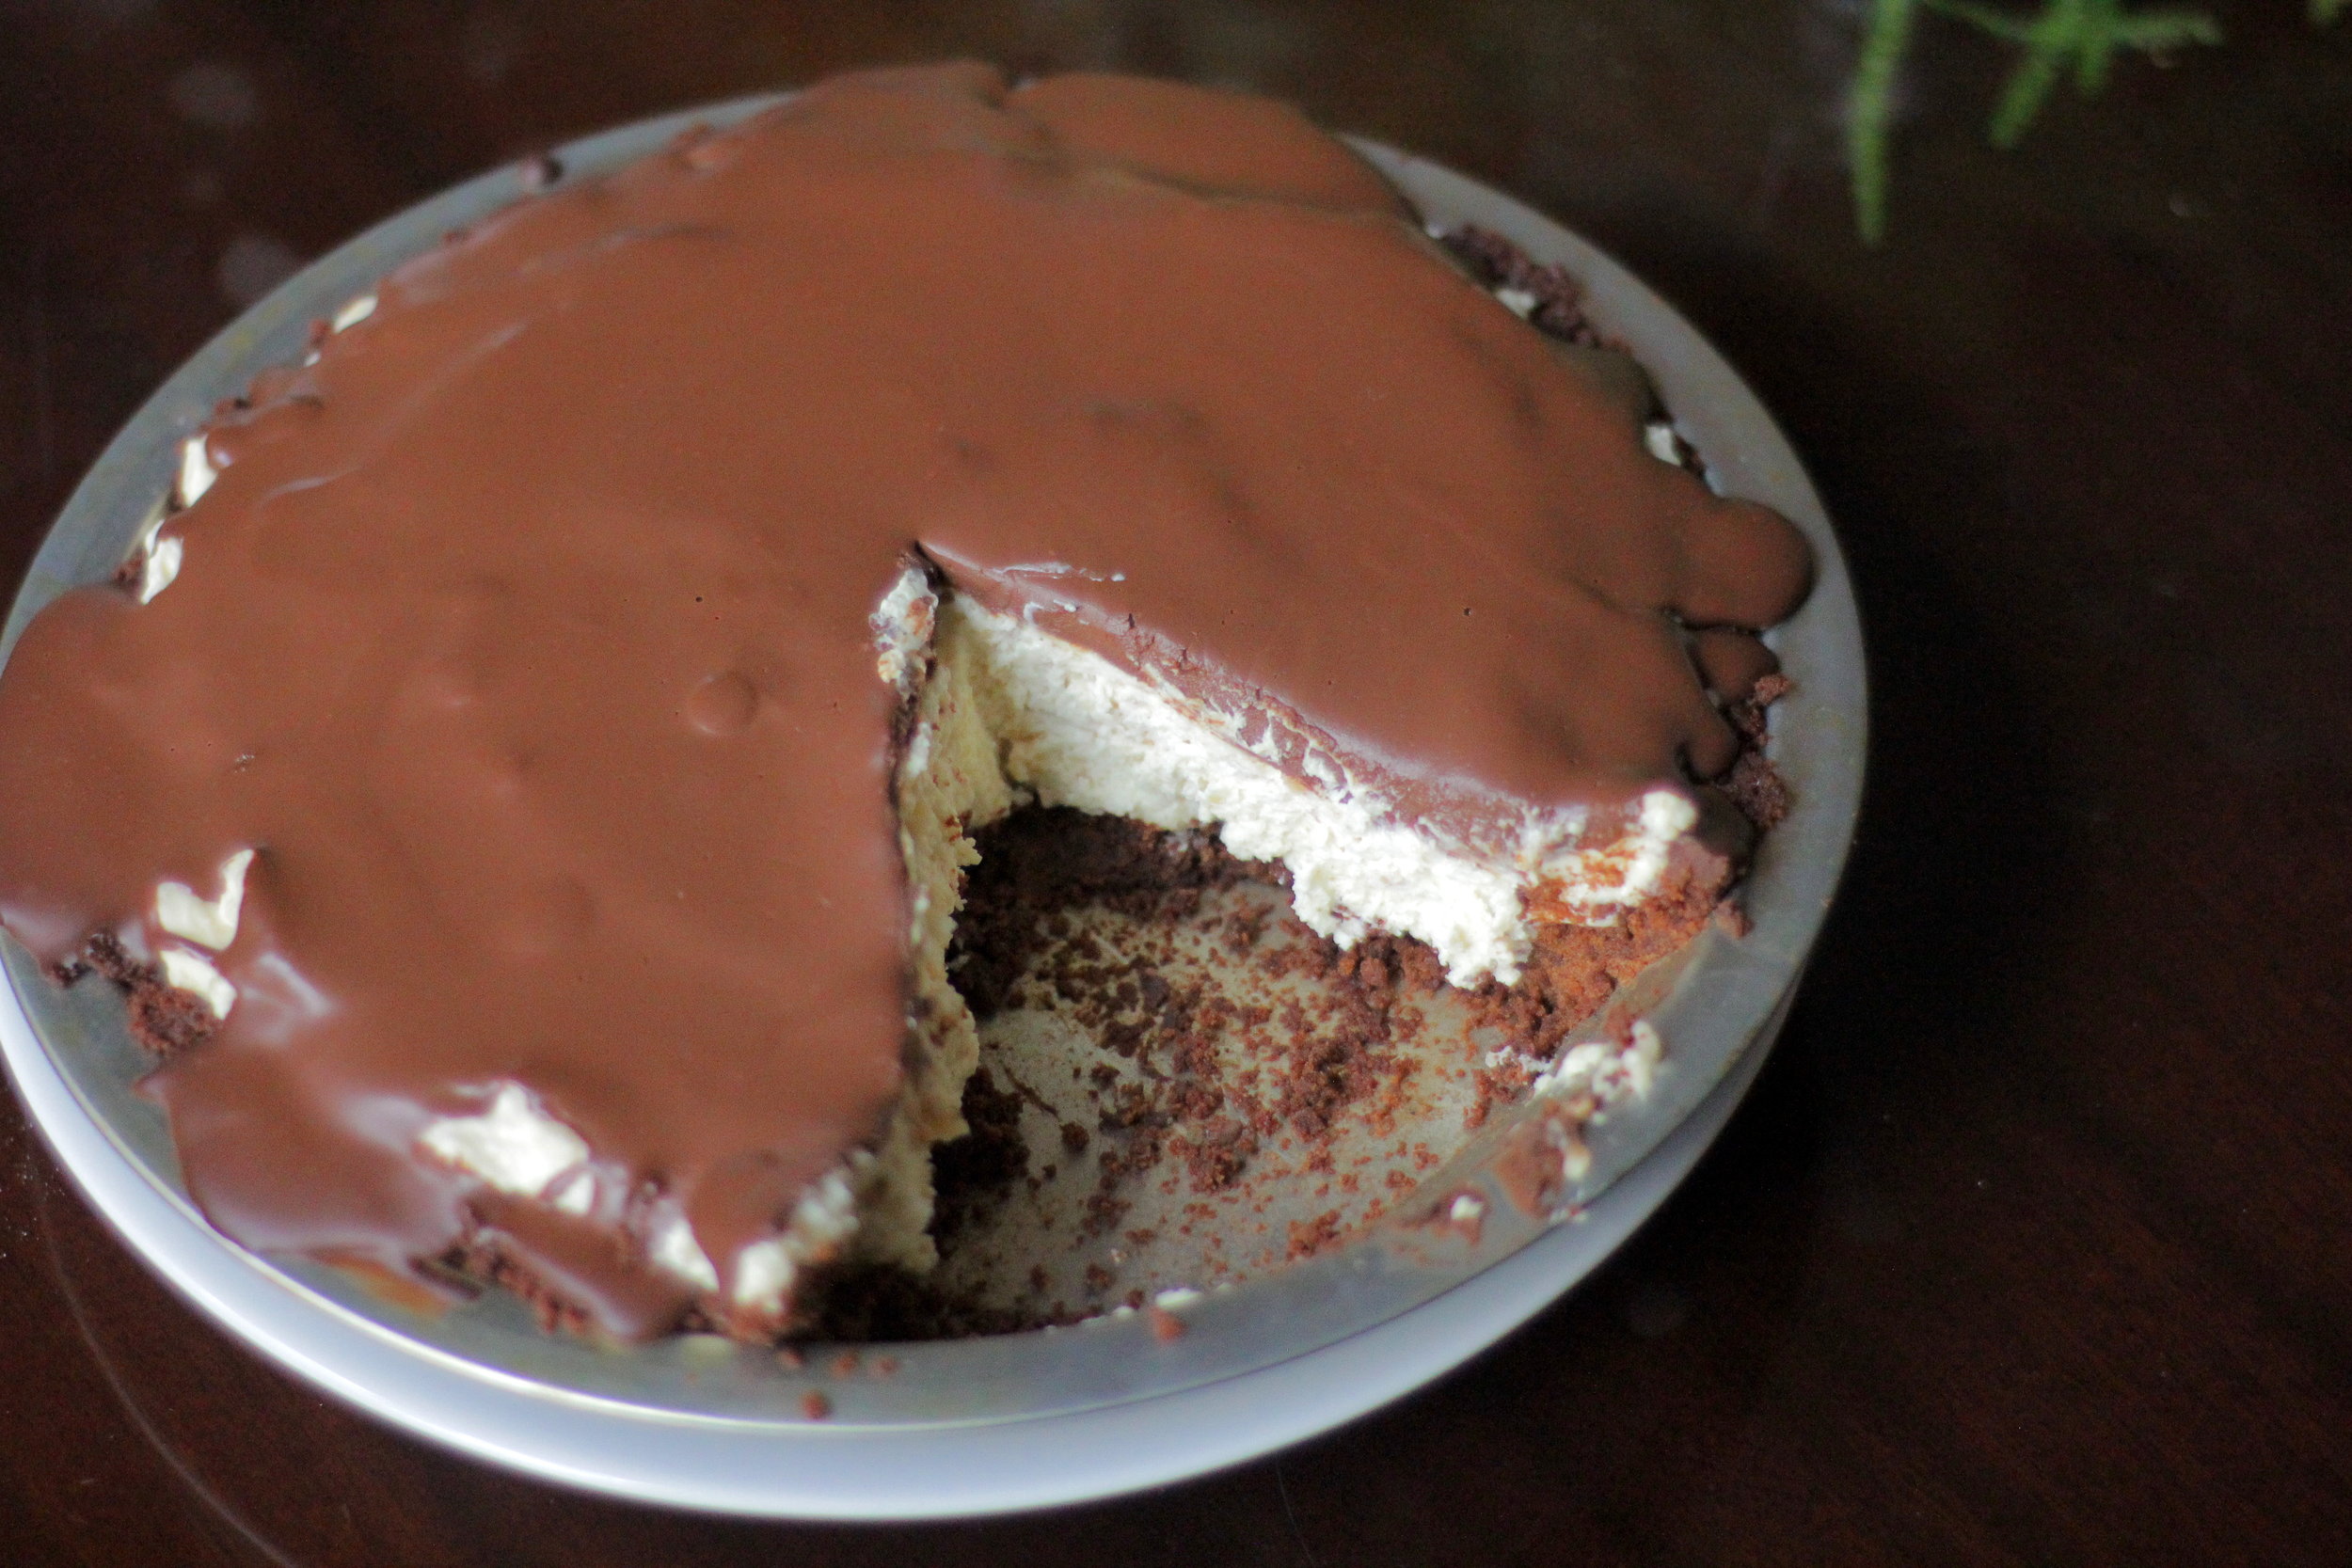
Mascarpone Peanut Butter Pie with Chocolate Ganache
/Let me take a gander at what you're thinking, probably something like, "OH! PEANUT BUTTER PIE? I love peanut butter pie! So good! But I already have a recipe for peanut butter pie. Why do I need this recipe? Wait, don't YOU already have a recipe up on this blog for peanut butter pie??" Maybe? Well, you'd be right about one thing, this is not my first recipe up for a peanut butter pie. But let me tell you, they each have their own merited place in your recipe box. For example, the Peanut Butter Pie with Chocolate Whipped Cream has a shortbread crust, creamy peanut butter filling, topped with chocolate whipped cream. Perfect for casual events, potlucks, birthdays, summer evenings, Sunday afternoons...but what happens if you need a peanut butter pie for a gala? The president is coming over? You're presenting a peanut butter pie to the CEO of Godiva chocolate and want chocolate to be showcased more prominently? Then you need a peanut butter pie with refinement, elegance, and classy chocolate utilized in more than one element of the pie. How do you do this without compromising the stand-alone peanut butter filling of a peanut butter pie? Why, you change out the shortbread crust for a chocolate crust, and top the pie with flowing chocolate ganache. Elegance. Refinement. The chocolate ganache envelopes the peanut butter filling in a tender embrace...still with me? Ok let's stop dreaming and comparing peanut butter pies and MAKE one!
Not a fan of chocolate and peanut butter together? Neither is my mom. That's ok, I still love you. And because of that, why not head over to this Nutter Butter Pie instead? No chocolate there!
This post may contain affiliate links. If you buy something using these links, Jennyblogs may receive a small commission, at no extra cost to you. This helps to support Jennyblogs. For further information see the privacy policy. Grazie!
Recipe adapted from what megan's making.
Mascarpone Peanut Butter Pie with Chocolate Ganache
Serves 8-12
Ingredients:
For the Chocolate Crust
7.5 oz / 210g chocolate graham crackers, teddy grahams, or chocolate shortbread
2 oz / 55g (1/3 cup) semi-sweet chocolate, finely chopped, or mini chips
5 Tbsp / 65g butter, melted
For the Peanut Butter Filling
1 cup / 237g heavy whipping cream
8 oz / 227g mascarpone or cream cheese, room temperature
1 cup / 250g peanut butter
1/2 cup / 100g sugar
1 tsp / 5g vanilla extract
For the Chocolate Ganache
4 oz / 110g (2/3 cup) semi-sweet chocolate, finely chopped, or chips
1 Tbsp / 14g butter
1/2 cup / 118g heavy whipping cream
Directions:
Oven 325°F / 163°C. Ungreased 9in / 23cm pie dish.
Make the Chocolate Crust
In a food processor combine chocolate grahams, butter, and chocolate chips. Pulse until the mixture is uniformly fine crumbs. Or do it the "old fashioned" way and beat the crumbs to oblivion in a well sealed plastic bag with a rolling pin or other hard object, then mixing in the chocolate and butter in a bowl with a spoon.
Press evenly into the bottom and sides of pie dish and bake for 8 minutes or until fragrant. Set aside to cool completely.
Make the Peanut Butter Filling
In the bowl of a stand mixer or with a handheld mixer, beat the whipping cream until stiff peaks form. Transfer to another bowl if using a stand mixer and set aside.
Again in the bowl of a stand mixer or a separate bowl with a handheld mixer, beat the cream cheese, peanut butter, sugar, and vanilla until light and fluffy.
Carefully fold the whipped cream into the peanut butter mixture in three or four parts.
Spoon the filling over the cooled crust and smooth the top. Refrigerate to set.

Make the Chocolate Ganache
Place the chocolate and butter in a small bowl. Heat the cream in a small saucepan over low heat, just until simmering. The moment you see bubbles remove from heat and pour over chocolate and butter. Let sit for 1 minute to melt the chocolate, then whisk briskly until smooth and shiny.
Pour over chilled pie. If you don't desire chocolate running over the sides, you may have to wait a minute or two between pourings, or simply don't use all the ganache. (The rest can be disposed of with a spoon and a mouth. But I don't need to tell you that.)
Chill for 3-4 hours or overnight until set.
Jenny's Notes:
If using a shallow pie dish you may have some leftover crust, and that's ok. Don't feel like you have to use all the crust mixture or you may have an impenetrable crust, especially in the corners.
I frequently substitute whole milk or coconut milk for all or part of the cream in ganache, but usually not when it's a topper as it can separate a bit if you don't use all cream. However, one time when making this I only had 1/4 cup cream left for the topping and so added 1/4 cup whole milk, and it made for a beautiful ganache, even as the topper.
Top with chocolate chips or chocolate shavings as desired!


Mascarpone Peanut Butter Pie with Chocolate Ganache
Ingredients:
- 7.5 oz / 210g chocolate graham crackers, teddy grahams, or chocolate shortbread
- 2 oz / 55g (1/3 cup) semi-sweet chocolate, finely chopped, or mini chips
- 5 Tbsp / 65g butter, melted
- 1 cup / 237g heavy whipping cream
- 8 oz / 227g mascarpone or cream cheese, room temperature
- 1 cup / 250g peanut butter
- 1/2 cup / 100g sugar
- 1 tsp / 5g vanilla extract
- 4 oz / 110g (2/3 cup) semi-sweet chocolate, finely chopped, or chips
- 1 Tbsp / 14g butter
- 1/2 cup / 118g heavy whipping cream
Instructions:
- Oven 325°F / 163°C. Ungreased 9in / 23cm pie dish.
- In a food processor combine chocolate grahams, butter, and chocolate chips. Pulse until the mixture is uniformly fine crumbs. Or do it the "old fashioned" way and beat the crumbs to oblivion in a well sealed plastic bag with a rolling pin or other hard object, then mixing in the chocolate and butter in a bowl with a spoon.
- Press evenly into the bottom and sides of pie dish and bake for 8 minutes or until fragrant. Set aside to cool completely.
- In the bowl of a stand mixer or with a handheld mixer, beat the whipping cream until stiff peaks form. Transfer to another bowl if using a stand mixer and set aside.
- Again in the bowl of a stand mixer or a separate bowl with a handheld mixer, beat the cream cheese, peanut butter, sugar, and vanilla until light and fluffy.
- Carefully fold the whipped cream into the peanut butter mixture in three or four parts.
- Spoon the filling over the cooled crust and smooth the top. Refrigerate to set.
- Place the chocolate and butter in a small bowl. Heat the cream in a small saucepan over low heat, just until simmering. The moment you see bubbles remove from heat and pour over chocolate and butter. Let sit for 1 minute to melt the chocolate, then whisk briskly until smooth and shiny.
- Pour over chilled pie. If you don't desire chocolate running over the sides, you may have to wait a minute or two between pourings, or simply don't use all the ganache. (The rest can be disposed of with a spoon and a mouth. But I don't need to tell you that.)
- Chill for 3-4 hours or overnight until set.
Notes:
Calories
791.91Fat (grams)
62.46Sat. Fat (grams)
30.79Carbs (grams)
54.43Fiber (grams)
3.89Net carbs
50.53Sugar (grams)
37.64Protein (grams)
12.12Sodium (milligrams)
502.22Cholesterol (grams)
110.56