Homemade Italian Dressing

Simple goodness: Arugula tossed with Homemade Italian Dressing

Simple goodness: Arugula tossed with Homemade Italian Dressing

Have you ever thought to make homemade Italian dressing? I certainly hadn’t, until this summer, as it’s usually something I buy. Why bother making it homemade when it’s cheap and I really don’t use it that often? Except for pasta salad, and I’ve been allll about the pasta salads this summer.

First I wanted the classic creamy pasta salad (dressing made with mayo and mustard), then the Italian dressing pasta salad, then I started going off and making up my own, like this Greek Pasta Salad I posted a couple weeks ago. But you know what’s ironic? You can’t find Italian dressing in Italy. Italian dressing is very American. Italians dress their salads with a quality olive oil, salt and pepper, generally speaking. One time I was in Switzerland grocery shopping and saw American dressing. I’m American and had no idea what it was. It was creamy, maybe like Ranch? Haha. I was amused. I wonder if that’s how Italians feel about Italian dressing.

Being in Italy with no Italian dressing ready made at the store, I figured I would see if I could find a homemade recipe. Surreeee there are plenty on the interwebs! And easy enough ingredients, you probably have them all on hand, as I did. Olive oil, vinegar, some spices…I looked at several different recipes, looked up the ingredients for “classic” Kraft Italian dressing, and combined a few of them to create a bit of my own version. It’s tangy and got the job done! Success. Made a delicious pasta salad and had a bit leftover even to dress some regular ol’ salads.

It probably won’t taste exactly like the store bought version, but maybe better if you’re not a die-hard Kraft fan? Some of the ingredients listed on the Kraft Zesty Italian dressing are a bit vague, like “spice,” which can be hard to replicate, but the bright side is that you can control the quality and freshness of ingredients going into your dressing. Better yet, no preservatives at all!

Great for salads, pasta salad, marinades for all types of proteins!

This post may contain affiliate links. If you make a purchase using these links, Jennyblogs may receive a small commission, at no extra cost to you. This helps to support Jennyblogs. For further information see the privacy policy. Grazie!

Recipe adapted from Kraft, Five Heart Home, and the Whole Cook


Homemade Italian Dressing

Makes about 1 cup dressing

I clearly need to figure out how to attractively photograph liquids…and find my whisk. (Recently moved apartments.) But hey, forks work, too!

I clearly need to figure out how to attractively photograph liquids…and find my whisk. (Recently moved apartments.) But hey, forks work, too!

Ingredients:

  • 3/4 cup / 168g extra virgin olive oil

  • 1/4 cup / 60g red or white wine vinegar

  • 1 tsp / 5g lemon juice

  • 1 tsp / 7g honey

  • 3/4 tsp dried basil

  • 1/2 tsp dried oregano

  • 1/2 tsp garlic powder

  • 1/2 tsp salt

  • 1/4 tsp onion powder

  • 1/4 tsp crushed red pepper

  • 1/4 tsp black pepper

  • 1/4 cup / 25g grated parmesan cheese, optional

Directions:

  1. Whisk or shake all ingredients together; taste and adjust seasonings as desired.

  2. Store in fridge, shake well before using.

Jenny’s Notes:

  • This is one of those very versatile and very easily adjustable recipes, no one says you have to follow this one to a T! If you don’t have red or white wine vinegar, use what you have on hand. Even the olive oil can be switched out for what you have. While olive oil will give you the heartiest flavor, technically Kraft uses a bunch of rather junkier oils that don’t add much to the flavor profile (soybean, canola), but oils do tone the vinegar in dressings/vinaigrettes. The spices can be upped if you want a very zesty dressing, or you can add another teaspoon of honey to help tone it down a bit.

  • You could also finely dice red bell pepper to add to this instead of the crushed red pepper, but that seemed like more work than I wanted to put in for this “whip up” type recipe. Plus, I like the touch of added spice, even if not original.

Homemade Italian dressing recipe, copycat Zesty Kraft Dressing, Greek dressing
Condiment
American
Yield: 8
Author: Jennyblogs
Print
Homemade Italian Dressing

Homemade Italian Dressing

Homemade zesty Italian dressing is simple, uses pantry ingredients, and doesn't have any preservatives like store-bought versions.
Prep time: 10 MinTotal time: 10 Min

Ingredients:

  • 3/4 cup / 168g extra virgin olive oil
  • 1/4 cup / 60g red or white wine vinegar
  • 1 tsp / 5g lemon juice
  • 1 tsp / 7g honey
  • 3/4 tsp dried basil
  • 1/2 tsp dried oregano
  • 1/2 tsp garlic powder
  • 1/2 tsp salt
  • 1/4 tsp onion powder
  • 1/4 tsp crushed red pepper
  • 1/4 tsp black pepper
  • 1/4 cup / 25g grated parmesan cheese, optional

Instructions:

  1. Whisk or shake all ingredients together; taste and adjust seasonings as desired.
  2. Store in fridge, shake well before using.

Notes:

This is one of those very versatile and very easily adjustable recipes, no one says you have to follow this one to a T! If you don’t have red or white wine vinegar, use what you have on hand. Even the olive oil can be switched out for what you have. While olive oil will give you the heartiest flavor, technically Kraft uses a bunch of rather junkier oils that don’t add much to the flavor profile (soybean, canola), but oils do tone the vinegar in dressings/vinaigrettes. The spices can be upped if you want a very zesty dressing, or you can add another teaspoon of honey to help tone it down a bit. You could also finely dice red bell pepper to add to this instead of the crushed red pepper, but that seemed like more work than I wanted to put in for this “whip up” type recipe. Plus, I like the touch of added spice, even if not original.

Calories

204.62

Fat (grams)

21.89

Sat. Fat (grams)

3.39

Carbs (grams)

1.58

Fiber (grams)

0.14

Net carbs

1.44

Sugar (grams)

0.75

Protein (grams)

0.98

Sodium (milligrams)

202.78

Cholesterol (grams)

2.69
Nutritional information is approximate. Based on 8 servings of 2 Tbsp each and includes parmesan cheese.
Did you make this recipe?
Tag @jenevamorris on instagram and hashtag it #jennyblogs
Created using The Recipes Generator

Pistachio Cake with Honey Vanilla Buttercream

Pistachios remind me of Christmas.  In fact, just this morning I had my first pang of "I miss Christmas," which usually hits me around July.  My family rarely eats/buys/uses pistachios, but we always have bowls of them out for Christmas.  It's tradition.  Beyond that, I never thought too much of cooking or baking with them because they were only ever around when we were already over inundated with food.  And yes, they are expensive and you may have to shell them.  

Then I went to Europe where pistachio gelato is the best flavor and the line up of pastries always includes pistachio right next to the chocolate and vanilla.  Pistachio was this flavor, this nut, that I had not tapped into.  And I've only just started.  Oh the thrills!  This cake was a light bulb of "What have I been missing out on!?" My poor family and friends, all these years and I didn't make this for them.  How selfish of me.  Selfish no more, here is the recipe so you can revel in the glory with me!

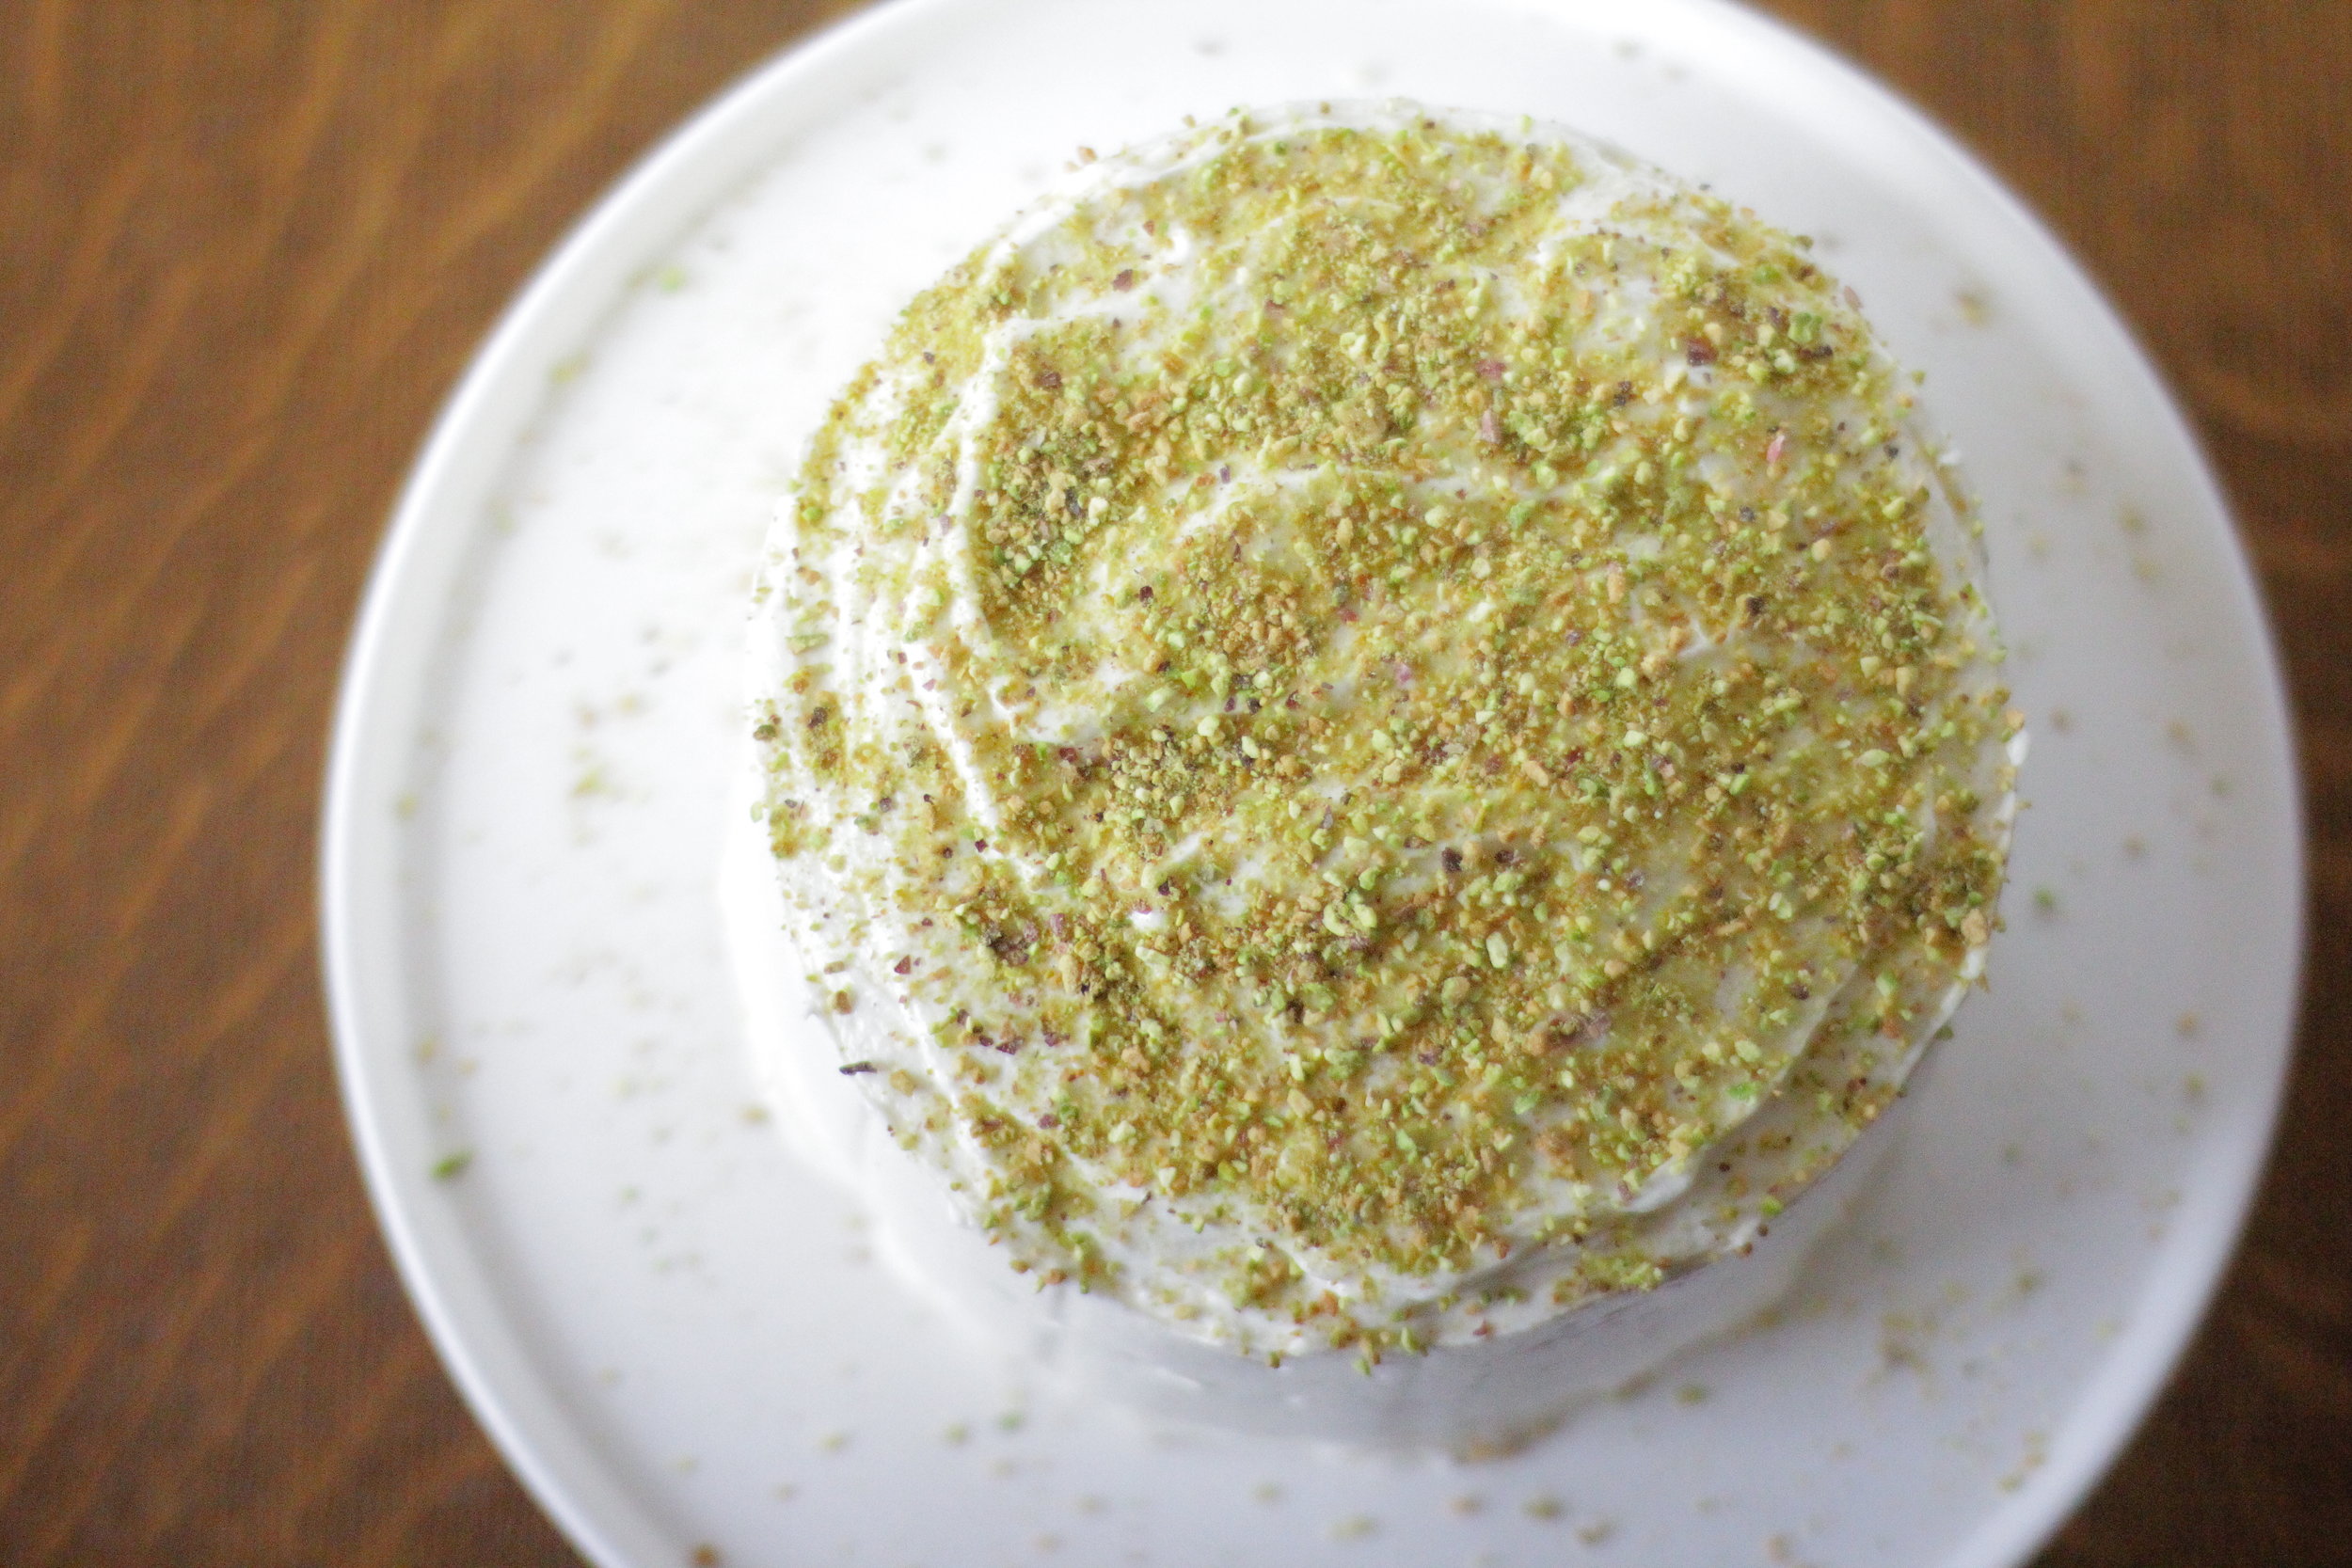
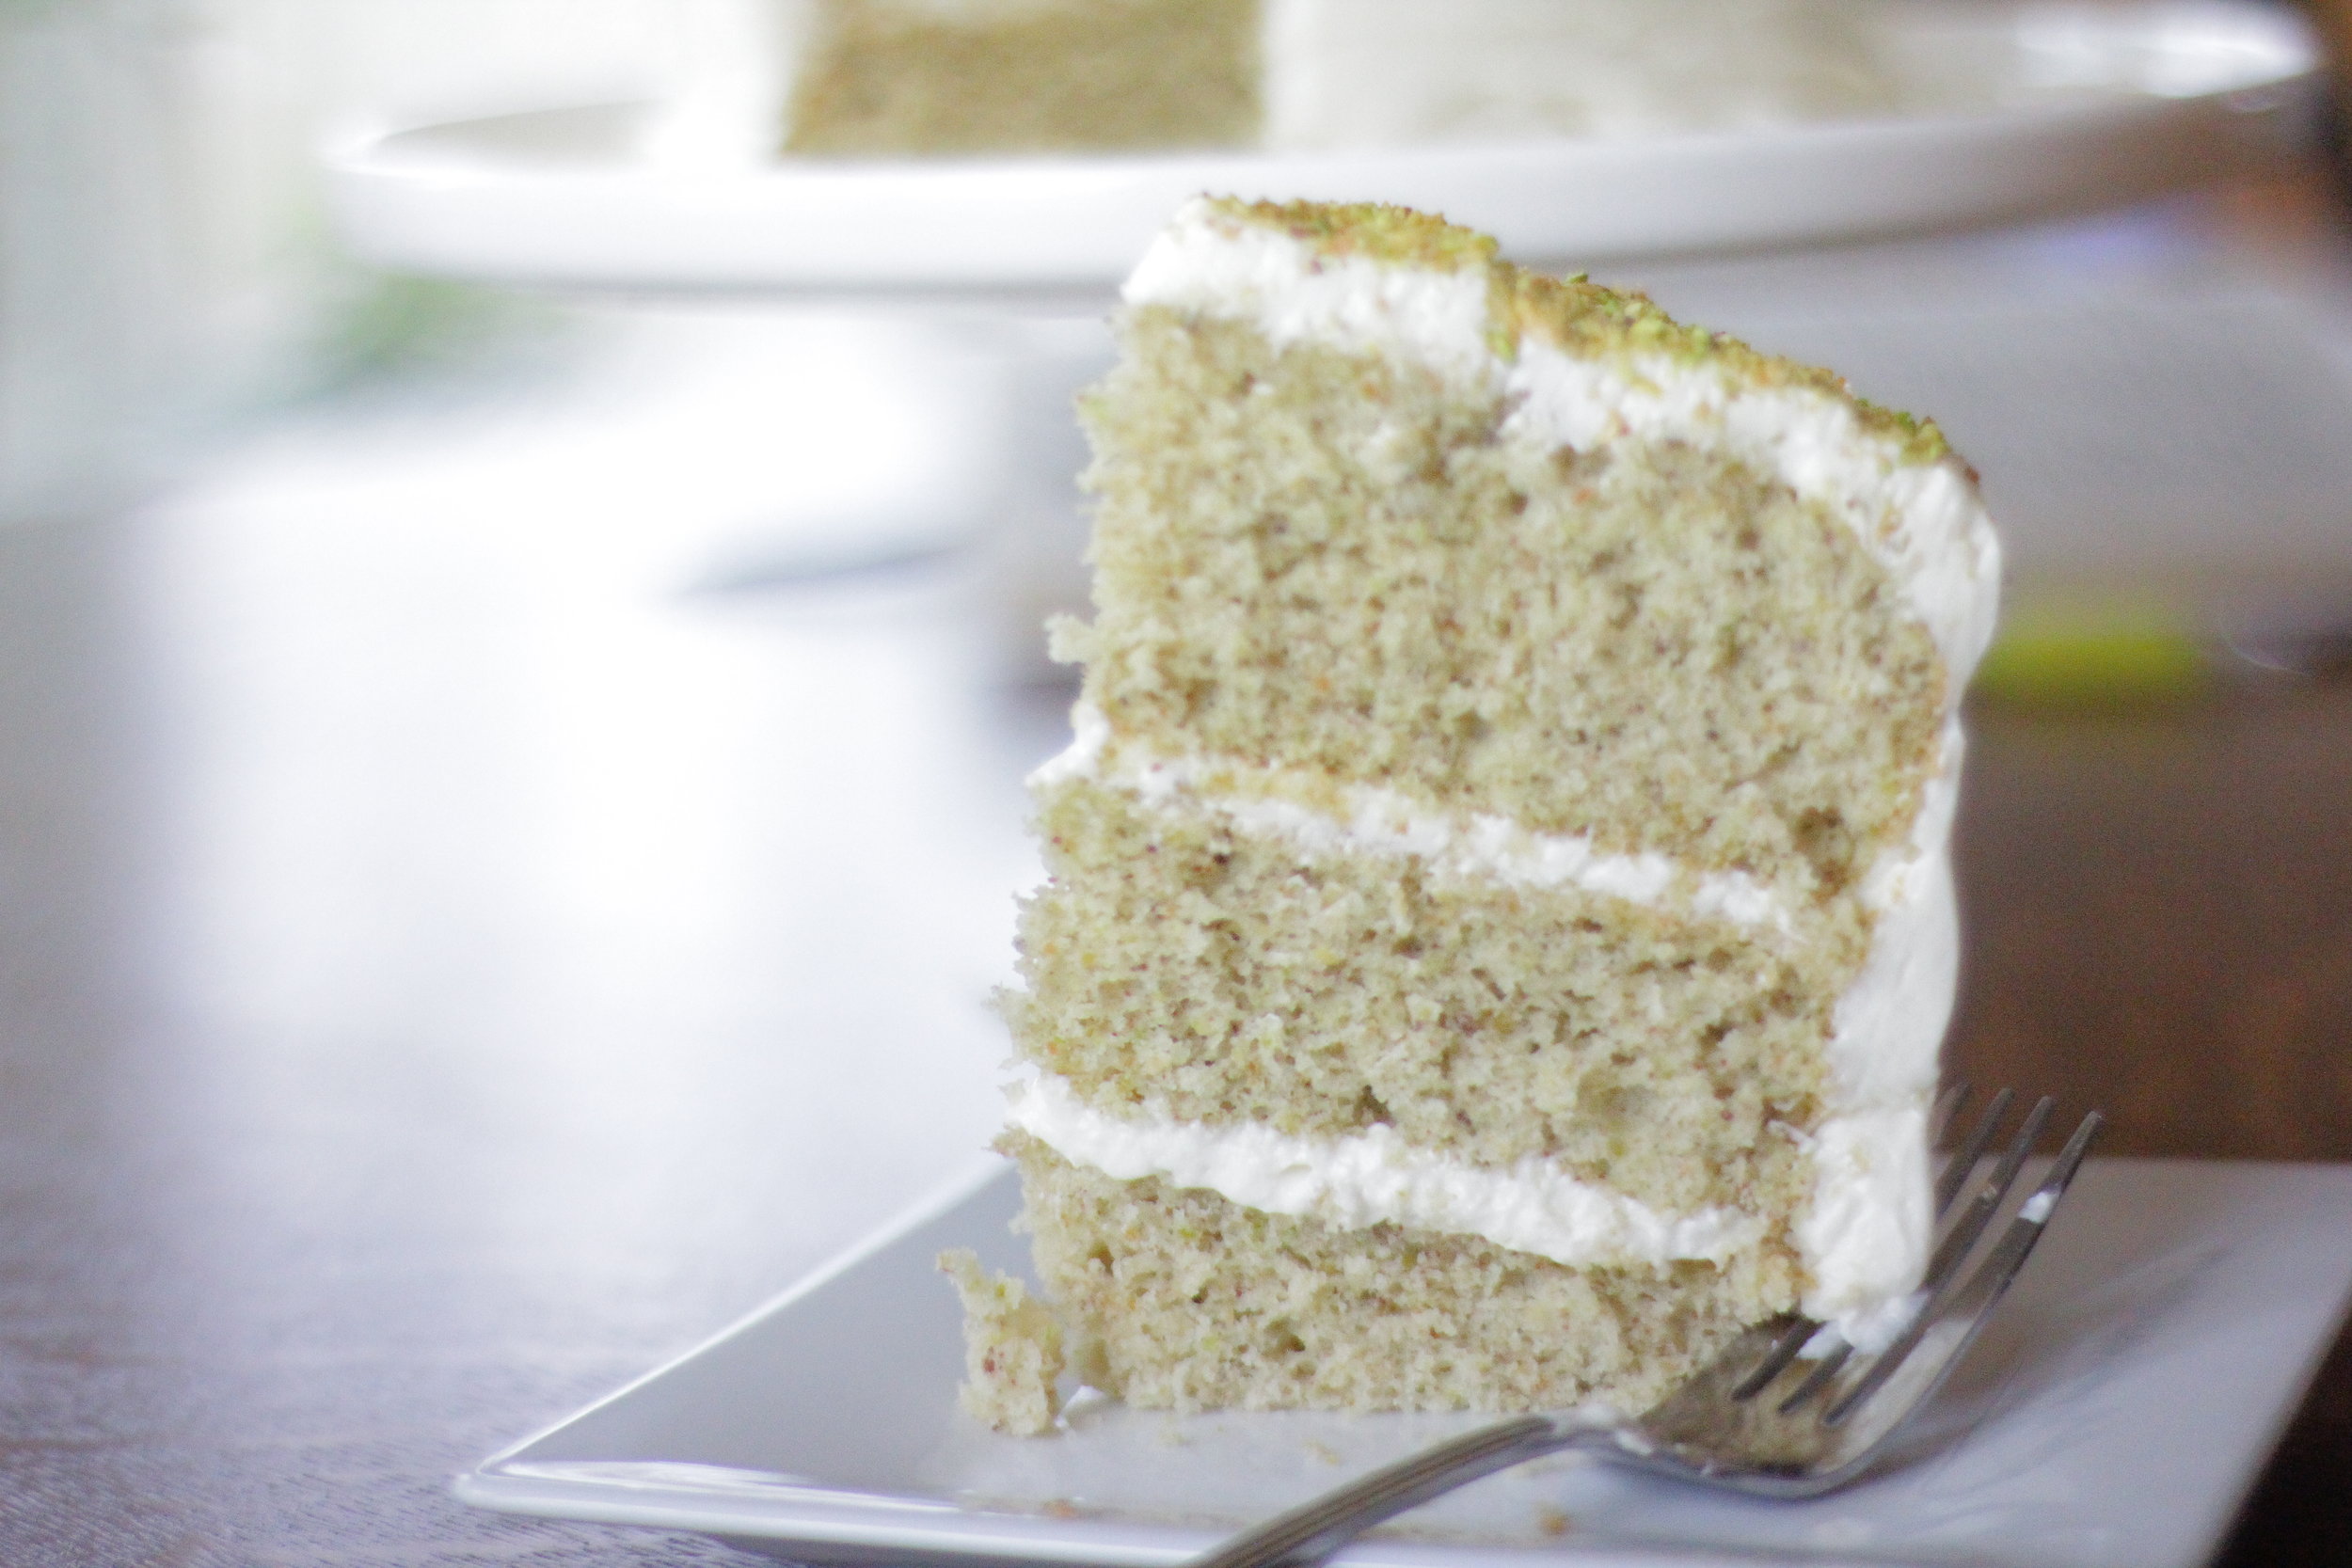
This cake is fluffy, light, with a wonderful, nutty pistachio flavor that is not overbearing. It has a slight elegance to it, something about being more than 2 layers and the white frosting.

The cake ingredients are fairly standard aside from the pistachios. If you have pistachio flour ready-made available to you, you can save yourself step. Maybe try Amazon, you can find anything online these days! If not, pistachios should be readily available, and you can make pistachio flour yourself by grinding them for a few seconds in a food processor. I don’t have a food processor in Italy, so I get by with an electric coffee grinder which works great!

The frosting is a light and creamy, not-too-sweet cooked frosting. Ever since the first time I’ve made a cooked frosting, the raves come pouring in about how it’s the best frosting they’ve ever eaten. Between cooked frostings and Italian meringue buttercream, I’ve rarely looked back at the traditional American buttercream that is mostly sugar. It has its place, but it seems the general consensus between anyone who has tried some of my cakes and cupcakes that a not-too-sweet frosting is GREATLY appreciated. Give the cooked frosting below a try and see if you don’t fall in love with it!

This post may contain affiliate links. If you buy something using these links, Jennyblogs may receive a small commission, at no extra cost to you. This helps to support Jennyblogs. For further information see the privacy policy. Grazie!

Recipe adapted from Joanne eats well with others


Pistachio Cake with Honey Vanilla Buttercream

Makes 1 3 layer 6-inch round cake. Serves about 8

Ingredients:

For the Pistachio Cake

  • 1/2 cup / 63g shelled pistachios

  • 1 1/4 cups / 164g cake flour

  • scant 1/2 cup / 47g all-purpose flour

  • 1 1/2 tsp / 7g baking powder

  • 1/2 tsp / 2.5g baking soda

  • 1/2 tsp / 2.5g salt

  • scant 1/2 cup / 100g oil

  • 3/4 cup / 150g sugar

  • 1 1/2 tsp / 7g vanilla extract

  • 1 egg

  • 3/4 cup / 178g ice water

  • 1 egg white

  • 1/4 tsp cream of tartar

For the Honey Vanilla Buttercream

  • 3/4 cup / 150g sugar

  • 3 Tbsp / 20g all-purpose flour

  • 3/4 cup / 178g milk

  • 3 Tbsp / 44g heavy whipping cream

  • 3/4 cup / 170g butter, cubed

  • 1 tsp / 5g vanilla extract

  • 2 Tbsp / 42g honey

Directions:

Oven 350°F / 177°C.  Grease and line the bottoms of 3 6-inch cake rounds with parchment paper.

Make the Pistachio Cake

  1. Place the pistachios in a food processor and pulse until coarsely chopped.  Set aside 2 tablespoons.  Continue to pulse remaining pistachios until finely ground, like flour in texture.  

  2. In a medium bowl, whisk together pistachio flour, cake flour, all-purpose flour, baking powder, baking soda, and salt.  

  3. In a normal bowl or bowl of a stand mixer, beat together oil, sugar, and vanilla.  Add egg and beat until just combined.  

  4. With the mixer on low, add the pistachio flour mixture to the batter in three additions, alternating with the ice water, beginning and ending with pistachio flour mixture.  After each addition mix until just combined.  

  5. In another medium bowl, beat the egg white with cream of tartar until soft peaks form, about 3-4 minutes.  Gently fold the egg white into the cake batter, starting with just a spoonful to lighten the batter, then continue on with the rest.  

  6. Pour batter into prepared cake pans and bake for 25-30 minutes, or until toothpick inserted in center comes out clean.  Allow cakes to cool in pans for 10 minutes, then flip onto a wire rack to cool completely while you make the buttercream.  Remove parchment paper from bottoms.  

Make the Honey Vanilla Buttercream

  1. In a medium saucepan, whisk together sugar and flour.  Add milk and cream and place over medium heat, stirring frequently, until mixture boils and thickens, about 5-10 minutes.  

  2. Once thickened, pour mixture into a bowl of a stand mixer.  Beat on high until cool, 8-10 minutes.  Reduce speed to medium low and add butter, piece by piece, until fully incorporated.  Increase speed and beat a few minutes, until light and fluffy.  Beat in vanilla and honey.  

Assembly

Use a serrated knife to level off the top of the cakes.  Cut off just as much as necessary to make the top of the cake level and flat.  If you prefer domed cakes, leave one layer uncut for the top. Place one leveled layer on desired serving plate, cut side down.  Generously spread frosting over top and place second layer on top, again cut side down.  Top with more frosting.  Finish with top layer, domed side up if desired.  Frost the whole cake.  Top with remaining 2 tablespoons chopped pistachios.   

Jenny's Notes:

  • For an 8 - 9in / 20-23cm 3 layer cake, double this recipe.  

  • If your buttercream seems too thin or soupy after you've added the butter, stick it in the fridge for a few minutes, then rewhip.  Most likely it has not cooled down enough to stabilize.

  • If you don’t have 3 6-inch pans, it is easier to split the batter in two and bake in two pans, instead of 3. You then have the option of making a two layer cake, or cutting each layer in two for a four layer cake.  

cake,layer cake,pistachio flour,pistachio,roux,cooked frosting,buttercream,honey vanilla
dessert, cake
American
Yield: 8 servings
Author: Jennyblogs
Pistachio Cake with Honey Vanilla Buttercream

Pistachio Cake with Honey Vanilla Buttercream

3 layer moist pistachio cake with a light and fluffy cooked honey vanilla buttercream frosting.
Prep time: 1 H & 25 MCook time: 30 MinTotal time: 1 H & 55 M

Ingredients

For the Pistachio Cake
For the Honey Vanilla Buttercream

Instructions

Make the Pistachio Cake
  1. Oven 350°F / 177°C. Grease and line the bottoms of 3 6-inch cake rounds with parchment paper.
  2. Place the pistachios in a food processor and pulse until coarsely chopped. Set aside 2 tablespoons. Continue to pulse remaining pistachios until finely ground, like flour in texture.
  3. In a medium bowl, whisk together pistachio flour, cake flour, all-purpose flour, baking powder, baking soda, and salt.
  4. In a normal bowl or bowl of a stand mixer, beat together oil, sugar, and vanilla. Add egg and beat until just combined.
  5. With the mixer on low, add the pistachio flour mixture to the batter in three additions, alternating with the ice water, beginning and ending with pistachio flour mixture. After each addition mix until just combined.
  6. In another medium bowl, beat the egg white with cream of tartar until soft peaks form, about 3-4 minutes. Gently fold the egg white into the cake batter, starting with just a spoonful to lighten the batter, then continue on with the rest.
  7. Pour batter into prepared cake pans and bake for 25-30 minutes, or until toothpick inserted in center comes out clean. Allow cakes to cool in pans for 10 minutes, then flip onto a wire rack to cool completely while you make the buttercream. Remove parchment paper from bottoms.
Make the Honey Vanilla Buttercream
  1. In a medium saucepan, whisk together sugar and flour. Add milk and cream and place over medium heat, stirring frequently, until mixture boils and thickens, about 5-10 minutes.
  2. Once thickened, pour mixture into a bowl of a stand mixer. Beat on high until cool, 8-10 minutes. Reduce speed to medium low and add butter, piece by piece, until fully incorporated. Increase speed and beat a few minutes, until light and fluffy. Beat in vanilla and honey.
Assembly
  1. Use a serrated knife to level off the top of the cakes. Cut off just as much as necessary to make the top of the cake level and flat. If you prefer domed cakes, leave one layer uncut for the top. Place one leveled layer on desired serving plate, cut side down. Generously spread frosting over top and place second layer on top, again cut side down. Top with more frosting. Finish with top layer, domed side up if desired. Frost the whole cake. Top with remaining 2 tablespoons chopped pistachios.

Notes:

For an 8 - 9in / 20-23cm 3 layer cake, double this recipe. If your buttercream seems too thin or soupy after you've added the butter, stick it in the fridge for a few minutes, then rewhip. Most likely it has not cooled down enough to stabilize.


If you don’t have 3 6-inch pans, it is easier to split the batter in two and bake in two pans, instead of 3. You then have the option of making a two layer cake, or cutting each layer in two for a four layer cake.  

Calories

619.89

Fat (grams)

36.67

Sat. Fat (grams)

13.98

Carbs (grams)

68.16

Fiber (grams)

1.40

Net carbs

66.76

Sugar (grams)

42.85

Protein (grams)

6.57

Sodium (milligrams)

500.72

Cholesterol (grams)

77.11
Nutritional information is approximate. Based on 8 servings.
Did you make this recipe?
Tag @jennyblogsandbakes on instagram and hashtag it #jennyblogs

Buttermilk Bread

This post may contain affiliate links. If you make a purchase using these links, Jennyblogs may receive a small commission, at no extra cost to you. This helps to support Jennyblogs. For further information see the privacy policy. Grazie!

What’s the first thing that comes to mind when someone says, "Buttermilk"?  

For me, that would be buttermilk pancakes.  The lightest and fluffiest of all pancakes.  If you live in the south, maybe that's buttermilk biscuits.  Maybe your favorite cake recipe or scone recipe calls for buttermilk.  Whatever it may be, these delectable food items all have one thing in common:  Their light crumb, a.k.a. fluffiness.  The high acidity in the buttermilk reacts with the leavening agent, like baking soda, thus creating a beautiful rise, and a nice, light product.  

I don't often have buttermilk on hand; I find it much easier to make my own as I always have milk and lemon juice/vinegar on hand.  Lemon juice or vinegar are both very acidic and will have a similar effect on the leavening agent.  However, there is something so satisfying about using true buttermilk in a recipe.  After all, Milk and Lemon Juice Pancakes don't sound nearly as appealing as Buttermilk pancakes.   

So, a trip to the store, a carton of buttermilk bought, pancakes made and eaten.  Now, there is only 7/8 of a carton of buttermilk left in your fridge.  The likelihood of making 7 or more batches of buttermilk pancakes before the buttermilk goes bad is, well, not likely.  (But if you do, let me know, I’ll come live at your house!)  

The question remains, what I can do with the rest of this buttermilk without being wasteful?  Make buttermilk bread! (Another side note, if you like to drink buttermilk straight, well then.  You just can't relate with our buttermilk overload predicament, can you?)  The fluffiness factor we were talking about earlier still plays a role in this bread.  So fluffy.  Makes great toast.  And did I mention french toast?  Now you can serve buttermilk french toast! Oh yes.  Full circle, baby.  Actually, I don't really know where the circle started, so it's hard to tell if we actually came full circle...

On to the recipe! 

Recipe adapted from Jane's Sweets and Baking Journal


Buttermilk Bread

Makes 2 approx. 9x5 inch loaves

Ingredients:

  • 5-6 cups / 620-740g all-purpose flour

  • 1 Tbsp / 9g instant yeast

  • 2 tsp / 10g salt

  • 2 cups / 474g buttermilk

  • 1 Tbsp / 20g maple syrup or honey

  • 2 Tbsp / 28g oil or melted butter

Directions:

Oven 375°F / 190°C.  Grease two approx. 9x5in / 24x13cm loaf pans.

  1. In a large bowl or bowl of a stand mixer fitted with the paddle attachment, place 5 cups of flour, yeast, and salt.  Mix together.  Add buttermilk, maple syrup, and oil, mixing well.  Switch to the dough hook if using a stand mixer.  

  2. Knead in the stand mixer or by hand on a lightly floured surface, until a smooth dough is formed, adding more flour as needed.   This should take about 5-7 minutes with a stand mixer, 10 minutes by hand.  If using a stand mixer, still knead a few rounds on a lightly floured surface at the end.

  3. Lightly grease a bowl and place your dough in it, flipping once so that all the dough is lightly coated in oil.  Cover with a clean towel or plastic wrap and place in a warm place to rise until doubled in volume, about one hour.  

  4. When bread has risen, punch or press down to degas it.  Dump back onto your floured surface and divide the dough into two even pieces, using a scale for accuracy.  

  5. Starting with one half, form dough into a ball by flattening in a small square, then folding 3-4 times to create a ball, stretching as you do to create some tension. Move to a part of your work surface that has minimal flour.  Place the ball between your two floured hands, loosely cupped. Move the ball between your hands in a circular motion while gently pulling the dough in a downward action.  The bottom of the dough should stick to your surface a bit, and as you gently stretch it down in a circular motion you are creating surface tension.  If the dough starts to tear lighten up on the pressure; the dough should look taught and smooth.  The surface tension will create a nice crust for your dough.  This is called shaping a "Boule."  If you're as confused as I would be reading this for the first time, this demonstration from King Arthur Flour is very helpful, the technique we're going for is shown starting at about 0:30.  

  6. Repeat with other half of dough.  Place towel or plastic wrap over the two boules and let rest for 15 minutes.

  7. Shape each round into a loaf and place in prepared pans.  Place back in a warm place to double, about 1 hour.  Preheat your oven towards the end of this time.  

  8. When dough has risen for the second time and the oven is hot, spray the inside walls of your oven with water to create steam.  A spray bottle works well.  Place loaves in oven and bake for 25-30 minutes, or until internal temperature reads 200-210°F / 93-99°C.  Allow to cool in pans for 10 minutes, then remove and transfer to a wire rack.  

bread, white bread, carbs, buttermilk, toast, french toast bread
Bread
American
Yield: 20
Author:

Buttermilk Bread

A soft white bread made extra fluffy with the use of buttermilk. Great for toast and french toast.
prep time: 40 Mcook time: 30 Mtotal time: 70 M

ingredients:

  • 5-6 cups / 620g-740g all-purpose flour
  • 1 Tbsp / 9g instant yeast
  • 2 tsp / 10g salt
  • 2 cups / 474g buttermilk
  • 1 Tbsp / 20g maple syrup or honey
  • 2 Tbsp / 28g oil or melted butter

instructions:

How to cook Buttermilk Bread

  1. Oven 375°F / 190°C. Grease two approx. 9x5in / 24x13cm loaf pans.
  2. In a large bowl or bowl of a stand mixer fitted with the paddle attachment, place 5 cups of flour, yeast, and salt. Mix together. Add buttermilk, maple syrup, and oil, mixing well. Switch to the dough hook if using a stand mixer.
  3. Knead in the stand mixer or by hand on a lightly floured surface, until a smooth dough is formed, adding more flour as needed. This should take about 5-7 minutes with a stand mixer, 10 minutes by hand. If using a stand mixer, still knead a few rounds on a lightly floured surface at the end.
  4. Lightly grease a bowl and place your dough in it, flipping once so that all the dough is lightly coated in oil. Cover with a clean towel or plastic wrap and place in a warm place to rise until doubled in volume, about one hour.
  5. When bread has risen, punch or press down to degas it. Dump back onto your floured surface and divide the dough into two even pieces, using a scale for accuracy.
  6. Starting with one half, form dough into a ball by flattening in a small square, then folding 3-4 times to create a ball, stretching as you do to create some tension. Move to a part of your work surface that has minimal flour. Place the ball between your two floured hands, loosely cupped. Move the ball between your hands in a circular motion while gently pulling the dough in a downward action. The bottom of the dough should stick to your surface a bit, and as you gently stretch it down in a circular motion you are creating surface tension. If the dough starts to tear lighten up on the pressure; the dough should look taught and smooth. The surface tension will create a nice crust for your dough. This is called shaping a "Boule." If you're as confused as I would be reading this for the first time, this demonstration from King Arthur Flour is very helpful, the technique we're going for is shown starting at about 0:30.
  7. Repeat with other half of dough. Place towel or plastic wrap over the two boules and let rest for 15 minutes.
  8. Shape each round into a loaf and place in prepared pans. Place back in a warm place to double, about 1 hour. Preheat your oven towards the end of this time.
  9. When dough has risen for the second time and the oven is hot, spray the inside walls of your oven with water to create steam. A spray bottle works well. Place loaves in oven and bake for 25-30 minutes, or until internal temperature reads 200-210°F / 93-99°C. Allow to cool in pans for 10 minutes, then remove and transfer to a wire rack.

Calories

161.19

Fat (grams)

2.00

Sat. Fat (grams)

0.28

Carbs (grams)

30.42

Fiber (grams)

1.12

Net carbs

29.30

Sugar (grams)

2.10

Protein (grams)

4.79

Sodium (milligrams)

239.83

Cholesterol (grams)

0.95
Nutritional information is approximate and based on 1 slice from 20 servings.
Created using The Recipes Generator

Whole Wheat Bread

This post may contain affiliate links. If you make a purchase using these links, Jennyblogs may receive a small commission, at no extra cost to you. This helps to support Jennyblogs. For further information see the privacy policy. Grazie!

Simple, delicious, whole wheat bread.  No batons, bread machines, or rocket scientists required.  Actually, if you have a bread machine your bread making life is probably a lot simpler than mine.  I enjoy working the bread with my own hands, though.  It's very therapeutic and gives you a nice upper body workout.   Which means you could then eat more bread, yes?

Anyway, this is a simple, versatile bread, good for sandwiches, toast, and...bread.  

Recipe adapted from The Frugal Girl


Whole Wheat Bread

Makes 2 approx. 9in / 23cm loaves

Ingredients:

  • 1 1/2 Tbsp / 14g instant yeast

  • 2 1/2 tsp / 13g salt

  • 3 cups / 384g whole wheat flour

  • 2 3/4 cups / 330g all-purpose flour

  • 2 1/3 cups / 552g warm water (about 110°F / 43°C)

  • 1/4 cup / 80g maple syrup or honey

  • 1/4 cup / 56g oil or melted butter

Directions:

Oven 350°F / 177°C.  Grease 2 approx. 9x5in / 23x13cm bread pans. 

  1. Combine yeast, salt, 1 cup / 128g whole wheat flour, and 1 cup / 120g all-purpose flour in the bowl of a stand mixer on low speed, or mix by hand.  

  2. Add warm water, maple syrup, and oil.  Mix until ingredients are combined, then increase speed to medium, beating for 3 minutes, or vigorously by hand.  

  3. Add remaining whole wheat flour and all-purpose flour until a soft but kneadable dough is formed.  

  4. Switch to dough hook and knead for 5-7 minutes, turning out on to a lightly floured surface to knead for 1-2 minutes more, until dough looks smooth and elastic. Or, knead by hand on a lightly floured surface for about 10 minutes.  

  5. Grease a large bowl and place dough in it.  Flip the dough over once so that both sides are lightly greased.  Cover bowl with a clean towel and place in a warm place to rise until doubled in volume, about 45-60 minutes.  

  6. When dough has risen, punch down and knead on a lightly floured surface for 4-5 minutes.  

  7. Separate dough into two equal pieces.  Roll or press one piece out into a small rectangle.  It does not have to be exact or very big, the width of it should be a touch smaller than your bread pan, or 9 inches.  Starting from the short end, roll the dough up and place in your prepared pan.  Repeat with second piece.  

  8. Place towel back over loaves and let rise until doubled, about 30-45 minutes.  

  9. When loaves have risen, bake for about 30 minutes.  They should sound hollow when tapped on the bottom or the internal temperature should read about 205°F / 96°C.  

  10. Cool in pans 10 minutes before removing and allowing to cool fully.  

Jenny's Notes:

  • If you use oil to make this bread, it will be dairy-free. If you use oil and maple syrup, it will also be vegan.

  • I have also made this bread with great success substituting part of the all-purpose flour with wheat germ.  Gives it an extra nutty flavor profile.  

  • The rolling step creates surface tension in the bread, and therefore a prettier loaf.  I only eat pretty loaves.  ;)

vegan, dairy-free, whole wheat bread, wheat germ, honey, maple syrup, toast, french toast, whole wheat sandwich bread, homemade bread, loaves
Bread
American
Yield: 20
Author:

Whole Wheat Bread

Classic everyday whole wheat bread, great for sandwiches, toast, or anyway you like to eat bread!
prep time: 35 Mcook time: 30 Mtotal time: 65 M

ingredients:

  • 1 1/2 Tbsp / 14g instant yeast
  • 2 1/2 tsp / 13g salt
  • 3 cups / 384g whole wheat flour
  • 2 3/4 cups / 330g all-purpose flour
  • 2 1/3 cups / 552g warm water (about 110°F / 43°C)
  • 1/4 cup / 80g maple syrup or honey
  • 1/4 cup / 56g oil or melted butter

instructions:

How to cook Whole Wheat Bread

  1. Oven 350°F / 177°C. Grease 2 approx. 9x5in / 23x13cm bread pans.
  2. Combine yeast, salt, 1 cup / 128g whole wheat flour, and 1 cup / 120g all-purpose flour in the bowl of a stand mixer on low speed, or mix by hand.
  3. Add warm water, maple syrup, and oil. Mix until ingredients are combined, then increase speed to medium, beating for 3 minutes, or vigorously by hand.
  4. Add remaining whole wheat flour and all-purpose flour until a soft but kneadable dough is formed.
  5. Switch to dough hook and knead for 5-7 minutes, turning out on to a lightly floured surface to knead for 1-2 minutes more, until dough looks smooth and elastic. Or, knead by hand on a lightly floured surface for about 10 minutes.
  6. Grease a large bowl and place dough in it. Flip the dough over once so that both sides are lightly greased. Cover bowl with a clean towel and place in a warm place to rise until doubled in volume, about 45-60 minutes.
  7. When dough has risen, punch down and knead on a lightly floured surface for 4-5 minutes.
  8. Separate dough into two equal pieces. Roll or press one piece out into a small rectangle. It does not have to be exact or very big, the width of it should be a touch smaller than your bread pan, or 9 inches. Starting from the short end, roll the dough up and place in your prepared pan. Repeat with second piece.
  9. Place towel back over loaves and let rise until doubled, about 30-45 minutes.
  10. When loaves have risen, bake for about 30 minutes. They should sound hollow when tapped on the bottom or the internal temperature should read about 205°F / 96°C.
  11. Cool in pans 10 minutes before removing and allowing to cool fully.

NOTES:

If you use oil to make this bread, it will be dairy-free. If you use oil and maple syrup, it will also be vegan. I have also made this bread with great success substituting part of the all-purpose flour with wheat germ. Gives it an extra nutty flavor profile. The rolling step creates surface tension in the bread, and therefore a prettier loaf.

Calories

162.77

Fat (grams)

3.50

Sat. Fat (grams)

0.30

Carbs (grams)

29.38

Fiber (grams)

2.69

Net carbs

26.69

Sugar (grams)

2.54

Protein (grams)

4.53

Sodium (milligrams)

254.58

Cholesterol (grams)

0.00
Nutritional information is approximate and based on 1 slice from a 10-slice loaf.
Created using The Recipes Generator

Caramel Sauce

Everyone should have a good caramel sauce on hand, in my mind it's an essential tool in the baker's repertoire.  It's simple to make and not too time consuming, the only special item you will need is a candy thermometer, and you can find those pretty cheaply.  Everyone will love you for making it.  Take it one step further to make salted caramel, and everyone and their brother will love you, too. 

So get your thermometers ready, let's get cracking!  Actually, we will not be going to the soft-crack nor hard-crack stages like on your thermometer, so calm down.  If we did, our caramel would not be soft and pour-able but capable of cracking teeth.  

This post may contain affiliate links. If you make a purchase using these links, Jennyblogs may receive a small commission, at no extra cost to you. This helps to support Jennyblogs. For further information see the privacy policy. Grazie!

Recipe adapted from Martha Stewart


Caramel Sauce

Makes 2+ cups

Ingredients:

  • 2 cups / 400g sugar

  • 2 Tbsp / 40g light corn syrup

  • 2 Tbsp / 28g water

  • 1 cup / 237g heavy whipping cream

  • 1/4 tsp coarse salt

  • 1/2 cup / 113g cold, unsalted butter

Directions:

  1. Combine sugar, corn syrup, and water in a medium sauce over high heat.  Allow to cook without stirring until the mixture turns a beautiful amber color.  (If it turns an ugly amber color, I can't help ya. Just kidding. Proceed.)  This could take anywhere from 10-20 minutes, depending on how hot your stove top cooks.  Keep a watchful eye on it, as it goes fast from light golden, perfectly amber, to burnt.  

  2. Remove from heat and carefully pour in cream, a little at a time, as it will bubble up and spatter at you.  Stir until all the cream is mixed in. 

  3. Attach a candy thermometer to the pan and return to the heat.  Cook until mixture reaches 238°F / 114°C, about 2-5 minutes. 

  4. Remove from heat and stir in salt.  Stir in butter, one tablespoon at a time, until completely smooth.  Transfer to a bowl and allow to cool completely before using.  Store in the refrigerator. 

Jenny's Notes:

  • Don't like using corn syrup? Neither do I, in which case you can substitute honey for the corn syrup.  Keep in mind that it will give it a honey taste, so use discernment for which type of dessert you will be using it with and who you will be serving it to, if honey will suit or not. Honey also has a tendency to result in a slightly grainy caramel, rather than the silken smooth corn syrup caramel, especially if you are using a natural or raw honey that naturally crystallizes. (This is actually a sign of good honey.) Again, use your best judgment!

  • To make salted caramel, use salted butter and/or up the salt in the recipe to 1/2-1 tsp or to taste.

  • This is great in coffee, for cookies, swirling in brownies, using as a filling between cake layers, dipping apples and fruit into, on ice cream, and anything else you like to use caramel sauce for!  Get creative and may the streams of caramel forever be abundant in your life.   

Homemade Caramel, Caramel Sauce, Caramel fruit dip, Caramel recipe
Dessert
French
Yield: 16
Author: Jennyblogs
Print
Caramel Sauce

Caramel Sauce

A reliable and versatile caramel sauce you can use on most anything! Think in coffee, for cookies, swirling in brownies, using as a filling between cake layers, dipping apples and fruit into, on ice cream, or by the spoonful!
Prep time: 10 MCook time: 25 MTotal time: 35 M

Ingredients:

  • 2 cups / 400g sugar
  • 2 Tbsp / 40g light corn syrup
  • 2 Tbsp / 28g water
  • 1 cup / 237g heavy whipping cream
  • 1/4 tsp coarse salt
  • 1/2 cup / 113g cold, unsalted butter

Instructions:

  1. Combine sugar, corn syrup, and water in a medium sauce over high heat. Allow to cook without stirring until the mixture turns a beautiful amber color. (If it turns an ugly amber color, I can't help ya. Just kidding. Proceed.) This could take anywhere from 10-20 minutes, depending on how hot your stove top cooks. Keep a watchful eye on it, as it goes fast from light golden, perfectly amber, to burnt.
  2. Remove from heat and carefully pour in cream, a little at a time, as it will bubble up and spatter at you. Stir until all the cream is mixed in.
  3. Attach a candy thermometer to the pan and return to the heat. Cook until mixture reaches 238°F / 114°C, about 2-5 minutes.
  4. Remove from heat and stir in salt. Stir in butter, one tablespoon at a time, until completely smooth. Transfer to a bowl and allow to cool completely before using. Store in the refrigerator.

Notes:

Don't like using corn syrup? Neither do I, in which case you can substitute honey for the corn syrup. Keep in mind that it will give it a honey taste, so use discernment for which type of dessert you will be using it with and who you will be serving it to, if honey will suit or not. Honey also has a tendency to result in a slightly grainy caramel, rather than the silken smooth corn syrup caramel, especially if you are using a natural or raw honey that naturally crystallizes. (This is actually a sign of good honey.) Again, use your best judgment! To make salted caramel, use salted butter and/or up the salt in the recipe to 1/2-1 tsp or to taste.

Calories

204.83

Fat (grams)

11.08

Sat. Fat (grams)

6.98

Carbs (grams)

27.32

Fiber (grams)

0.00

Net carbs

27.32

Sugar (grams)

27.31

Protein (grams)

0.48

Sodium (milligrams)

42.98

Cholesterol (grams)

31.92
Nutritional information is approximate; based on roughly 16 servings of 2 Tbsp each.
Did you make this recipe?
Tag @jenevamorris on instagram and hashtag it #jennyblogs
Created using The Recipes Generator

Peanut Butter Energy Bites

What is energy, and why do these bites have so much?  I'm not about to give you a lesson in physics, I'll leave that to Iggy Azalea, but basically they are filled with good calories (energy) from the nutrients and natural sugar.  If there is the word energy in the title, it probably just means it's high calorie.  But if they were called Peanut Butter Calorie Bites, who would make them?  Calories get such a bad rap, poor things.  Calories, I can't liiive without yooooou!  Literally. (If you just sang that to the tune of "Without You" by Badfinger, congratulations. Me too.) 

So if you need a boost of energy or a quick pick-me-up, these are your friends.  Also great if you are about to expend a lot of energy, like going for a run or playing Twister, or after.  They are small but pack a punch, so they don't make you feel too full.  

This post may contain affiliate links. If you make a purchase using these links, Jennyblogs may receive a small commission, at no extra cost to you. This helps to support Jennyblogs. For further information see the privacy policy. Grazie!

Recipe adapted from Gimme Some Oven


Peanut Butter Energy Bites

Makes about 15 1-in. diameter balls

A mass of energy...

A mass of energy...

Ingredients:

  • 1 cup / 90g oats

  • 2/3 cup / 67g flaked or shredded coconut, unsweetened

  • 1/2 cup / 130g peanut butter

  • 1/2 cup wheat germ (50g), chia seeds (80g), or ground flax seed (90g)

  • 1/3 cup / 110g honey or maple syrup

  • 1 tsp / 5g vanilla extract

  • 1/2 cup / 85g mini chocolate chips

Directions:

  1. In a medium bowl, combine all ingredients.  If dough is too dry to form balls, add more honey or peanut butter; if they seem too sticky, add more oats or wheat germ. 

  2. Form into balls and store in the fridge or freezer for when you want a quick snack.

Jenny's Notes:

  • For vegan bites, be sure to use dairy-free chips and use maple syrup instead of honey.

  • For gluten-free bites, make sure your oats are certified gluten-free and use chia or flax seeds instead of wheat germ. 

  • You can get creative with these bites, substitute or add to the chocolate chips with your favorite dried fruit or nuts, or even types of cereal, such as grape-nuts, puffed rice, granola, etc.

peanut butter energy balls, chocolate chips, coconut, granola bar bites
Snacks
American
Yield: 15 Balls
Author: Jennyblogs
Print
Peanut Butter Energy Bites

Peanut Butter Energy Bites

All the goodness of granola bars in an easier, rolled form. Packed with energy and nutrients, these peanut butter, coconut, chocolate chip energy bites are perfect for a quick snack or pick-me-up.
Prep time: 15 MCook time: Total time: 15 M

Ingredients:

  • 1 cup / 90g oats
  • 2/3 cup / 67g flaked or shredded coconut, unsweetened
  • 1/2 cup / 130g peanut butter
  • 1/2 cup wheat germ (50g), chia seeds (80g), or ground flax seed (90g)
  • 1/3 cup / 110g honey or maple syrup
  • 1 tsp / 5g vanilla extract
  • 1/2 cup / 85g mini chocolate chips

Instructions:

  1. In a medium bowl, combine all ingredients. If dough is too dry to form balls, add more honey or peanut butter; if they seem too sticky, add more oats or wheat germ.
  2. Form into balls and store in the fridge or freezer for when you want a quick snack.

Notes:

For vegan bites, be sure to use dairy-free chips and use maple syrup instead of honey. For gluten-free bites, make sure your oats are certified gluten-free and use chia or flax seeds instead of wheat germ. You can get creative with these bites, substitute or add to the chocolate chips with your favorite dried fruit or nuts, or even types of cereal, such as grape-nuts, puffed rice, granola, etc.

Calories

167.43

Fat (grams)

9.64

Sat. Fat (grams)

4.52

Carbs (grams)

18.89

Fiber (grams)

2.68

Net carbs

16.21

Sugar (grams)

10.10

Protein (grams)

4.14

Sodium (milligrams)

44.67

Cholesterol (grams)

0.00
Nutritional information is approximate. Based on 15 servings.
Did you make this recipe?
Tag @jenevamorris on instagram and hashtag it #jennyblogs
Created using The Recipes Generator