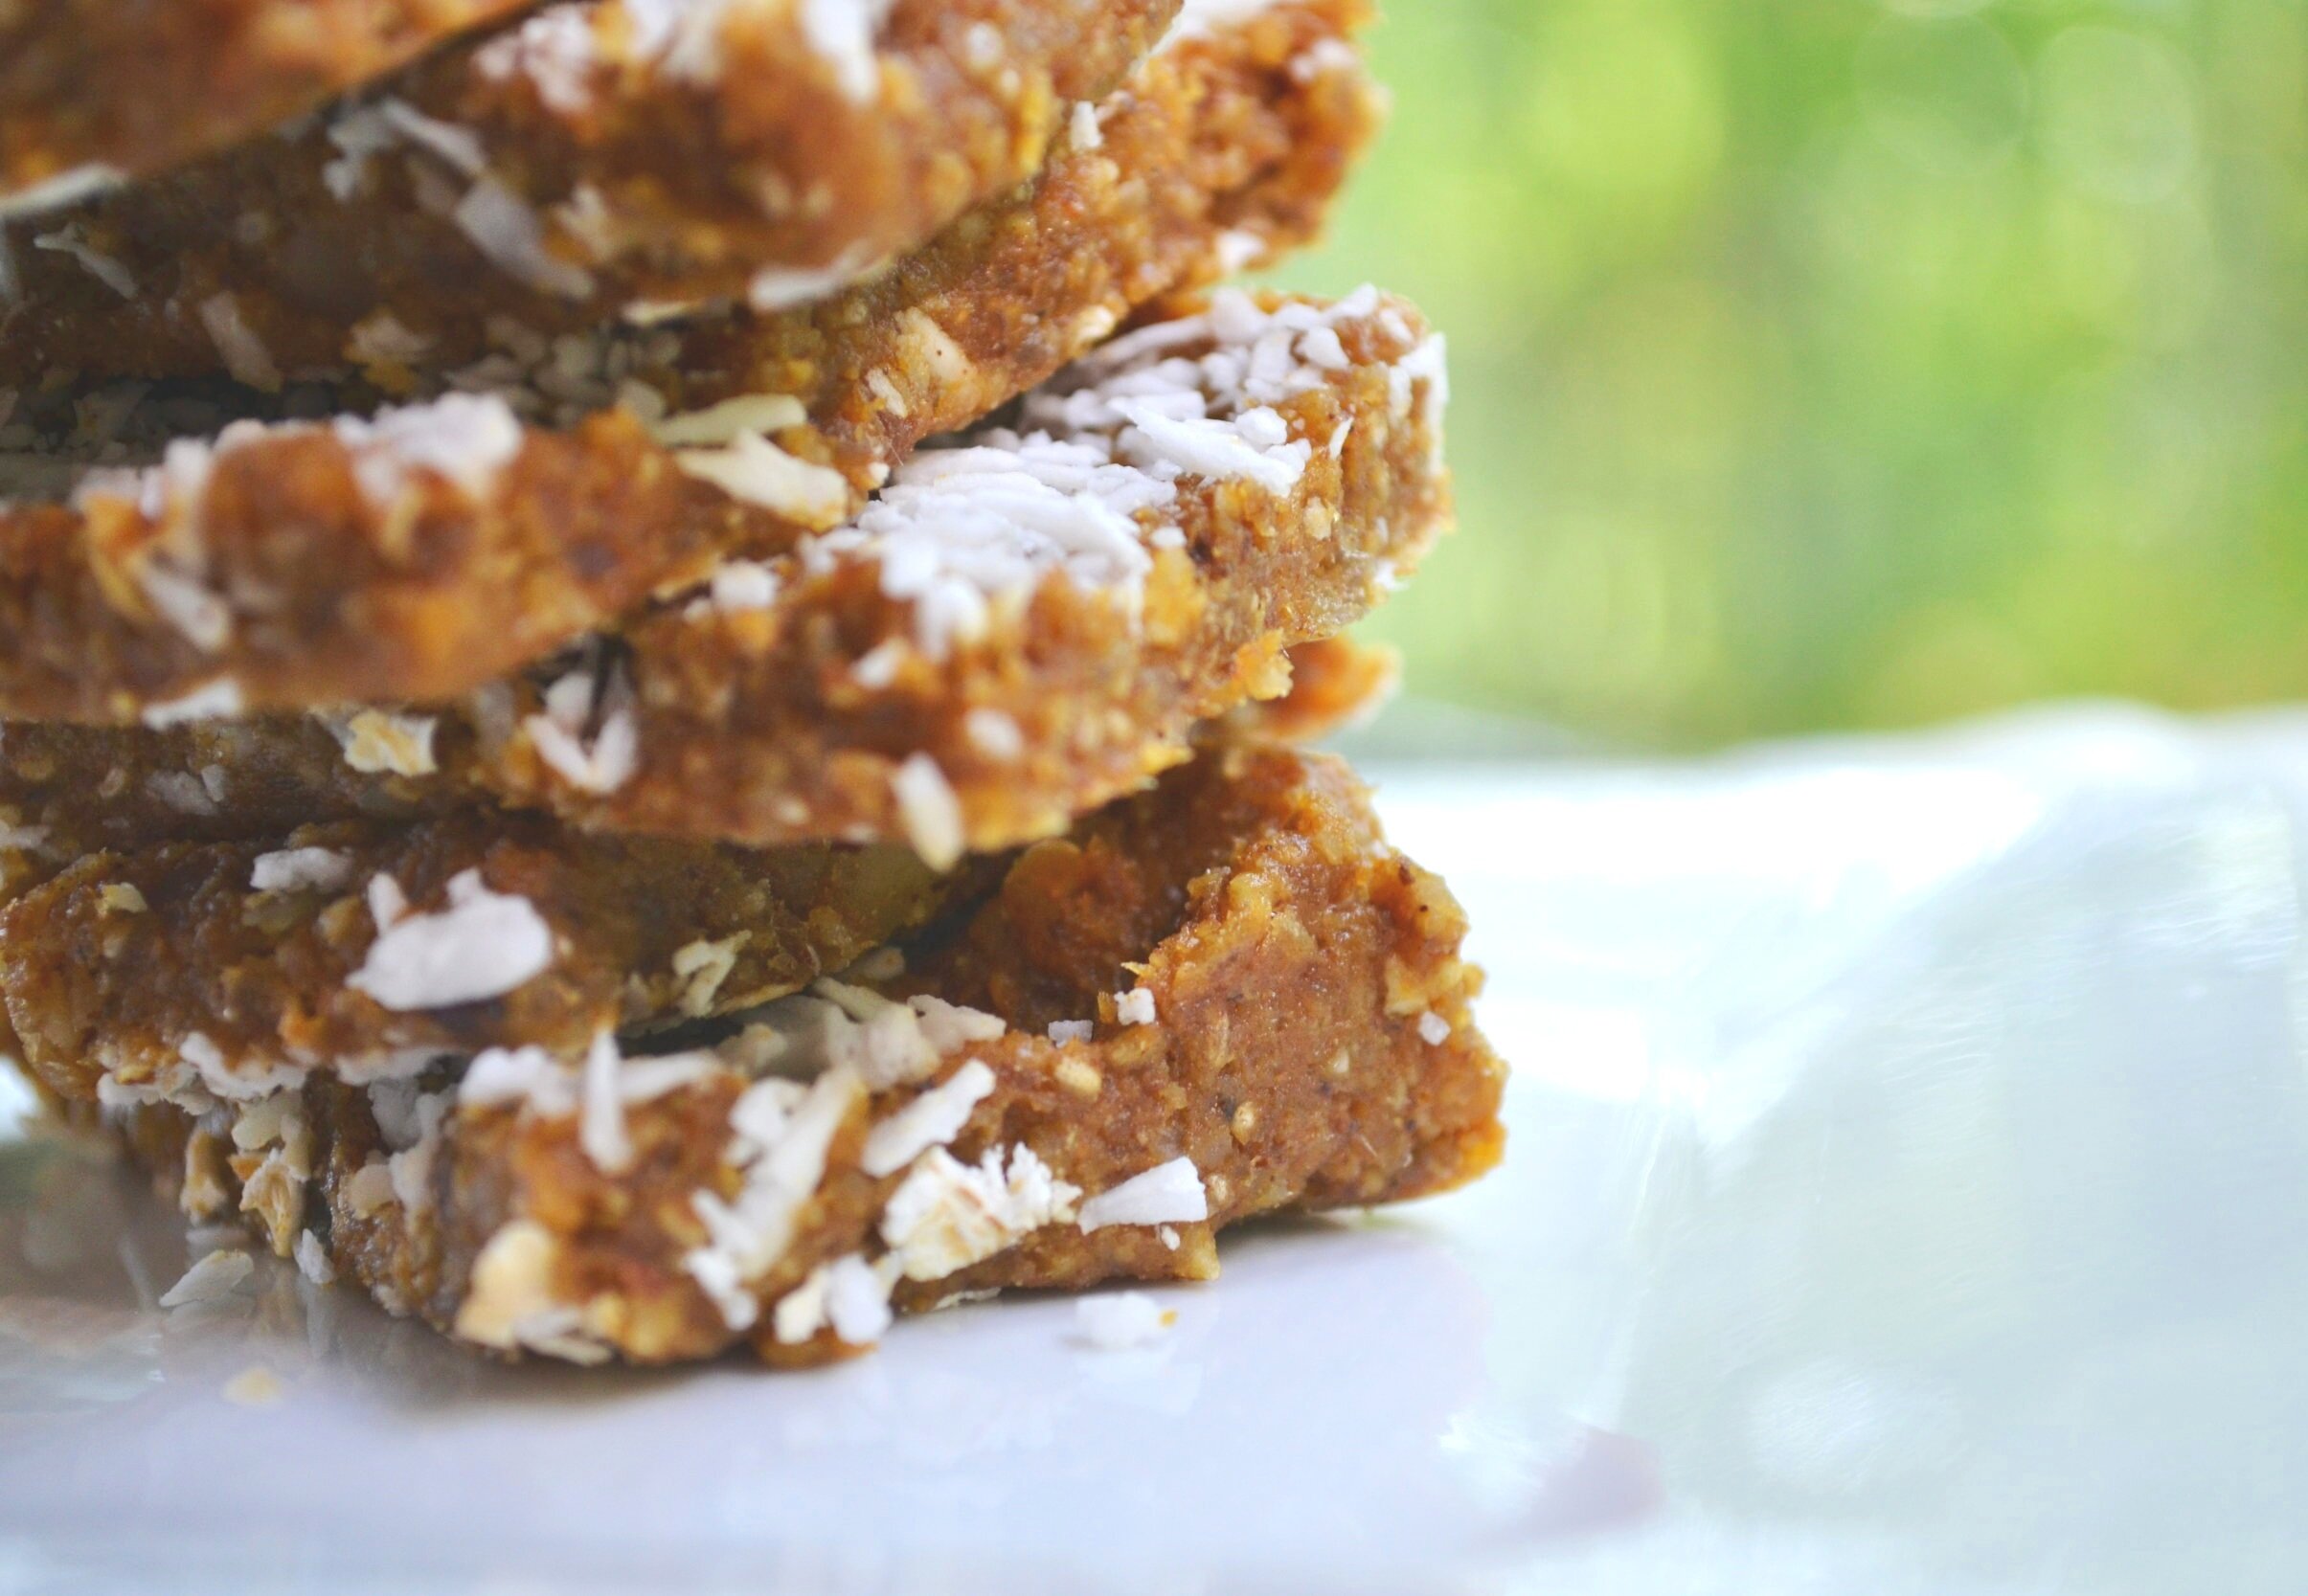
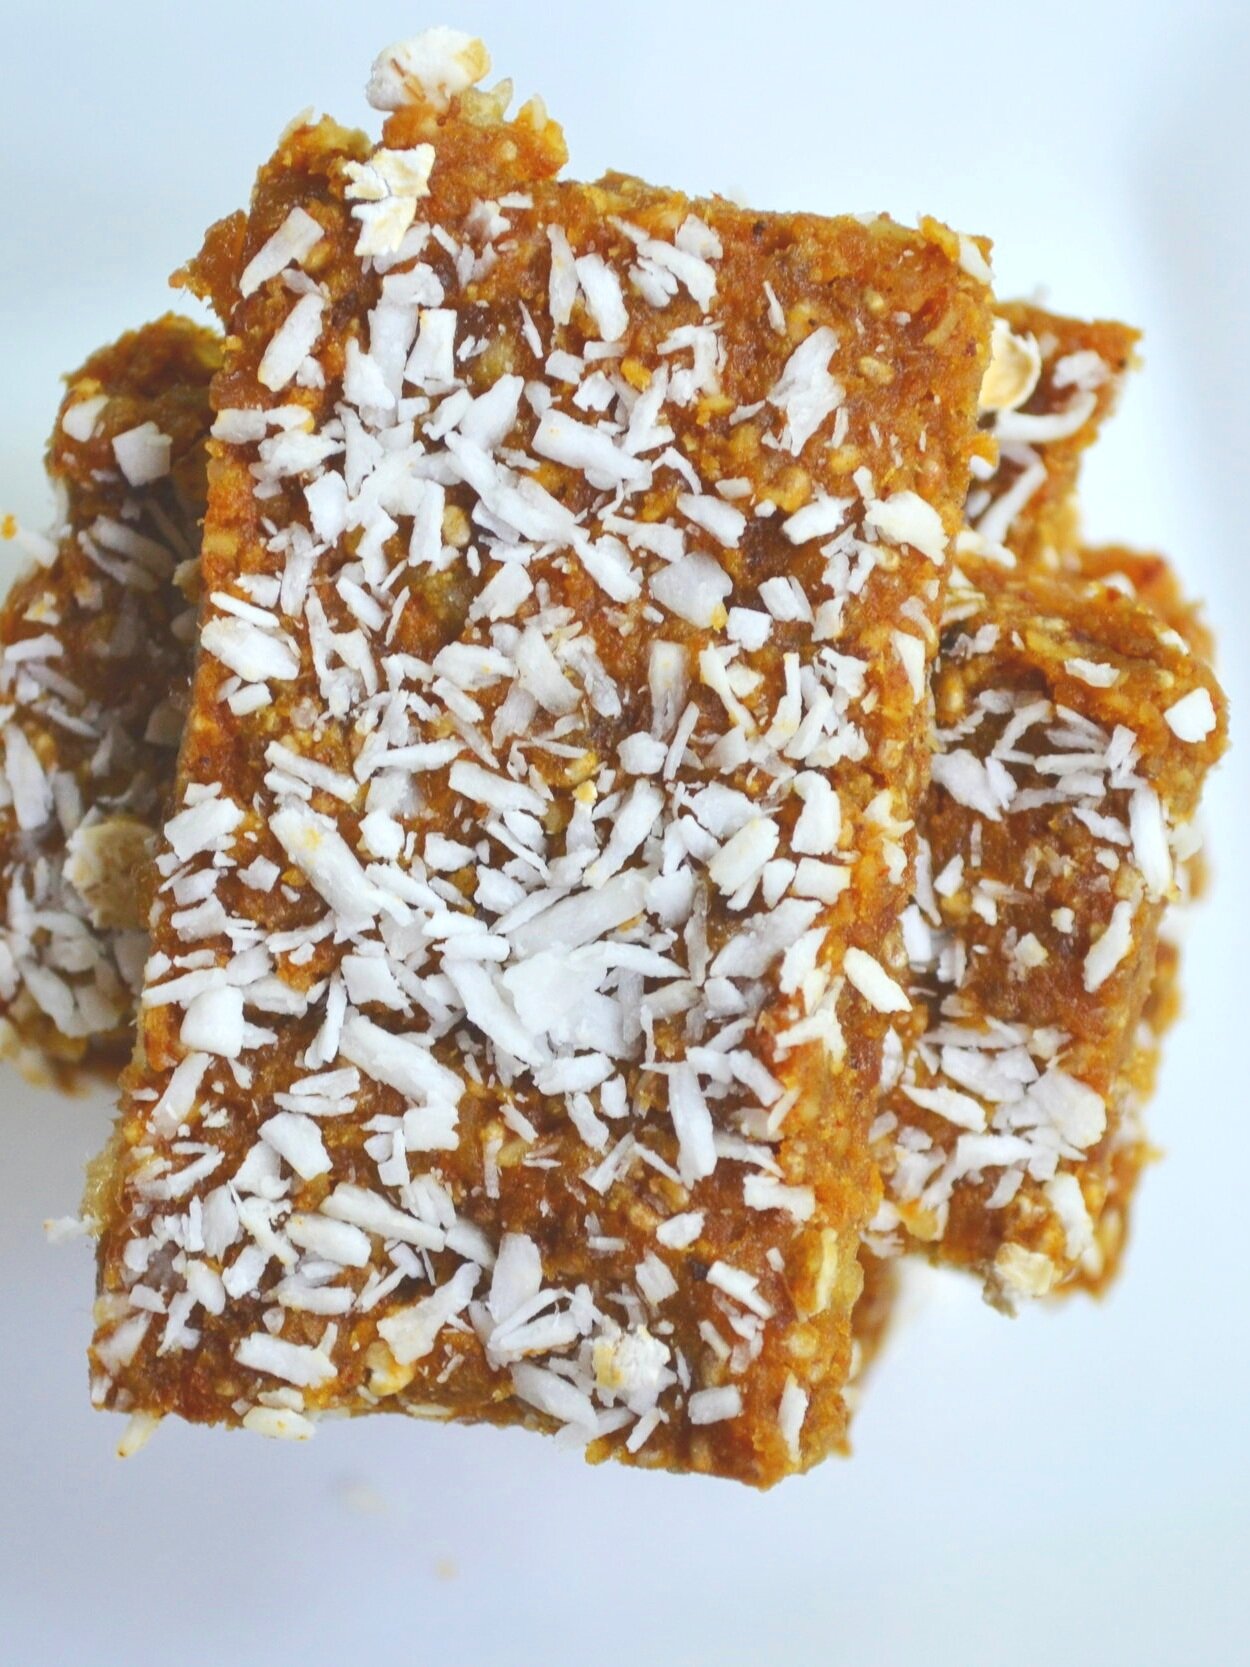
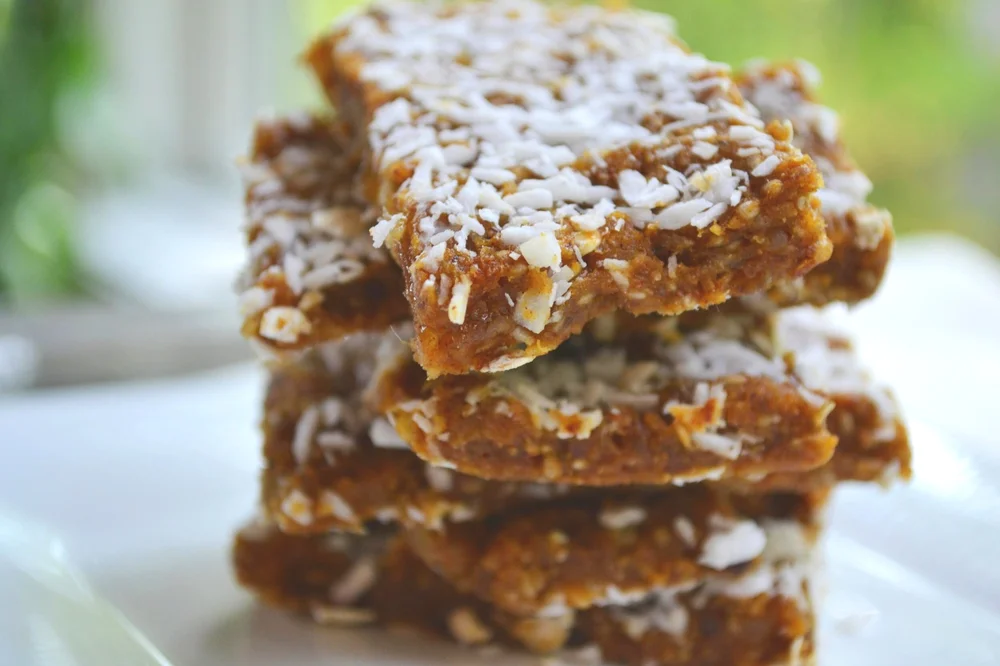
Pumpkin Coconut Energy Bars (Vegan)

One week until Thanksgiving!  'Tis the season for baking too much, cooking too much, and eating too much. 

Sometimes you don't want to wait until Thanksgiving for a slice of pumpkin pie, yet you don't want to ruin it, or sometimes you just want something of a lighter nature that you can feel good about eating.  The upcoming season of delicious foods and feasting does not mean that you should be eating plain lettuce, carrot sticks, and rutabaga all day to "save up" for the holidays.  In fact, if it's not delicious, then you shouldn't eat it.  I believe food is a good gift and should always be enjoyed, and never suffered through.  If it's not delicious, then something isn't being done right.  Nutritious can be delicious.  But delicious does not always have to be nutritious.  Everything in moderation.  Do you follow me?  Well, never mind. 

Now for something that falls into the three most important categories: Delicious, Nutritious, AND Festive. 

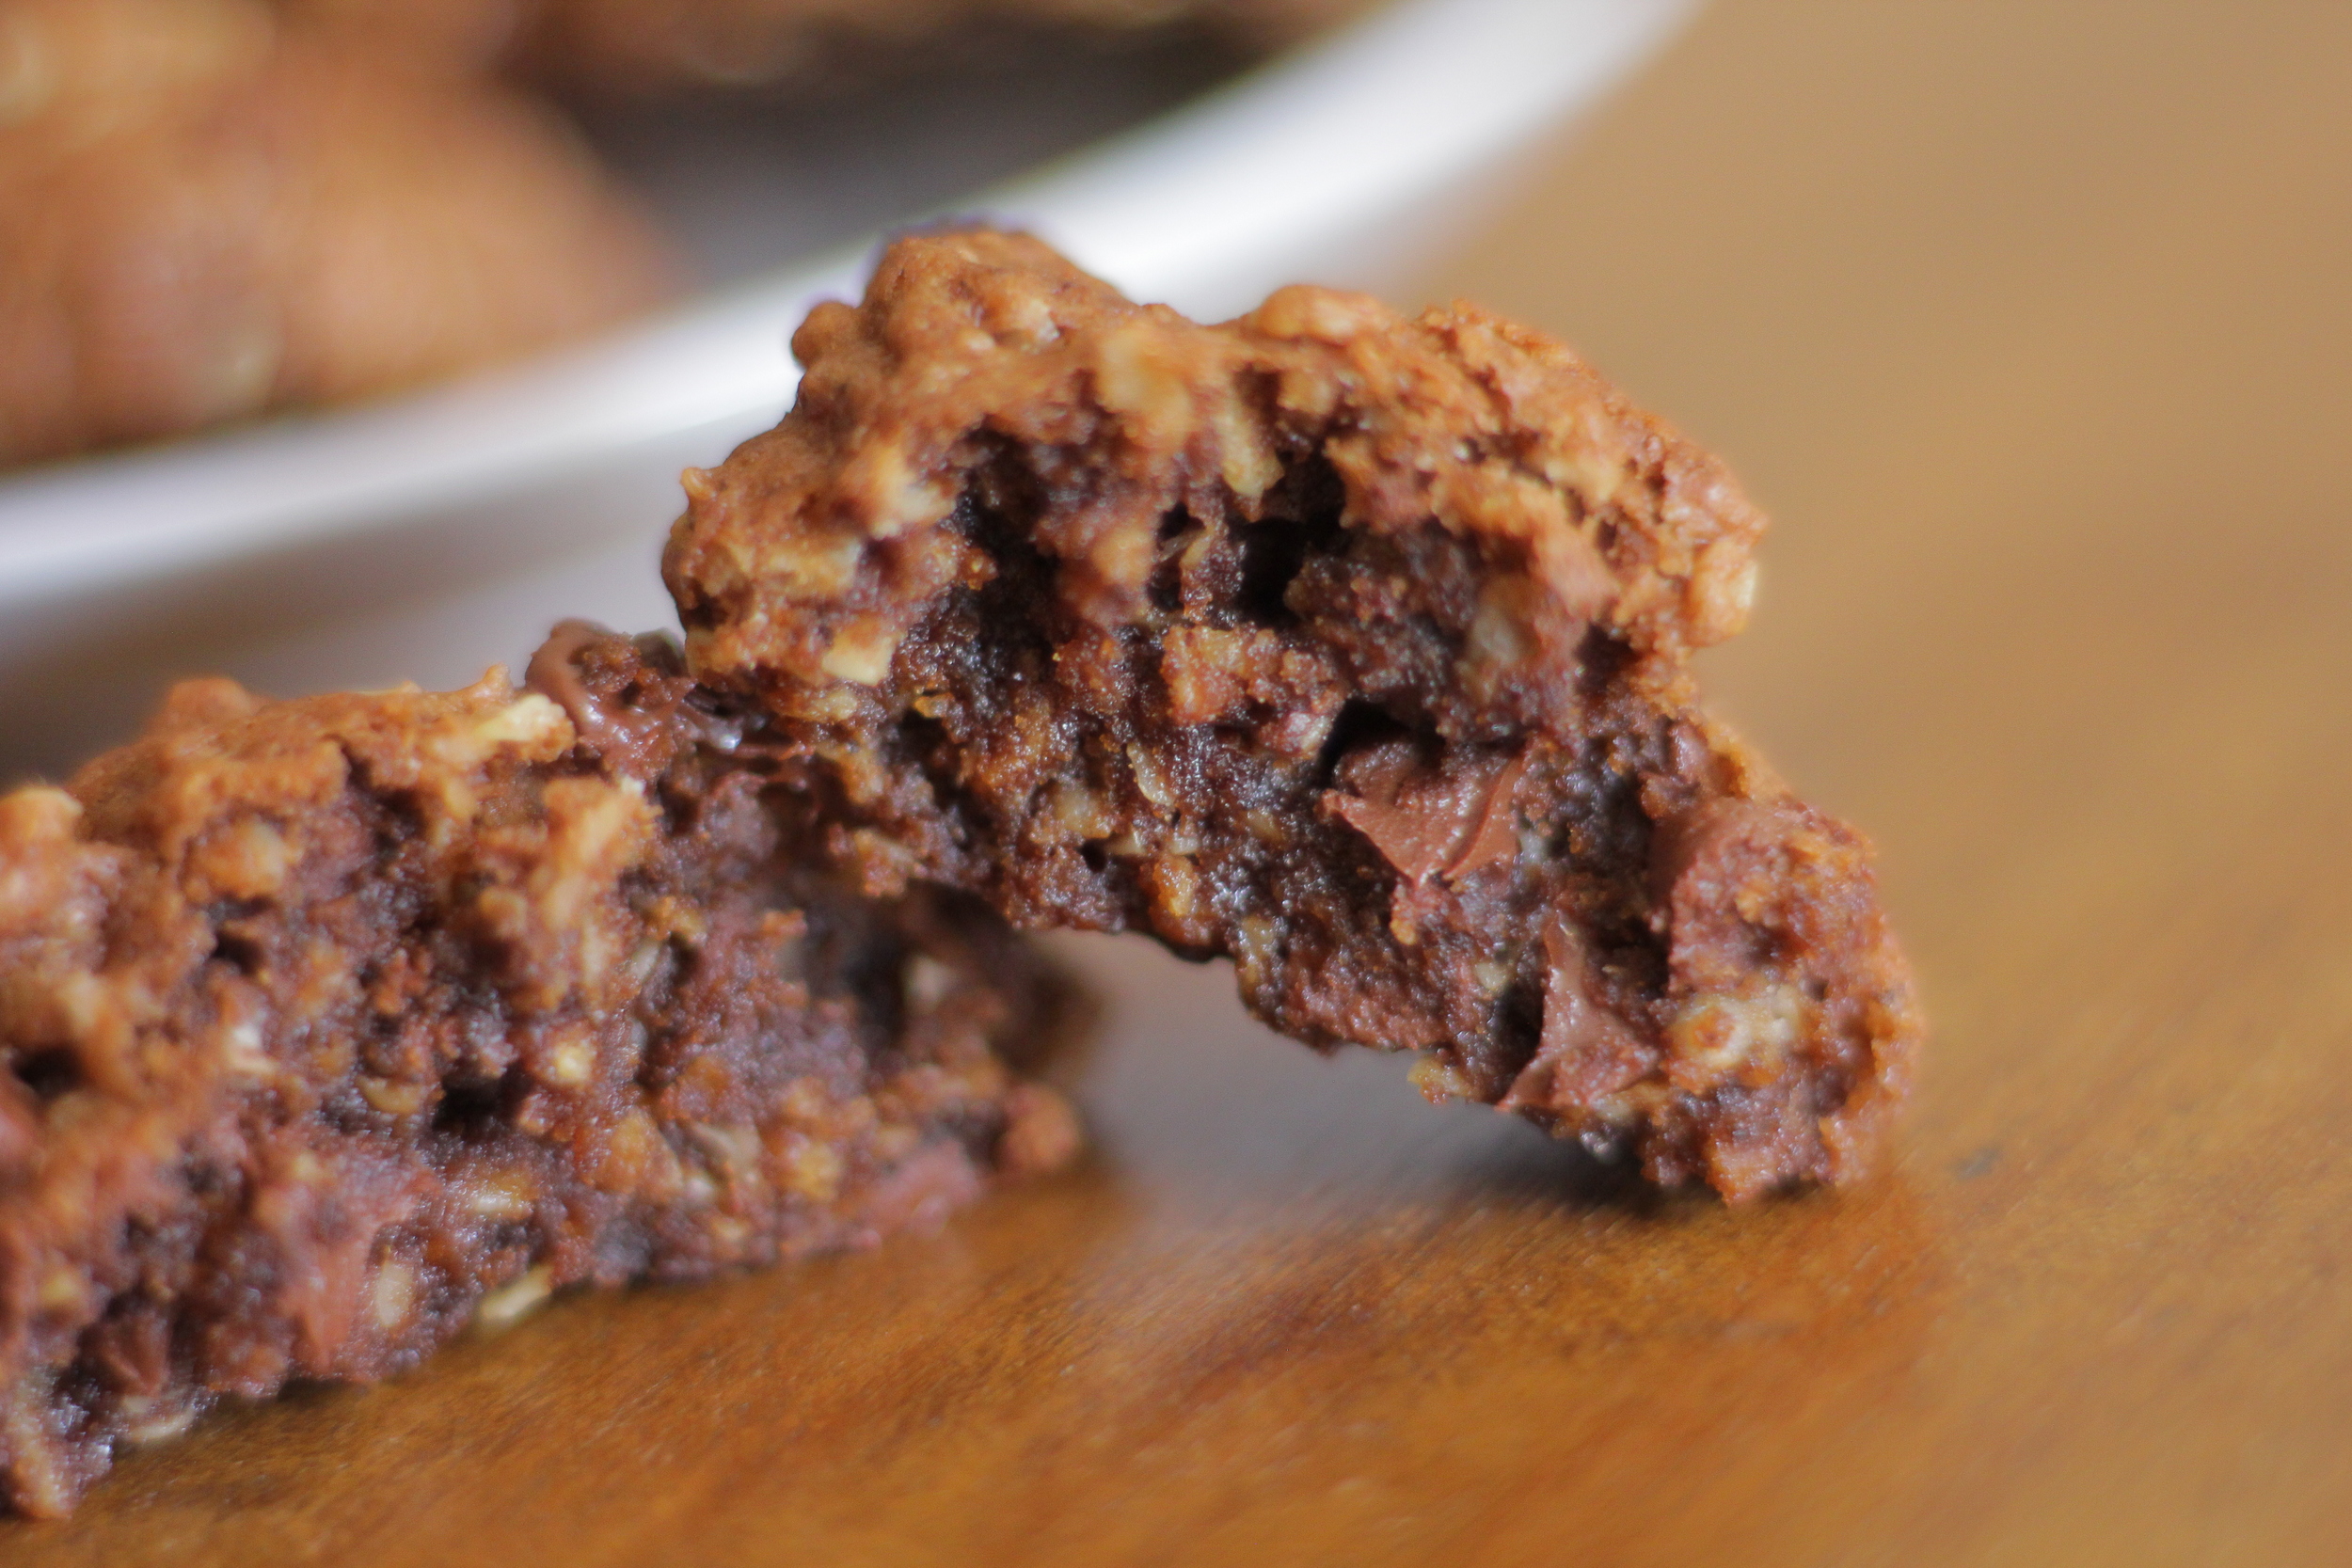
Namely, Pumpkin Coconut Energy Bars. They’re pumpkin spiced, vegan, dairy-free, and gluten-free (if you use gluten-free oats), so most everyone can enjoy them! They’re sweetened with dates which also makes them refined sugar free.

Eat them as dessert, snack, after-workout boost, or for on the go. By nature they’re a bit soft, so if you prefer them harder keep them in the fridge or freezer until you need a little nutritious pick-me-up.

This post may contain affiliate links. If you make a purchase using these links, Jennyblogs may receive a small commission, at no extra cost to you. This helps to support Jennyblogs. For further information see the privacy policy. Grazie!

Recipe adapted from Nutritionist in the Kitch


Pumpkin Coconut Energy Bars

Makes 8-10 Bars

Ingredients:

  • 1 cup / 160g pitted dates

  • 1/2 cup / 75g nuts of choice, raw and unsalted

  • 2 Tbsp / 24g pumpkin seeds or chia seeds

  • 2 Tbsp / 14g unsweetened shredded or flaked coconut

  • 1/4 cup / 23g oats

  • 1 tsp cinnamon

  • 1/4 tsp nutmeg

  • 1/4 tsp cloves

  • 1/4 tsp ginger

  • 1/4 cup / 60g pumpkin puree

Directions:

  1. Combine all ingredients in a food processor.  Blend for several minutes, until slightly chunky or completely smooth, as you wish.

  2. Line an 8x8in / 20x20cm square baking dish with parchment paper.  Lightly sprinkle with oats or coconut to prevent mixture from sticking too much.

  3. Scoop mixture into dish and carefully spread to the edges.  Use lightly oiled or wet hands to help this process.  Sprinkle with more coconut, pumpkin seeds, or both.

  4. Place in the freezer for a couple hours, then slice into bars.  Store in at room temperature, in the fridge, or in the freezer, depending on how firm you want the bars to be. 

Jenny's Notes:

  • I used a combination of almonds, pecans, hazelnuts, cashews, and Brazil nuts.  Why use only 1 or 2 varieties of nuts when you can use 5?? Haha

pumpkin, pumpkin spice, fall recipe, no bake, vegan, dairy free, gluten free, refined sugar free, pumpkin seeds, raw, coconut
dessert, snack
American
Yield: 8-10 servings
Author:

Pumpkin Coconut Energy Bars (vegan)

No-bake pumpkin bars with plenty of fall spice, coconut, and pumpkin seeds. Vegan, gluten-free if using gluten-free oats, refined-sugar free, and dairy-free.
prep time: 15 Mcook time: total time: 15 M

ingredients:

  • 1 cup / 160g pitted dates
  • 1/2 cup / 75g nuts of choice, raw and unsalted
  • 2 Tbsp / 24g pumpkin seeds or chia seeds
  • 2 Tbsp / 14g unsweetened shredded or flaked coconut
  • 1/4 cup / 23g oats
  • 1 tsp cinnamon
  • 1/4 tsp nutmeg
  • 1/4 tsp cloves
  • 1/4 tsp ginger
  • 1/4 cup / 60g pumpkin puree

instructions:

How to cook Pumpkin Coconut Energy Bars (vegan)

  1. Combine all ingredients in a food processor. Blend for several minutes, until slightly chunky or completely smooth, as you wish.
  2. Line an 8x8in / 20x20cm square baking dish with parchment paper. Lightly sprinkle with oats or coconut to prevent mixture from sticking too much.
  3. Scoop mixture into dish and carefully spread to the edges. Use lightly oiled or wet hands to help this process. Sprinkle with more coconut, pumpkin seeds, or both.
  4. Place in the freezer for a couple hours, then slice into bars. Store in at room temperature, in the fridge, or in the freezer, depending on how firm you want the bars to be.

Calories

149.51

Fat (grams)

6.45

Sat. Fat (grams)

1.46

Carbs (grams)

22.40

Fiber (grams)

3.70

Net carbs

18.70

Sugar (grams)

13.99

Protein (grams)

3.46

Sodium (milligrams)

32.30

Cholesterol (grams)

0.00
Nutritional information is approximate and based on 8 servings.
Created using The Recipes Generator

White Chocolate Cranberry Oatmeal Cookies

"Delicious Oats.  Sweet Oats.  Lovely, crunchy oats!  Splendid Oats."  If you've ever seen the live-action talking horse Black Beauty, you'll know what I'm talking about.  If you haven't, then you probably think I'm crazy and really like oats.  I'm not denying that.  But if you fall into the latter category and have never seen Black Beauty, the I suggest you make these cookies, pop a large bowl of popcorn, and do yourself a favor and enjoy this classic.  The stuff of childhood.   

We all love oatmeal cookies, yes? Probably also oatmeal cranberry cookies, those little tart chunks of cranberry a midst the chewy sweet oat cookie. Add white chocolate chips and you just took a classic to a whole new level!

This post may contain affiliate links. If you make a purchase using these links, Jennyblogs may receive a small commission, at no extra cost to you. This helps to support Jennyblogs. For further information see the privacy policy. Grazie!

A recipe by Jenny


White Chocolate Cranberry Oatmeal Cookies

Makes about 2 dozen cookies

Ingredients:

  • 1 3/4 cup / 210g all-purpose flour

  • 1 tsp salt

  • 1 tsp baking soda

  • 3/4 cup / 169g oil

  • 1 1/4 cups / 250g sugar

  • 2 eggs

  • 1 tsp vanilla extract

  • 3 cups / 270g rolled oats

  • 1 1/2 cups / 255g white chocolate chips

  • 1 1/2 cups / 225g dried cranberries

Directions:

Oven 350°F / 177°C. Ungreased or silpat lined baking sheet.

  1. In a medium bowl whisk together flour, salt, and baking soda. 

  2. In another large bowl combine oil, sugar, eggs and vanilla; mix well. 

  3. Add dry ingredients to wet ingredients and stir to combine.  Stir in oats, chips, and cranberries until evenly distributed. 

  4. Drop by spoonfuls onto baking sheet and bake for 7-9 minutes, until edges are set but centers are still soft and wet looking.  Allow to cool for a few minutes before removing from baking sheet.

Jenny's Notes:

  • Dried cherries are also a delicious combination with white chocolate.  And if you live in Traverse City, Michigan, it may be obligatory for you to try it at least once...;)

  • In Italy only mini chocolate chips exist, so although you may see mini in the photos feel free to use normal sized chips! Actually, I don’t know that I’ve seen mini white chocolate chips readily available in the States…?

oatmeal cookies, cranberry, white chocolate
dessert
American
Yield: 24
Author:

White Chocolate Cranberry Oatmeal Cookies

Chewy oatmeal cookies with tart cranberries and sweet white chocolate chips.
prep time: 20 Mcook time: 9 Mtotal time: 29 M

ingredients:

  • 1 3/4 cup / 210g all-purpose flour
  • 1 tsp salt
  • 1 tsp baking soda
  • 3/4 cup / 169g oil
  • 1 1/4 cups / 250g sugar
  • 2 eggs
  • 1 tsp vanilla extract
  • 3 cups / 270g rolled oats
  • 1 1/2 cups / 255g white chocolate chips
  • 1 1/2 cups / 225g dried cranberries

instructions:

How to cook White Chocolate Cranberry Oatmeal Cookies

  1. Oven 350°F / 177°C. Ungreased or silpat lined baking sheet.
  2. In a medium bowl whisk together flour, salt, and baking soda.
  3. In another large bowl combine oil, sugar, eggs and vanilla; mix well.
  4. Add dry ingredients to wet ingredients and stir to combine. Stir in oats, chips, and cranberries until evenly distributed.
  5. Drop by spoonfuls onto baking sheet and bake for 7-9 minutes, until edges are set but centers are still soft and wet looking. Allow to cool for a few minutes before removing from baking sheet.

NOTES:

Dried cherries are also a delicious combination with white chocolate.

Calories

269.65

Fat (grams)

11.77

Sat. Fat (grams)

2.80

Carbs (grams)

38.82

Fiber (grams)

1.89

Net carbs

36.93

Sugar (grams)

23.64

Protein (grams)

3.55

Sodium (milligrams)

166.25

Cholesterol (grams)

17.73
Nutritional information is approximate and based on 24 servings of 1 cookie each.
Created using The Recipes Generator

Burgundy Chocolate Cherry Cookies

September 24 feels like a very significant day.  You know, one of those days where you feel like it's someone's birthday (well, that's always true, even if you don't know them), a holiday, or something significant happened for you on that day.  But, I have nothing.  Except, this day last year my friend Hannah and I got off our first and hopefully last overnight train in Europe...terror....nope, not that.  Oh, it's the third day of autumn.  OH YEAH.  That's significant, we'll roll with that.  If you still have a nagging feeling like you're forgetting something, best wish everyone you meet a happy birthday, just in case...

...and make these Burgundy Chocolate Cherry Cookies so it really didn't look like you forgot....worst case scenario it's no one's birthday and you have to eat them yourself...

...actually, it's always a good idea to have cookies on hand, whatever the occasion, if even just to say "Happy September 24!" Especially these ones. 

Let me list some reasons for you.  Wine, chocolate, very chocolate, cherries, super chocolatey, and very chocolatey.  In fact, the batter is so chocolatey it makes the semi-sweet chocolate chips look like light milk chocolate.  But they are not.  So chocolatey. 

Go make them. And Happy Birthday.

This post may contain affiliate links. If you make a purchase using these links, Jennyblogs may receive a small commission, at no extra cost to you. This helps to support Jennyblogs. For further information see the privacy policy. Grazie!


Burgundy Chocolate Cherry Cookies

Makes about 3 dozen cookies

Ingredients:

  • 2 cups / 240g all-purpose flour

  • 3/4 cup / 75g cocoa powder

  • 1 tsp baking soda

  • 1 tsp salt

  • 1/4 cup / 56g oil

  • 3/4 cup / 150g sugar

  • 3/4 cup / 150g brown sugar

  • 1 egg

  • 1 tsp vanilla extract

  • 1/2 cup / 118g burgundy red wine

  • 12 oz / 340g bag semi-sweet chocolate chips

  • 1 cup / 120g dried cherries

Directions:

Oven 375°F / 190°C. Have ready one or two ungreased baking sheets.

  1. In a medium bowl whisk together flour, cocoa, baking soda, and salt.

  2. In another large bowl combine oil, sugar, brown sugar, egg, and vanilla.  Carefully stir in wine.  Stir in dry ingredients until fully incorporated, then add chocolate chips and cherries.  Dough will be soft, but shouldn't be too soupy.  If it is, add a touch more flour.

  3. Spoon little mounds onto a baking sheet and bake for 6-8 minutes, until edges look set but center still looks wet.  Allow to cool for several minutes on baking sheet before transferring to a wire rack or counter to cool completely.

Pairs wonderfully with...the remainder of the bottle of wine you used to make these...

Jenny's Notes:

  • Feel free to use any kind of red wine you like for these!  I have used the an Italian red, Savini Montepulciano d'Abruzzo Riserva with great success, and the cookies in the photos I used a French red, Côtes du Rhône.  I chose to call these Burgundy because of the Burgundy wine region, which I think would be lovely in these, (the wine, not the region) and saying "Burgundy Cookies" is a whole lot easier than "Côtes du Rhône Cookies," no?  And, red (wine) plus brown (chocolate) makes burgundy.  Yes.  Maybe. Some other good wines would a pinot noir, cabernet, or merlot.

Double chocolate cherry cookies, dried tart cherries, double chocolate chip cookies, Burgundy cookies, wine, red wine
dessert, cookies
American
Yield: 36 small cookies
Author:
Print
Burgundy Chocolate Cherry Cookies

Burgundy Chocolate Cherry Cookies

Double chocolate chip cookies made with a splash of red wine and tart dried cherries.
Prep time: 25 MCook time: 8 MTotal time: 33 M

Ingredients:

  • 2 cups / 240g all-purpose flour
  • 3/4 cup / 75g cocoa powder
  • 1 tsp baking soda
  • 1 tsp salt
  • 1/4 cup / 56g oil
  • 3/4 cup / 150g sugar
  • 3/4 cup / 150g brown sugar
  • 1 egg
  • 1 tsp vanilla extract
  • 1/2 cup / 118g burgundy red wine
  • 12 oz / 340g bag semi-sweet chocolate chips
  • 1 cup / 120g dried cherries

Instructions:

  1. Oven 375°F / 190°C. Have ready one or two ungreased baking sheets.
  2. In a medium bowl whisk together flour, cocoa, baking soda, and salt.
  3. In another large bowl combine oil, sugar, brown sugar, egg, and vanilla. Carefully stir in wine. Stir in dry ingredients until fully incorporated, then add chocolate chips and cherries. Dough will be soft, but shouldn't be too soupy. If it is, add a touch more flour.
  4. Spoon little mounds onto a baking sheet and bake for 6-8 minutes, until edges look set but center still looks wet. Allow to cool for several minutes on baking sheet before transferring to a wire rack or counter to cool completely.
  5. Pairs wonderfully with...the remainder of the bottle of wine you used to make these...

Notes:

Feel free to use any kind of red wine you like for these! I have used the an Italian red, Savini Montepulciano d'Abruzzo Riserva with great success, and the cookies in the photos I used a French red, Côtes du Rhône. I chose to call these Burgundy because of the Burgundy wine region, which I think would be lovely in these, (the wine, not the region) and saying "Burgundy Cookies" is a whole lot easier than "Côtes du Rhône Cookies," no? And, red (wine) plus brown (chocolate) makes burgundy. Yes. Maybe. Some other good wines would a pinot noir, cabernet, or merlot.

Calories

140.06

Fat (grams)

4.82

Sat. Fat (grams)

1.84

Carbs (grams)

23.42

Fiber (grams)

1.24

Net carbs

22.18

Sugar (grams)

15.64

Protein (grams)

1.73

Sodium (milligrams)

104.48

Cholesterol (grams)

5.17
Nutritional information is approximate. Based on 1 cookie.
Did you make this recipe?
Tag @jenevamorris on instagram and hashtag it #jennyblogs
Created using The Recipes Generator

Salted Caramel Thumbprint Cookies

I'm not sure where August went off to, but happy September!  Sometimes when I think too much about time, and how fast it goes by (and I'm still young by most people's standards!!) I get a little nostalgic.  I'm sorry future self, I hear it only gets worse!  However, when that happens, sometimes it's best to make cookies.  And eat a few.  A recipe for success! Sorry couldn't resist...

Now, if you followed my lead and made lots of caramel last week, (then I left you hanging and didn't blog for a while, so sorry.  It's called: Apartment hunting in Italy) then you were probably wondering what to do with all of it.  A little on ice cream, a little in coffee, a little for dipping, a little in the freezer for emergency situations, and some left over for....these salted caramel thumbprint cookies! Or if you opted for the eating by spoonful, no worries, the recipe is still up and you can just go make some more, fret not!

This post may contain affiliate links. If you make a purchase using these links, Jennyblogs may receive a small commission, at no extra cost to you. This helps to support Jennyblogs. For further information see the privacy policy. Grazie!

Recipe adapted from The Busty Baker


Salted Caramel Thumbprint Cookies

Makes about 18 Cookies

Ingredients:

  • 3/4 cup / 90g all-purpose flour

  • 1/4 cup / 25g cocoa powder

  • 1/4 tsp salt

  • Scant 1/2 cup / 100g oil

  • 1/4 cup / 50g sugar, plus more for rolling

  • 1 egg yolk

  • 1/2 tsp vanilla extract

  • 2 oz / 60g semisweet chocolate or 1/3 cup chips, melted and cooled

  • 1 cup / 300g caramel sauce, or make a 1/2 recipe of this caramel sauce

Directions:

Oven 350°F / 177°C.  Line a baking sheet with parchment paper or silicone.

  1. In a medium bowl, whisk together flour, cocoa, and salt. 

  2. In a separate bowl, combine sugar and oil.  Beat in egg yolk and vanilla, then mix in melted chocolate, scraping down sides of bowl with a spatula as needed.  Add flour mixture and stir until just combined.  Dough will be soft.

  3. Place dough in fridge for about 20-30 minutes, or until dough thickens enough to be rolled into balls.  Alternately, place in the freezer to speed up the process. 

  4. Place some sugar in a small bowl.  Roll dough into about 1-inch balls, then roll in sugar.  Press thumb into the center of each cookie, place on cookie sheet and bake for about 8-10 minutes.  If centers have puffed up, remove from oven and press down again.  Return to oven and bake for 3-5 minutes more, until edges are cracked and set but center still looks soft.  Remove from baking sheet and allow to cool. 

  5. When cookies are almost cool, spoon caramel into centers.  Sprinkle with coarse sea salt. 

Jenny’s Notes:

  • Cookies still warm when caramel is added makes for ooey gooey drippy caramel...yes please!

Salted Caramel Thumbprint Cookies
Yield 18
Author
Prep time
15 Min
Cook time
15 Min
Inactive time
20 Min
Total time
50 Min

Salted Caramel Thumbprint Cookies

Decadent chocolate cookies with a pool of salted caramel in the middle.

Ingredients

Instructions

  1. Oven 350°F / 177°C. Line a baking sheet with parchment paper or silicone.
  2. In a medium bowl, whisk together flour, cocoa, and salt.
  3. In a separate bowl, combine sugar and oil. Beat in egg yolk and vanilla, then mix in melted chocolate, scraping down sides of bowl with a spatula as needed. Add flour mixture and stir until just combined. Dough will be soft.
  4. Place dough in fridge for about 20-30 minutes, or until dough thickens enough to be rolled into balls. Alternately, place in the freezer to speed up the process.
  5. Place some sugar in a small bowl. Roll dough into about 1-inch balls, then roll in sugar. Press thumb into the center of each cookie, place on cookie sheet and bake for about 8-10 minutes. If centers have puffed up, remove from oven and press down again. Return to oven and bake for 3-5 minutes more, until edges are cracked and set but center still looks soft. Remove from baking sheet and allow to cool.
  6. When cookies are almost cool, spoon caramel into centers. Sprinkle with coarse sea salt.

Notes

Cookies still warm when caramel is added makes for ooey gooey drippy caramel...yes please!

Nutrition Facts

Calories

194.68

Fat

11.94 g

Sat. Fat

4.17 g

Carbs

21.83 g

Fiber

0.61 g

Net carbs

21.23 g

Sugar

16.84 g

Protein

1.30 g

Sodium

51.79 mg

Cholesterol

24.50 mg

Nutritional information is approximate. Based on 1 cookie from a batch of 18, using Jenny's homemade caramel sauce.

chocolate thumbprint cookies, salted caramel, homemade caramel, caramel sauce
dessert
American
Did you make this recipe?
Tag @jennyblogsandbakes on instagram and hashtag it #jennyblogs

Espresso Oatmeal Cookies

Coffee. What a beautiful word.  It incites such eager anticipation, excitement, thirst, and general burst of energy even before drinking said caffeinated beverage.  It's loved the world over, with different ways and preferences for roasting, preparing, and consuming, but in the end it's something we share together, with our family, friends, and our early mornings and foggy brains. 

My mom's coffee bar. A nice mix of the Italian Moka pot on the left, an American drip coffee machine, Chemex, and a French Nespresso machine.

My mom's coffee bar. A nice mix of the Italian Moka pot on the left, an American drip coffee machine, Chemex, and a French Nespresso machine.

In Italy coffee is a way of life.  More or less espresso, because if you order a caffé or caffé normale, you will get a shot of espresso.  Drip coffee, or so to speak "normal" coffee for Americans is rare to find here.  Almost all of their drinks are espresso based and served in small espresso cups, such as cappuccino, macchiato, ristretto, etc. Whereas our coffee is served in large mugs and not nearly as strong, usually the smallest size being a 12 oz if you go to a coffee shop.  If you think about it, the Americano is aptly named, being watered down espresso.  And what is espresso?  Strong coffee.  So if you add water to strong coffee, what do you get?  A bigger cup of not as strong coffee, more similar to American coffee.  And we seem to like that quantity.  Soup bowls of it in the morning.  You know it, all the mugs with "Don't talk to me before coffee," "Coffee First," and the likes.  And we go out for coffee dates with friends that last an hour, two, or three.  And that 20 oz mug of coffee will last for almost that long. 

In Italy, you go to a bar, order your coffee at the bar, and throw that espresso back within a minute or two.  Sometimes you sit down, but usually only if you are with someone and are at your leisure.  Un caffé, or espresso, only costs 1 euro usually, so it doesn't set you back too far.  You're not dropping $5 on an Ethiopian single origin organic latte with raw honey and cardamom with a twist of lemon.  Actually, that sounds really good right now.  

Un cappuccino from News Caffé in Florence

Un cappuccino from News Caffé in Florence

Not to infer that Italians always drink their coffee out and at the bar, especially when they drink it throughout the day; something with milk for breakfast, such as a cappuccino, espresso to finish off the other meals and at any other time of the day that tickles their fancy. They also prepare their own at home as well, usually involving the beloved Moka pot.  According to my Italian workbook, the average Italian drinks 600 cups of caffé and cappuccino per year, and of these cups 70% are drunk at home while only 20% are drunk at a bar, and 10% at work. 

Another interesting tidbit about espresso is that the word "espresso" is the Italian past tense of "esprimere" or "to express."  The Italians love to express themselves (but who doesn't?) and I like to think of it as just another way in which they do that, in their art and passion for creating and drinking coffee.  It also denotes express meaning the speed in which the beverage is both prepared and consumed.  The express lane.  So don't be too harsh on your friends when they call espresso "expresso."  They're actually not as far off as we think.  But still, be a good friend and correct them.

Does all this talk of coffee leave you wanting some?  Me too.  And cookies.  But I always want cookies.  You know those people who sport the mugs saying not to talk to them before coffee? Yeah, I can be that way before cookies.  So today, cookies with espresso in them!!!

This post may contain affiliate links. If you make a purchase using these links, Jennyblogs may receive a small commission, at no extra cost to you. This helps to support Jennyblogs. For further information see the privacy policy. Grazie!

Adapted from She Bakes Here


Espresso Oatmeal Cookies

Makes about 30 small cookies

Ingredients:

  • 1 cup / 120g all-purpose flour

  • 1 1/4 cups / 100g oats

  • 1/4 cup / 25g cocoa powder

  • 1 tsp baking powder

  • 1/2 tsp baking soda

  • 1/4 tsp salt

  • 1/2 cup / 113g oil

  • 1/2 cup / 100g brown sugar

  • 1/2 cup / 100g sugar

  • 1 egg

  • 1 tsp / 5g vanilla extract

  • 2 tsp ground espresso beans, ground coffee, or instant coffee

  • 1 cup / 170g mini chocolate chips

Directions:

Preheat oven to 350°F / 177°C.

  1. In a large bowl, whisk together flour, oats, cocoa, baking powder, baking soda, and salt.

  2. In another large bowl, mix together oil, brown and white sugar.  Beat in the egg, vanilla, and espresso powder until well combined.

  3. Add the dry mixture and chocolate chips to wet mixture and mix until well combined. 

  4. Drop dough by spoonful onto cookie sheets and bake for 7-10 minutes or until edges are set and center still looks a touch wet.  Allow to cool for 1-2 minutes before removing from cookie sheet.

Jenny's Notes:

  • Only have white sugar or brown sugar on hand?  In a recipe such as this they can easily be substituted for each other.  You can use all white or all brown sugar.  In Italy true brown sugar is hard to find, and it can have a strong molasses taste. I frequently use all white sugar and eliminate the brown sugar here, I can't have all my desserts tasting like molasses and gingerbread and Christmas time! :)

cookies, oatmeal cookies, double chocolate oatmeal cookies, coffee cookies, espresso cookies, mocha cookies
dessert, cookies
American
Yield: 30
Author: Jennyblogs
Print
Espresso Oatmeal Cookies

Espresso Oatmeal Cookies

Decadent double chocolate oatmeal cookies livened up with espresso.
Prep time: 20 MinCook time: 10 MinTotal time: 30 Min

Ingredients:

  • 1 cup / 120g all-purpose flour
  • 1 1/4 cups / 100g oats
  • 1/4 cup / 25g cocoa powder
  • 1 tsp baking powder
  • 1/2 tsp baking soda
  • 1/4 tsp salt
  • 1/2 cup / 113g oil
  • 1/2 cup / 100g brown sugar
  • 1/2 cup / 100g sugar
  • 1 egg
  • 1 tsp / 5g vanilla extract
  • 2 tsp ground espresso beans, ground coffee, or instant coffee
  • 1 cup / 170g mini chocolate chips

Instructions:

  1. Preheat oven to 350°F / 177°C.
  2. In a large bowl, whisk together flour, oats, cocoa, baking powder, baking soda, and salt.
  3. In another large bowl, mix together oil, brown and white sugar. Beat in the egg, vanilla, and espresso powder until well combined.
  4. Add the dry mixture and chocolate chips to wet mixture and mix until well combined.
  5. Drop dough by spoonful onto cookie sheets and bake for 7-10 minutes or until edges are set and center still looks a touch wet. Allow to cool for 1-2 minutes before removing from cookie sheet.

Notes:

Only have white sugar or brown sugar on hand? In a recipe such as this they can easily be substituted for each other. You can use all white or all brown sugar.

Calories

119.65

Fat (grams)

5.97

Sat. Fat (grams)

1.35

Carbs (grams)

16.11

Fiber (grams)

0.95

Net carbs

15.17

Sugar (grams)

9.72

Protein (grams)

1.47

Sodium (milligrams)

60.91

Cholesterol (grams)

6.20
Nutritional information is approximate. Based on one cookie from a batch of 30.
Did you make this recipe?
Tag @jennyblogsandbakes on instagram and hashtag it #jennyblogs
Created using The Recipes Generator

No-Bake Pumpkin Date Bars

image.jpg

Happy Wednesday/Buon Mercoledì!! Still didn't quite make the "Baking Tuesday" but today I shall dub "Baking Wednesday."  And it shall be good.  And involve all things healthy disguised as dessert (did I just lose you? Don't go away just yet, I don't put gross food on my blog!), chocolate (there, now you'll stay), pumpkin, spice, and everything nice! Life is too short to eat and drink poorly.

"La vita è troppo breve per mangiare e bere male" - Eataly

These bars feature a creamy, pumpkin chocolate chip filling atop a wonderfully soft and chewy-sweet date crust. They can easily be made gluten-free, vegan, and dairy-free.  And you can eat them anytime for breakfast or a healthy snack (to be pronounced snaaaaaack with the Italian hand going) because there is no refined sugar (except from the chocolate chips), but there is protein from the beans, fiber from the oat flour and dates, antioxidants from the maple syrup and spices, and lots of vitamins and minerals from the pumpkin and above mentioned ingredients! 

You guys, this is such a win-win.  In fact, these bars might help you not die. 

That last claim is not backed by science. 

This post may contain affiliate links. If you make a purchase using these links, Jennyblogs may receive a small commission, at no extra cost to you. This helps to support Jennyblogs. For further information see the privacy policy. Grazie!

Adapted from Imma Eat That


No-Bake Pumpkin Date Bars

Serves about 9-12

image.jpg

Ingredients:

For the Date Crust

  • 1 cup / 160g packed pitted dates

  • 1 cup / 140g raw almonds

  • pinch of salt

For the Pumpkin Chocolate-Chip Filling

  • 1 15 oz can / 400g white beans, drained (navy beans, great northern, etc.)

  • 1 cup / 240g pumpkin purée

  • 1 cup / 100g oat flour

  • 1 1/2 tsp cinnamon

  • 1/4 tsp cloves

  • 1/4 tsp ginger

  • 1/4 tsp nutmeg

  • 1/4 tsp salt

  • 1/4 cup / 40g packed pitted dates

  • 5 Tbsp / 100g maple syrup or honey

  • 1 tsp / 5g vanilla extract

  • 2/3 cup / 113g semi-sweet mini chocolate chips, plus extra for topping

Directions:

Make the Date Crust

  1. In a food processor combine dates, almonds, and salt.  Pulse until the almonds are finely ground and everything comes together into a soft, crumbly dough that sticks together when pressed between your fingers.  If after a few minutes the crust doesn't come together, add a few more dates.

  2. Spread and press crust into a 8x8in / 20x20cm or 9x9in /23x23cm square pan.  Clean food processor, you are about to use it again.

Make the Pumpkin Chocolate-Chip Filling

  1. In the food processor, combine all the filling ingredients except for chocolate chips.  Blend until smooth.  Scrape filling into a bowl and stir in chocolate chips.  Spread over crust and top with more chocolate chips. 

  2. Cover and refrigerate for two hours before slicing and serving.  Of course, that's in an ideal world, if you just can't wait, it will be okay.  The center will just be softer.  (And I know this because...)

raw, vegan, dairy-free, egg-free, gluten-free, pumpkin bars, fall dessert, Thanksgiving
dessert, bars
American
Yield: 9-12
Author: Jennyblogs
Print
No-Bake Pumpkin Date Bars

No-Bake Pumpkin Date Bars

Raw Pumpkin Bars with an almond date crust topped with lightly sweetened pumpkin and chocolate chip filling. Vegan, Gluten-free, and dairy-free.
Prep time: 20 Mininactive time: 2 HourTotal time: 2 H & 20 M

Ingredients

For the Date Crust
  • 1 cup / 160g packed pitted dates
  • 1 cup / 140g raw almonds
  • pinch of salt
For the Pumpkin Chocolate-Chip Filling
  • 1 15 oz can / 400g white beans, drained (navy beans, great northern, etc.)
  • 1 cup / 240g pumpkin purée
  • 1 cup / 100g oat flour
  • 1 1/2 tsp cinnamon
  • 1/4 tsp cloves
  • 1/4 tsp ginger
  • 1/4 tsp nutmeg
  • 1/4 tsp salt
  • 1/4 cup / 40g packed pitted dates
  • 5 Tbsp / 100g maple syrup or honey
  • 1 tsp / 5g vanilla extract
  • 2/3 cup / 113g semi-sweet mini chocolate chips, plus extra for topping

Instructions

Make the Date Crust
  1. In a food processor combine dates, almonds, and salt. Pulse until the almonds are finely ground and everything comes together into a soft, crumbly dough that sticks together when pressed between your fingers. If after a few minutes the crust doesn't come together, add a few more dates.
  2. Spread and press crust into a 8x8in / 20x20cm or 9x9in /23x23cm square pan. Clean food processor, you are about to use it again.
Make the Pumpkin Chocolate-Chip Filling
  1. In the food processor, combine all the filling ingredients except for chocolate chips. Blend until smooth. Scrape filling into a bowl and stir in chocolate chips. Spread over crust and top with more chocolate chips.
  2. Cover and refrigerate for two hours before slicing and serving. 

Notes:

Vegan Version: Simply make sure your chocolate chips are vegan, as some brands contain dairy.

Gluten-free: Use certified gluten-free oats.

Dairy-free: Make sure your chocolate chips are dairy-free. 

  • Don't have oat flour? Make your own! Put the amount of oat flour you need of oats in a food processor or blender, plus a little extra, and blend until finely ground into flour! Tada.
  • If you like sweeter desserts, or are serving a crowd that isn't used to "healthy" desserts, you could always add up to an extra 1/2 cup / 100g or so of brown sugar to the filling.


Calories

360.82

Fat (grams)

12.91

Sat. Fat (grams)

3.10

Carbs (grams)

56.60

Fiber (grams)

9.02

Net carbs

47.58

Sugar (grams)

29.52

Protein (grams)

10.64

Sodium (milligrams)

24.38

Cholesterol (grams)

0.00
Nutritional information is approximate. Based on 9 servings.
Did you make this recipe?
Tag @jennyblogsandbakes on instagram and hashtag it #jennyblogs
Created using The Recipes Generator
image.jpg

Jenny's Notes:

Vegan Version: Simply make sure your chocolate chips are vegan, as some brands contain dairy.

Gluten-free: Use certified gluten-free oats.

Dairy-free: Make sure your chocolate chips are dairy-free.  Easy, no?

  • Don't have oat flour? Make your own! Put the amount of oat flour you need of oats in a food processor or blender, plus a little extra, and blend until finely ground into flour! Tada.

  • If you like sweeter desserts, or are serving a crowd that isn't used to "healthy" desserts, you could always add up to an extra 1/2 cup / 100g or so of brown sugar to the filling.

Maple syrup made by my dad, home-ground oat flour, dry beans, homemade vanilla extract

Maple syrup made by my dad, home-ground oat flour, dry beans, homemade vanilla extract


Peanut Butter Cheesecake Bars

IMG_4192.jpg

Bars. Like cookies, but without all the rolling and fussing. Just…plopping in a pan and baking. I like it.

These bars are extra special because they are cheesecake bars. I really like cheesecake.  I mean creamy, not overpoweringly sweet, with a bit of graham cracker accompanying each bite.  Good morning, sunshine!  I also really like chocolate and peanut butter.  So today let's make some peanut butter cheesecake bars with chocolate chips. 

Fair warning: These particular bars can be very difficult to make.  You have to be able to resist eating all of the dough.  If you can do that, then the actual making of these are quite simple.  Va bene? Va bene.

This post may contain affiliate links. If you make a purchase using these links, Jennyblogs may receive a small commission, at no extra cost to you. This helps to support Jennyblogs. For further information see the privacy policy. Grazie!

Adapted from Pinch of Yum


Peanut Butter Cheesecake Bars

Serves 9-12

Ingredients:

For the Peanut Butter Chocolate Chip Cookie Dough

image.jpg
  • 6 Tbsp / 84g oil

  • 1/2 cup / 100g sugar

  • 1/2 cup / 100g brown sugar

  • 1/2 cup / 130g peanut butter

  • 1 egg

  • 1 cup / 120g all-purpose flour

  • 1 tsp baking soda

  • 1/2 tsp salt

  • 1/2 cup / 40g rolled oats

  • 1 1/2 cups / 255g mini chocolate chips

For the Cream Cheese Filling

  • 8 oz / 225g cream cheese, room temperature

  • 1/4 cup / 50g sugar

  • 1 egg

  • 1 tsp / 5g vanilla

Directions:

Oven preheated to 325°F / 163°C

Make the Peanut Butter Chocolate Chip Cookie Dough

  1. Mix together the oil, sugars, and peanut butter in a large bowl until well combined.  Add the egg and beat well.

  2. In a separate bowl, whisk together flour, baking soda, salt, and oats.

  3. Stir flour mixture into sugar mixture, then add chocolate chips and stir until evenly distributed. Set aside.

Make the Cream Cheese Filling

  1. Beat cream cheese in a stand mixer or with a handheld mixer until smooth, about 30 seconds. Add sugar, egg, and vanilla and beat until thoroughly combined. 

Assembly

  1. Press half of the cookie dough into the bottom of an 8x8in / 20x20cm or 9x9in / 23x23cm pan.  Pour and spread cream cheese filling evenly over dough.  Using your hands, crumble the remaining half of cookie dough over cream cheese until it is thoroughly covered.

  2. Cover with tinfoil and bake for 15 minutes.  Remove foil and continue to bake for another 10-15 minutes, until cream cheese center is almost set and the top is lightly golden brown. 

cheesecake, bars, peanut butter chocolate chip cookie cheesecake bars, peanut butter oatmeal, cream cheese
dessert, bars, cheesecake
American
Yield: 9-12
Author: Jennyblogs
Print
Peanut Butter Cheesecake Bars

Peanut Butter Cheesecake Bars

Layers of peanut butter chocolate chip and oat cookie layers with a cheesecake filling.
Prep time: 25 MinCook time: 30 MinTotal time: 55 Min

Ingredients

For the Peanut Butter Chocolate Chip Cookie Dough
  • 6 Tbsp / 84g oil
  • 1/2 cup / 100g sugar
  • 1/2 cup / 100g brown sugar
  • 1/2 cup / 130g peanut butter
  • 1 egg
  • 1 cup / 120g all-purpose flour
  • 1 tsp baking soda
  • 1/2 tsp salt
  • 1/2 cup / 40g rolled oats
  • 1 1/2 cups / 255g mini chocolate chips
For the Cream Cheese Filling
  • 8 oz / 225g cream cheese, room temperature
  • 1/4 cup / 50g sugar
  • 1 egg
  • 1 tsp / 5g vanilla

Instructions

Make the Peanut Butter Chocolate Chip Cookie Dough
  1. Mix together the oil, sugars, and peanut butter in a large bowl until well combined. Add the egg and beat well.
  2. In a separate bowl, whisk together flour, baking soda, salt, and oats.
  3. Stir flour mixture into sugar mixture, then add chocolate chips and stir until evenly distributed. Set aside.
Make the Cream Cheese Filling
  1. Beat cream cheese in a stand mixer or with a handheld mixer until smooth, about 30 seconds. Add sugar, egg, and vanilla and beat until thoroughly combined.
Assembly
  1. Oven preheated to 325°F / 163°C
  2. Press half of the cookie dough into the bottom of an 8x8in / 20x20cm or 9x9in / 23x23cm pan. Pour and spread cream cheese filling evenly over dough. Using your hands, crumble the remaining half of cookie dough over cream cheese until it is thoroughly covered.
  3. Cover with tinfoil and bake for 15 minutes. Remove foil and continue to bake for another 10-15 minutes, until cream cheese center is almost set and the top is lightly golden brown.

Calories

596.11

Fat (grams)

34.98

Sat. Fat (grams)

12.70

Carbs (grams)

62.57

Fiber (grams)

2.60

Net carbs

59.97

Sugar (grams)

44.08

Protein (grams)

10.24

Sodium (milligrams)

458.31

Cholesterol (grams)

73.10
Nutritional information is approximate. Based on 9 servings.
Did you make this recipe?
Tag @jennyblogsandbakes on instagram and hashtag it #jennyblogs
Created using The Recipes Generator
image.jpg

Chocolate Brownie Cookies

Cioccolato Cioccolato Cioccolato!

Cioccolato Cioccolato Cioccolato!

Don't be fooled, these cookies are nothing more than a chocolate bar with a few added ingredients to allow them to be legally called "cookies."  In trying to decide what to call these, Chocolate Candy Bar Cookies and True Chocolate Cookies were contending, but I can thank some taste testers for calling them out for what they really taste like: fudgy brownies in cookie form!  Oh yes, they be so chocolatey, so fudgy, so soft. 

This post may contain affiliate links. If you make a purchase using these links, Jennyblogs may receive a small commission, at no extra cost to you. This helps to support Jennyblogs. For further information see the privacy policy. Grazie!

Recipe adapted from the Clinton St. Baking Company Cookbook


Chocolate Brownie Cookies

Makes about 24 cookies

Ingredients:

  • 2 Tbsp / 28g oil

  • 14 oz / 400g chopped quality semi-sweet or bitter-sweet chocolate

  • 2 large eggs

  • 3/4 cup / 150g sugar

  • 1/2 tsp vanilla extract

  • 1/2 cup / 60g all-purpose flour

  • 1/4 tsp baking powder

  • 1/4 tsp salt

Directions:

Oven preheated to 350°F / 177°C. Line two cookie sheets with parchment paper.

  1. In a medium saucepan combine oil and 7 oz / 200g of the chopped chocolate, .  Melt over medium-low heat, stirring frequently, until chocolate is mostly melted.  Remove from heat and continue to stir until chocolate is completely melted.  Set aside.

  2. In a medium-large bowl, whisk together eggs, sugar, and vanilla until well combined.  Stir the melted chocolate mixture into the egg mixture.  It's okay if it is still a little warm. 

  3. In a separate bowl, whisk together flour, baking powder, and salt.  Stir flour mixture and remaining 7 oz of chocolate chunks into chocolate mixture until well combined. 

  4. Place the bowl with the chocolate mixture in the freezer for 15-25 minutes.  Check and stir the dough every 5 minutes or so until batter has thickened and set up.

  5. Drop small spoonfuls of dough evenly spaced on the prepared cookie sheets, leaving about 2 in / 5 cm between the cookies as they will spread quite a bit.  About 12 cookies will fit on a standard sheet.  

  6. Bake for 6-8 minutes or until cookies start to crackle and the edges set. 

  7. Remove from the oven and allow to cool for several minutes before transferring to a wire cooling rack or plate.  Or counter.  Or mouth.  Whatever floats your boat with these!  Maybe just don't eat all of them or your boat will sink...

cookies, brownies, chocolate crackle cookies
dessert, cookies
American
Yield: 24
Author:
Chocolate Brownie Cookies

Chocolate Brownie Cookies

Rich, fudgy, chewy chocolate cookies that are mostly made of pure chocolate with just enough other ingredients to politely be able to be called "cookies".
Prep time: 45 MinCook time: 8 Mininactive time: 25 MinTotal time: 1 H & 18 M

Ingredients

Instructions

  1. Oven preheated to 350°F / 177°C. Line two cookie sheets with parchment paper.
  2. In a medium saucepan combine oil and 7 oz / 200g of the chopped chocolate, . Melt over medium-low heat, stirring frequently, until chocolate is mostly melted. Remove from heat and continue to stir until chocolate is completely melted. Set aside.
  3. In a medium-large bowl, whisk together eggs, sugar, and vanilla until well combined. Stir the melted chocolate mixture into the egg mixture. It's okay if it is still a little warm.
  4. In a separate bowl, whisk together flour, baking powder, and salt. Stir flour mixture and remaining 7 oz of chocolate chunks into chocolate mixture until well combined.
  5. Place the bowl with the chocolate mixture in the freezer for 15-25 minutes. Check and stir the dough every 5 minutes or so until batter has thickened and set up.
  6. Drop small spoonfuls of dough evenly spaced on the prepared cookie sheets, leaving about 2 in / 5 cm between the cookies as they will spread quite a bit. About 12 cookies will fit on a standard sheet.
  7. Bake for 6-8 minutes or until cookies start to crackle and the edges set.
  8. Remove from the oven and allow to cool for several minutes before transferring to a wire cooling rack or plate. 

Calories

139.00

Fat (grams)

6.53

Sat. Fat (grams)

3.29

Carbs (grams)

18.11

Fiber (grams)

0.63

Net carbs

17.48

Sugar (grams)

14.85

Protein (grams)

2.06

Sodium (milligrams)

48.51

Cholesterol (grams)

19.33
Nutritional information is approximate; based on 1 cookie.
Did you make this recipe?
Tag @jennyblogsandbakes on instagram and hashtag it #jennyblogs
Oh, the symphony of crackle!

Oh, the symphony of crackle!


Healthy Chocolate Chip Banana Cookies

image.jpg

What has chocolate and oats in it, tastes like a cookie, but is sneakily nutritious for you?  These cookies!  Yay for things that taste good and are healthy simultaneously.  And don't forget fun to make!  So many wins, I want to make these all over again.  Instead, I shall have just as much fun writing out the recipe for you.

These cookies make an excellent on the go snack or breakfast. They’re easily gluten-free if you use certified GF oats, dairy-free (just make sure your chocolate chips don’t have any dairy hiding in them), and vegan if you use a flax or chia seed egg! See recipe notes for how to make a flax egg.

All of the sweetness in these cookies comes from dates and banana, with a boost from the chocolate chips.

This post may contain affiliate links. If you make a purchase using these links, Jennyblogs may receive a small commission, at no extra cost to you. This helps to support Jennyblogs. For further information see the privacy policy. Grazie!

Recipe adapted from Veggies Don't Bite


Chocolate Chip Banana Cookies

Makes about 30 cookies

Ingredients:

image.jpg
  • 1 1/3 cups / 215g pitted dates (about 15 regular dates or 12 medjool)

  • 1/4 cup / 60g almond milk (or milk of choice)

  • 1/2 cup / 130g peanut butter

  • 1 small / 80g very ripe banana, mashed

  • 1 egg

  • 1 1/2 tsp / 7g vanilla extract

  • 1 cup / 80g rolled oats

  • 1/2 tsp baking soda

  • 1/2 tsp salt

  • 2 cups / 340g semi-sweet chocolate chips

  • 1/2 cup / 62g chopped pecans (optional)

Directions:

Preheat oven to 350°F / 177°C. Prepare 1 or 2 cookie sheets lined with parchment paper or silpat.

  1. In a food processor, blend dates until very finely chopped.  Slowly add milk and continue to blend until a smooth paste forms.  (Be careful adding the milk as it may splatter; food processors aren’t always splatter proof.) 

  2. Add peanut butter, banana, egg, and vanilla to the date paste and mix well. 

  3. In a separate bowl whisk together oats, baking soda, and salt.  Add to date mixture.

  4. Stir in chocolate chips and pecans just until combined.  Refrigerate dough for 15 minutes. 

  5. Drop by spoonful onto prepared cookie sheets and bake for 12-15 minutes until edges start to turn lightly golden.  Allow cookies to cool and set a bit before removing from pan. 

Jenny's Notes:

  • These can easily be made vegan, dairy and/or gluten-free: Make a flax egg instead of a normal egg by adding 1 Tbsp ground flax seeds to 3 Tbsp water, use vegan chocolate chips (usually this means just making sure there is no dairy), use certified GF oats and vanilla extract.  Voila!  Now anyone can eat these delicious morsels. 

chunky monkey cookies, vegan, dairy free, gluten free, egg free, refined sugar free, chocolate chip banana cookies, healthy
dessert, cookies
American
Yield: 30
Author:
Healthy Chocolate Chip Banana Cookies

Healthy Chocolate Chip Banana Cookies

Chocolate Chip Banana Cookies loaded with oats, peanut butter, chocolate chips, and pecans are easily made vegan, gluten-free, dairy-free, egg-free! Most of the sweetness comes from dates and banana.
Prep time: 15 MinCook time: 15 Mininactive time: 15 MinTotal time: 45 Min

Ingredients

Instructions

  1. Preheat oven to 350°F / 177°C. Prepare 1 or 2 cookie sheets lined with parchment paper or silpat.
  2. In a food processor, blend dates until very finely chopped. Slowly add milk and continue to blend until a smooth paste forms. (Be careful adding the milk as it may splatter; food processors aren’t always splatter proof.)
  3. Add peanut butter, banana, egg, and vanilla to the date paste and mix well.
  4. In a separate bowl whisk together oats, baking soda, and salt. Add to date mixture.
  5. Stir in chocolate chips and pecans just until combined. Refrigerate dough for 15 minutes.
  6. Drop by spoonful onto prepared cookie sheets and bake for 12-15 minutes until edges start to turn lightly golden. Allow cookies to cool and set a bit before removing from pan.

Notes:

These can easily be made vegan, dairy and/or gluten-free: Make a flax egg instead of a normal egg by adding 1 Tbsp ground flax seeds to 3 Tbsp water, use vegan chocolate chips (usually this means just making sure there is no dairy), use certified GF oats and vanilla extract.  Voila!  Now anyone can eat these delicious morsels. 

Calories

130.36

Fat (grams)

7.42

Sat. Fat (grams)

2.64

Carbs (grams)

16.47

Fiber (grams)

2.03

Net carbs

14.43

Sugar (grams)

11.53

Protein (grams)

2.39

Sodium (milligrams)

84.40

Cholesterol (grams)

6.20
Nutritional information is approximate; based on 30 serving, includes pecans.
Did you make this recipe?
Tag @jennyblogsandbakes on instagram and hashtag it #jennyblogs
image.jpg

Hershey's Chewy Brownie Pie

Hershey’s Chewy Brownie Pie is like a chewy, slightly cakey blondie with bits of Oreo and smothered in a sweetened condensed milk glaze with melty chocolate chips.

After that description, you might agree with me that the name of this doesn’t really prepare you for what you’re about to eat. Hershey’s I associate with chocolate. Chewy, sure. Brownies are usually, well, brown. And pie? Pies usually have a crust. This does not have a crust and I don’t know what makes it a brownie pie other than it being round? Whatever category this best fits in, what we do know is that it’s a dessert, and it’s delicious. It’s also easy to make, unless you like to make things complicated like me, then you can make your own homemade sweetened condensed milk. Which is not hard, but does add in one more step. Whatever you call and however you make it, I love this Hershey’s Brownie Pie Thing.

The base is made with a Hershey’s Cookies ‘N’ Cream bar. This is a specialty product I’ve never seen in Europe. If you’ve never had one, it’s just a white chocolate Hershey chocolate bar with bits of Oreo cookie in it. They remind of me my childhood.  I probably only had one a handful of times, but I have a couple very fond memories of my mom letting my brother and me have one. For my European friends, you could try substituting white chocolate with some Oreo cookies crushed into small chunks, or even using just white chocolate.

The original recipe uses a can of sweetened condensed milk, but I made my own for the first time this week, and I like it so much better!  Not to mention no BPA from the can, and you can use organic milk and sugar.  Win win.  Plus you can nonchalantly throw out that the sweetened condensed milk is made from scratch when people ask you what it is or what's in it.  Win win win.

I tweaked a couple other small details in the recipe to make it a little less rich, but it's pretty delicious.  

This post may contain affiliate links. If you make a purchase using these links, Jennyblogs may receive a small commission, at no extra cost to you. This helps to support Jennyblogs. For further information see the privacy policy. Grazie!

Recipe adapted from Fahrenheit 350


Hershey's Chewy Brownie Pie

Serves 8-12

Ingredients

For the brownie:

  • 6.5 oz / 184g Hershey's Cookies 'N' Cream Candy Bar (that’s 1 giant bar)

  • 1/2 cup / 100g sugar

  • 1/2 cup / 113g salted butter

  • 2 eggs, lightly beaten

  • 1 tsp / 5g vanilla

  • 1 cup / 120g all-purpose flour

  • 1/2 tsp baking powder

For the topping:

Directions

Preheat oven to 350°F / 177°C.  Grease a 9in / 23cm spring-form pan.

Make the brownie:

  1. In a small saucepan, combine Cookies 'N' Cream bar, sugar, and butter over low heat just until melted, stirring occasionally. 

  2. Remove from heat and whisk in eggs and vanilla.

  3. Stir in flour and baking powder just until combined. 

  4. Pour into prepared pan and bake for 15-18 minutes or until edges are lightly golden brown and toothpick inserted near the center comes out clean. 

Add the topping:

  1. Immediately pour sweetened condensed milk over brownie, spreading to the edges.  Sprinkle on the chocolate chips.  Allow to cool before removing outer ring of spring-form pan and cutting. 

Jenny's Notes:

  • Want it denser and richer?  Omit the baking powder from the brownie and layer more mini chocolate chips on top.  Want it less rich?  Simply reduce the sugar in the brownie! Keep in mind that reducing sugar may result in a less chewy and more cakey brownie.

  • If you don’t have a springform pan, you could use a cake pan in its stead.

Blondie, White chocolate brownie, Oreo brownie, sweetened condensed milk brownie
Dessert, Bars
American
Yield: 8-12
Author:
Hershey's Chewy Brownie Pie

Hershey's Chewy Brownie Pie

A chewy, white chocolate brownie flecked with Oreo chunks, topped with a sweetened condensed milk glaze and melty chocolate chips.
Prep time: 15 MinCook time: 18 MinTotal time: 33 Min

Ingredients

For the Brownie
For the Topping

Instructions

Make the Brownie
  1. Preheat oven to 350°F / 177°C. Grease a 9in / 23cm spring-form pan.
  2. In a small saucepan, combine Cookies 'N' Cream bar, sugar, and butter over low heat just until melted, stirring occasionally.
  3. Remove from heat and whisk in eggs and vanilla.
  4. Stir in flour and baking powder just until combined.
  5. Pour into prepared pan and bake for 15-18 minutes or until edges are lightly golden brown and toothpick inserted near the center comes out clean.
Add the Topping
  1. Immediately pour sweetened condensed milk over brownie, spreading to the edges. Sprinkle on the chocolate chips. Allow to cool before removing outer ring of spring-form pan and cutting.

Notes:

  • Want it denser and richer?  Omit the baking powder from the brownie and layer more mini chocolate chips on top.  Want it less rich?  Simply reduce the sugar in the brownie! Keep in mind that reducing sugar may result in a less chewy and more cakey brownie.
  • If you don’t have a springform pan, you could use a cake pan in its stead.


Calories

484.70

Fat (grams)

24.51

Sat. Fat (grams)

14.74

Carbs (grams)

58.68

Fiber (grams)

1.33

Net carbs

47.85

Sugar (grams)

42.43

Protein (grams)

7.55

Sodium (milligrams)

204.36

Cholesterol (grams)

88.45

Nutritional information is approximate. Based on 1 serving if the pie is cut into 8 servings.

Did you make this recipe?
Tag @jennyblogsandbakes on instagram and hashtag it #jennyblogs
Created using The Recipes Generator

Biscoff Oreo Layer Bars

Bucca di Beppo, using the proper snaaaack hand.

Bucca di Beppo, using the proper snaaaack hand.

You had me at Biscoff.  Then you had me again at Oreo.  These bars are decadent and disappear quickly.  I had barely pulled them out of the oven when my nieces and nephews appeared at the door looking to see if we had any "snacks." (To be said, "snaaaaaacks," with the Italian hand gesture.)  Normally these bars should be cooled and chilled before slicing, but in this instance we used bowls and spoons to scoop up the warm, melty, ooey-gooey, Biscoff Oreo-ness with a hint of peanut butter atop a shortbread crust.  I practically had to put caution tape around the remaining few bars so I could get a picture of them before they all disappeared.  I don't own caution tape, but I think it would be a very handy thing to have around. 

This post may contain affiliate links. If you make a purchase using these links, Jennyblogs may receive a small commission, at no extra cost to you. This helps to support Jennyblogs. For further information see the privacy policy. Grazie!

Recipe adapted from Call Me PMc


Biscoff Oreo Layer Bars

Ingredients:

For the Crust

  • 1 1/3 cup / 160g all-purpose flour

  • 3/4 cup / 150g brown sugar

  • 6 Tbsp / 85g salted butter, cold, cut into cubes (3/4 of a stick)

For the Layers

  • 1/3 cup / 59g peanut butter chips

  • 12 Oreo cookies, crushed (You could always use more, my Oreo loving friends)

  • 14 oz can / 398g sweetened condensed milk

  • 1/2 cup Biscoff spread

Directions:

Oven preheated to 350° / 177°C

Make the Crust

  1. Lightly grease an 8x8inch / 20x20cm pan. 

  2. In a food processor pulse together flour and sugar.  Add butter, one cube at a time.  Continue to pulse until mixture looks like wet sand and will hold together when pressed between your fingers.  Press evenly into prepared pan.

Make the Layers

  1. Sprinkle peanut butter chips evenly over crust, then the Oreos. 

  2. In a small bowl whisk together sweetened condensed milk and Biscoff until smooth.  Pour over crust and spread to evenly cover Oreos.

  3. Bake for 20-22 minutes or until edges are lightly golden and center is just set.  The filling will go from shiny to matte, forming a sort of skin over the top. 

  4. Place in the fridge until completely cool.  Cut and serve.  Store covered in the fridge.

Jenny's Notes:

  • Don't sweat if you only have unsalted butter.  To interchange unsalted for salted butter, just add 1/4 tsp salt for every 1 stick of unsalted butter.  And vice versa, if you only have salted butter and a recipe calls for 1 stick of unsalted butter and salt, just omit the salt and replace unsalted butter with salted.  I just stared at the word "salt" for too long and now it looks very strange.  Salt.  Huh.

  • ALSO.  You could use the crunchy Biscoff spread in this and I think that would be amaze-za-zing.  I haven't gotten a chance to try it yet but if you do let me know and invite me over.  :)

Biscoff bars, biscoff caramel, shortbread bars, oreo caramel bars
dessert
American
Yield: 12-16
Author:
Biscoff Oreo Layer Bars

Biscoff Oreo Layer Bars

Shortbread crust with Oreos, Biscoff caramel, and peanut butter chips
Prep time: 25 MinCook time: 22 Mininactive time: 1 HourTotal time: 1 H & 47 M

Ingredients

For the Crust
For the Layers

Instructions

Make the Crust
  1. Oven preheated to 350° / 177°C
  2. Lightly grease an 8x8inch / 20x20cm pan.
  3. In a food processor pulse together flour and sugar. Add butter, one cube at a time. Continue to pulse until mixture looks like wet sand and will hold together when pressed between your fingers. Press evenly into prepared pan.
Make the Layers
  1. Sprinkle peanut butter chips evenly over crust, then the Oreos.
  2. In a small bowl whisk together sweetened condensed milk and Biscoff until smooth. Pour over crust and spread to evenly cover Oreos.
  3. Bake for 20-22 minutes or until edges are lightly golden and center is just set. The filling will go from shiny to matte, forming a sort of skin over the top.
  4. Place in the fridge until completely cool. Cut and serve. Store covered in the fridge.

Notes:

Don't sweat if you only have unsalted butter.  To interchange unsalted for salted butter, just add 1/4 tsp salt for every 1 stick of unsalted butter.  And vice versa, if you only have salted butter and a recipe calls for 1 stick of unsalted butter and salt, just omit the salt and replace unsalted butter with salted.


ALSO.  You could use the crunchy Biscoff spread in this and I think that would be amaze-za-zing.

Nutrition Facts

Calories

393.06

Fat (grams)

16.94

Sat. Fat (grams)

7.20

Carbs (grams)

56.29

Fiber (grams)

1.07

Net carbs

55.22

Sugar (grams)

39.04

Protein (grams)

5.59

Sodium (milligrams)

174.15

Cholesterol (grams)

26.55

Nutritional info is approximate. Based on 12 servings.

Did you make this recipe?
Tag @jennyblogsandbakes on instagram and hashtag it #jennyblogs

Peanut Butter Truffle Brownies

These aren't just any brownies.  They are ooey and gooey with a layer of peanut butter truffle, topped with chocolate ganache.  Did I mention you can also make the peanut butter truffle layer with Nutella? Well, yes, yes you can. 

Lately I've been experimenting with different takes on brownies.  If you've ever compared brownie recipes, you might have noticed that some recipes include a leavening agent, such as baking powder, while others don't, some use melted chocolate in the batter, and others only cocoa powder. 

Which is best?  This comes down to personal preference, but if you prefer that fudgy, dense brownie with a rich chocolate taste, I've found the most success without using a leavening agent and plenty of cocoa powder.  I couldn't taste a significant enough difference in chocolatey-ness if I included melted chocolate in the batter or not.  And for the trouble, I prefer sticking to a quality cocoa powder.  Sorry Hershey, you just don't cut it.  (I find their cocoa bland, lacking in that wonderful depth of flavor and buttery-ness that should come from chocolate.)  I love Saco Premium Baking Cocoa, Guittard, and Pernigotti.  I've heard wonderful things about Valrhona, but haven't had a chance to try it yet.  For these brownies, I used Saco.

This post may contain affiliate links. If you make a purchase using these links, Jennyblogs may receive a small commission, at no extra cost to you. This helps to support Jennyblogs. For further information see the privacy policy. Grazie!

Recipe adapted from Some Kitchen Stories


Peanut Butter Truffle Brownies

Makes about 24 servings

Ingredients:

For the Brownies

  • 3/4 cup / 169g oil

  • 2 cups / 400g sugar

  • 3 eggs

  • 3 tsp / 15g vanilla

  • 2/3 cup / 67g cocoa powder

  • 1/2 tsp salt

  • 1 cup / 120g all-purpose flour

For the Peanut Butter Truffle

  • 1/2 cup / 113g butter (1 stick), room temperature

  • 1/2 cup / 130g creamy peanut butter

  • 2 cups / 250g powdered sugar

  • 2-3 tsp / 10-15g milk

For the Ganache

  • 1/4 cup / 65g creamy peanut butter

  • 2 cups / 340g semi-sweet chocolate chips

  • 1/4 cup / 56g butter (1/2 stick)

  • 2 Tbsp / 30g heavy whipping cream

Directions:

Make the Brownies

Oven 350°F / 177°C.  Lightly grease a 9x13in / 23x33cm pan.

  1. In a large mixing bowl, combine oil and sugar.  Beat in eggs and vanilla.  Add cocoa powder and salt.  Mix in flour until just combined. 

  2. Pour into prepared pan and bake for 25-30 minutes, until toothpick inserted off center comes out mostly clean.  Allow to cool.

Make the Peanut Butter Truffle

  1. While the brownies are cooling, combine butter, peanut butter, and powdered sugar in the bowl of a stand mixer and beat until light and fluffy. 

  2. Add in 2 teaspoons of milk and beat.  The mixture should be spreadable.  If not, add another teaspoon of milk.

  3. Spread onto cooled brownies and place in the fridge to set the truffle layer. 

Make the Ganache

  1. While the filling sets, place a small saucepan with a small amount of water on the stove over low heat.  Place peanut butter, chocolate chips, butter, and whipping cream in a small glass or metal bowl and place over simmering water on the stove. The bottom of the bowl shouldn't touch the water.  Stir just until all the chocolate and butter is melted, and remove from heat.

  2. Remove brownies from fridge and spread ganache over the top.  Return to fridge and chill until set.

Nutella Version:

In the Peanut Butter Truffle replace the peanut butter with Nutella and add 1 1/4 cups / powdered sugar with 3/4 cup flour, instead of 2 cups powdered sugar.  Cuts the sweetness since Nutella is sweetened and Peanut Butter usually is not, or minimally so. 

For the Ganache replace the peanut butter with Nutella. 

Proceed as normal.

Jenny's Notes:

  • These are rich and delicious, small portions go a long way.  I often cut the recipe in half and bake in an 8x8inch / 20x20cm pan. 

brownies, truffle, peanut butter, ganache
dessert
American
Yield: 24
Author:
Peanut Butter Truffle Brownies

Peanut Butter Truffle Brownies

Chocolate brownies with a creamy peanut butter truffle layer topped with rich chocolate ganache
Prep time: 40 MinCook time: 30 MinInactive time: 1 HourTotal time: 2 H & 10 M

Ingredients

For the Brownies
For the Peanut Butter Truffle
For the Ganache

Instructions

Make the Brownies
  1. Oven 350°F / 177°C. Lightly grease a 9x13in / 23x33cm pan.
  2. In a large mixing bowl, combine oil and sugar. Beat in eggs and vanilla. Add cocoa powder and salt. Mix in flour until just combined.
  3. Pour into prepared pan and bake for 25-30 minutes, until toothpick inserted off center comes out mostly clean. Allow to cool.
Make the Peanut Butter Truffle
  1. While the brownies are cooling, combine butter, peanut butter, and powdered sugar in the bowl of a stand mixer and beat until light and fluffy.
  2. Add in 2 teaspoons of milk and beat. The mixture should be spreadable. If not, add another teaspoon of milk.
  3. Spread onto cooled brownies and place in the fridge to set the truffle layer.
Make the Ganache
  1. While the filling sets, place a small saucepan with a small amount of water on the stove over low heat. Place peanut butter, chocolate chips, butter, and whipping cream in a small glass or metal bowl and place over simmering water on the stove. The bottom of the bowl shouldn't touch the water. Stir just until all the chocolate and butter is melted, and remove from heat.
  2. Remove brownies from fridge and spread ganache over the top. Return to fridge and chill until set.

Notes

  • These are rich and delicious, small portions go a long way.  I often cut the recipe in half and bake in an 8x8inch / 20x20cm pan. 


Nutrition Facts

Calories

386.73

Fat

23.84 g

Sat. Fat

8.86 g

Carbs

35.36 g

Fiber

2.58 g

Net carbs

32.79 g

Sugar

16.18 g

Protein

4.52 g

Sodium

139.31 mg

Cholesterol

38.06 mg

Nutritional information is approximate; based on 24 servings.

Did you make this recipe?
Tag @jennyblogsandbakes on instagram and hashtag it #jennyblogs

Toasted Coconut Toffee Cookies

These Toasted Coconut Toffee Cookies are a new favorite of mine. I can’t get enough!

It is similar to a chocolate chip cookie, just add a handful of freshly toasted coconut and toffee bits.  The dough alone is magical.  The first time I ever made these the dough barely made it in the oven because it was in my mouth.  I think I made a note at the bottom of the recipe something to the effect of "KEEP THIS RECIPE FOREVER."  And here it is, yours to hold and keep and eat forever until death do you part.

This post may contain affiliate links. If you make a purchase using these links, Jennyblogs may receive a small commission, at no extra cost to you. This helps to support Jennyblogs. For further information see the privacy policy. Grazie!

Recipe adapted from Let's Dish Recipes


Toasted Coconut Toffee Cookies

Makes 40-50 smallish cookies (or less, depending on how much dough is consumed before baking)

Ingredients:

  • 2 cups / 160g shredded coconut, unsweetened

  • 1 3/4 cups / 210g all-purpose flour

  • 1 tsp baking powder

  • 1/2 tsp baking soda

  • 1/4 tsp salt

  • 1 1/2 cups / 300g brown sugar

  • 1/2 cup / 113g oil

  • 2 tsp / 10g vanilla extract

  • 2 eggs

  • 1 8 oz / 227g bag Heath Bits O Brickle or Toffee bits

  • 1 1/2 cups / 255g semi-sweet chocolate chips

Directions:

Preheat oven to 350°F / 177°C.

  1. Arrange coconut in an even layer on a large baking sheet or pan.  Bake in preheated oven for 5-8 minutes or until fragrant and lightly golden brown, stirring occasionally.

  2. While the coconut is toasting, whisk together flour, baking powder, baking soda, and salt in a medium bowl. 

  3. In another bowl, mix brown sugar and oil together.  Add vanilla and eggs and beat well.  Add dry ingredients and mix. 

  4. By this time your coconut should be done.*  Add coconut, toffee, and chocolate chips to dough and mix until just combined. 

  5. Place by small spoonful onto cookie sheet.  Bake for 6-8 minutes, or until edges are just golden and the center still looks soft and doughy. 

Jenny's Notes:

  • Coconut goes quickly from perfectly golden to burnt, so keep a close eye on it!

  • Feel free to use shredded, flaked, and desiccated coconut interchangeably, but keep in mind certain kinds, like shredded, are almost always sold sweetened.  You may need to adjust your toasting time accordingly: More time for flaked, less for desiccated. 

  • *I like to add the coconut to the dough while it's still warm from the oven, thus melting the chocolate chips a tad and creating a chocolate swirl in the batter.  Just be careful not to over mix.

chocolate chip cookies, toasted coconut, Heath toffee
dessert, cookies
American
Yield: 40-50 cookies
Author:
Toasted Coconut Toffee Cookies

Toasted Coconut Toffee Cookies

Cookies loaded with chocolate chips, toasted coconut, and toffee bits.
Prep time: 20 MinCook time: 24 MinTotal time: 44 Min

Ingredients

Instructions

  1. Preheat oven to 350°F / 177°C.
  2. Arrange coconut in an even layer on a large baking sheet or pan. Bake in preheated oven for 5-8 minutes or until fragrant and lightly golden brown, stirring occasionally.
  3. While the coconut is toasting, whisk together flour, baking powder, baking soda, and salt in a medium bowl.
  4. In another bowl, mix brown sugar and oil together. Add vanilla and eggs and beat well. Add dry ingredients and mix.
  5. By this time your coconut should be done.* Add coconut, toffee, and chocolate chips to dough and mix until just combined.
  6. Place by small spoonful onto cookie sheet. Bake for 6-8 minutes, or until edges are just golden and the center still looks soft and doughy.

Notes

  • Coconut goes quickly from perfectly golden to burnt, so keep a close eye on it!
  • Feel free to use shredded, flaked, and desiccated coconut interchangeably, but keep in mind certain kinds, like shredded, are almost always sold sweetened.  You may need to adjust your toasting time accordingly: More time for flaked, less for desiccated. 
  • *I like to add the coconut to the dough while it's still warm from the oven, thus melting the chocolate chips a tad and creating a chocolate swirl in the batter.  Just be careful not to over mix.

Nutrition Facts

Calories

163.73

Fat

8.77 g

Sat. Fat

4.1 g

Carbs

20.06 g

Fiber

1.04 g

Net carbs

19.04 g

Sugar

14.31 g

Protein

1.45 g

Sodium

57.12 mg

Cholesterol

14.47 mg

Nutritional information is approximate, based on 1 cookie.

Did you make this recipe?
Tag @jennyblogsandbakes on instagram and hashtag it #jennyblogs

German Chocolate Brownies

If you cross coconut, pecans, and chocolate, what do you get?  I don't know, but if you combine those, you get the dessert affectionately called German Chocolate, originally called German's chocolate cake, after Samuel German. 

This recipe is not a cake, but in fact brownies. German chocolate brownies. One of my favorite things about this recipe is the homemade coconut pecan frosting. I hadn’t made it homemade before, but after realizing just how easy it is and DELICIOUS, it seemed silly to ever buy it again! I hope it wins you over, too.

Now if you’re wondering where German Chocolate came from…

It might not be what you think. The original cake was not invented in Germany nor was Mr. German German.  Ach du lieber.  He was an English-American who worked for Baker's Chocolate Company (their chocolate is still in circulation and used in this recipe!) who developed a dark baking chocolate that was named after him.  Eventually a recipe came out featuring Mr. German's chocolate in a recipe called "Baker's German's Chocolate Cake."  I think you can probably see how the name morphed from there. And apparently June 11 is National German Chocolate Day in America.

This post may contain affiliate links. If you make a purchase using these links, Jennyblogs may receive a small commission, at no extra cost to you. This helps to support Jennyblogs. For further information see the privacy policy. Grazie!

Recipe adapted from Creations by Kara


German Chocolate Brownies

Serves about 12

Ingredients:

For the German Chocolate Brownies

  • 3/4 cup / 168g oil

  • 2 cups / 400g sugar

  • 2 tsp / 10g vanilla extract

  • 3 eggs

  • 4 oz / 113g Baker's German Chocolate, melted and cooled

  • 1 cup / 120g flour

  • 2/3 cup / 67g cocoa

  • 1/2 tsp salt

For the Coconut Pecan Frosting

  • 1 cup / 262g evaporated milk, make your own here!

  • 3 egg yolks

  • 1 cup / 200g brown sugar

  • 1/2 cup 113g butter

  • 1 tsp / 5g vanilla

  • 1 1/2 cups / 120g flaked coconut

  • 1 cup / 125g chopped pecans

Directions:

Make the German Chocolate Brownies

Oven 350°F / 177°C Grease a 9x13in / 23x33cm pan

  1. In a large bowl, beat together oil, sugar, vanilla, and eggs. 

  2. Add cooled chocolate.  Stir in flour, cocoa, and salt.  Pour and spread into prepared 9x13 pan. 

  3. Bake 20-25 minutes, or until toothpick inserted off center comes out mostly clean. Brownies like to be slightly under baked. Let cool.

Make the Coconut Pecan Frosting

  1. Whisk together milk, yolks, and sugar in a medium saucepan.  Add butter and place over medium heat, stirring until mixture becomes thick, approximately 10-12 minutes. 

  2. Remove from heat and add vanilla, coconut, and pecans.  Cool until spreadable. 

  3. Spread frosting evenly over brownies. Slice and enjoy. 

Jenny's Notes:

  • I'll let you in on a little secret.  You can make this recipe with regular milk, if you don’t have evaporated milk. I recommend you do, but I have done without!

German chocolate, evaporated milk, caramel coconut pecan frosting, german chocolate cake, brownies
dessert, bars
American
Yield: 20
Author:
German Chocolate Brownies

German Chocolate Brownies

Dense, fudgy German Chocolate brownies topped with a delectable caramel pecan coconut frosting. Just like the classic cake, but in brownie form.
Prep time: 30 MinCook time: 35 MinInactive time: 10 MinTotal time: 1 H & 15 M

Ingredients

For the German Chocolate Brownies
For the Coconut Pecan Frosting

Instructions

Make the German Chocolate Brownies
  1. Oven 350°F / 177°C Grease a 9x13in / 23x33cm pan
  2. In a large bowl, beat together oil, sugar, vanilla, and eggs.
  3. Add cooled chocolate. Stir in flour, cocoa, and salt. Pour and spread into prepared 9x13 pan.
  4. Bake 20-25 minutes, or until toothpick inserted off center comes out mostly clean. Brownies like to be slightly under baked. Let cool.
Make the Coconut Pecan Frosting
  1. Whisk together milk, yolks, and sugar in a medium saucepan. Add butter and place over medium heat, stirring until mixture becomes thick, approximately 10-12 minutes.
  2. Remove from heat and add vanilla, coconut, and pecans. Cool until spreadable.
  3. Spread frosting evenly over brownies. Slice and enjoy.

Notes

  • I'll let you in on a little secret.  You can make this recipe with regular milk, if you don’t have evaporated milk. I recommend you do, but I have done without!


Nutrition Facts

Calories

334.87

Fat

25.59 g

Sat. Fat

9.83 g

Carbs

37.1 g

Fiber

2.79 g

Net carbs

34.31 g

Sugar

15.61 g

Protein

4.33 g

Sodium

124.89 mg

Cholesterol

69.56 mg

Nutritional info is approximate, based on 1 serving if sliced into 20 pieces.

Did you make this recipe?
Tag @jennyblogsandbakes on instagram and hashtag it #jennyblogs

Coconut Banana Breakfast Cookies

Do you like cookies? Would you like to eat cookies for breakfast, or anytime? Then these cookies are for you, because they’re delicious and also healthy!

These Coconut Banana Breakfast Cookies have no refined sugar. Think bananas, coconut, pecans, and apricots with a light touch of maple syrup and oats. Of course, I practically just gave you the whole ingredient list so let's just get baking, shall we?? 


Coconut Banana Breakfast Cookies

Makes about 15 cookies

Ingredients:

Directions:

  • *1 1/2 cups oats

  • 1 cup unsweetened shredded coconut or flakes

  • 1/2 cup coarsely chopped pecans

  • 1/4 cup coarsely chopped almonds

  • 1 Tbsp flax seeds

  • 1/2 tsp salt

  • 1/2 cup dried apricots, chopped

  • 3 very ripe bananas, mashed

  • 1/4 cup coconut oil, melted

  • 1 Tbsp maple syrup

  • 1 tsp vanilla extract

Oven 350 Fahrenheit

In a medium bowl, stir together oats, coconut, pecans, flax, salt, and apricots.  Add the bananas, coconut oil, maple syrup, and vanilla until combined.  Spoon generous mounds onto a baking sheet lined with parchment paper or silpat. 

Bake 23-25 minutes, until lightly golden. 

Some raisins snuck into these ones

Some raisins snuck into these ones

Jenny's Notes:

Recipes like this are great because they can be so easily adapted to your tastes, or simply to change it up.  Feel free to use any kind of nuts you wish, or a combination of several, change up the dried fruit, or use honey instead of maple syrup.  I recommend also trying dried blueberries and dried cherries!

*Most recipes will list whether quick oats, rolled oats, or old-fashioned oats should be used.  You'll notice I don't specify unless I think the recipe really needs a specific kind of oat.  I've found that in most recipes the different kind of oats can be interchanged without affecting the quality of your product.  Just keep in mind that quick oats are more absorbent, so use slightly less than called for if substituting for old-fashioned or rolled, or slightly more rolled if substituting for quick.   


Beurre Noisette Chocolate Chip Cookies

All chocolate chip cookies are delicious, but not all are made equal.  This is my favorite recipe for chocolate chip cookies, because, beurre noisette.

What the heck is beurre noisette you ask?  Beurre noisette is French for hazelnut butter, or what we in the States call browned butter.  But beurre noisette sounds so much better, doesn't it?  I mean, if you were offered a beurre noisette cookie or a browned butter cookie, which one would you take?  The former, of course!  Beurre noisette has that foreign, slightly mysterious sound, but without going too wildly out of bounds because after all, it still had the word "cookie" in the question.  And who turns down a cookie?  Not me, and not that moose in that book, either.  He and I should be friends.  Do they have moose in Italy?  Just kidding.  But we do have moose in Michigan.  Oh wait, the moose likes muffins, not cookies, and the mouse likes cookies.  I like muffins too, and so the moose and the mouse can both be my friends. 

Back to beurre noisette, or browned butter.  If you already thought butter was delicious and makes everything better,  which is true, (Julia Child liked it for good reason) then browned butter is VERY delicious and makes everything WAY better.  See what I did there? Mmmhmmm.  It tastes very nutty and toasty, which is another reason why I think the French term is more accurate.  Browned butter is exactly what it sounds like; butter, that is brown.  Unless you call it beurre noisette, like me, and then it just sounds like burrs and noisy zits. 

If you've never made beurre noisette before, don't fret, I shall show you below.  

This post may contain affiliate links. If you buy something using these links, Jennyblogs may receive a small commission, at no extra cost to you. This helps to support Jennyblogs. For further information see the privacy policy. Grazie!

Making Beurre Noisette:

  1. Take the amount of butter you will need for your recipe of choice and place it in a small saucepan over low heat, no need to stir. 

  2. Allow to simmer until you notice the bottom start to turn golden brown.  These are the milk solids separating from the butterfat; the milk solids sink to the bottom and brown, giving it that wonderful nutty flavor.  If you stopped here and separated the butterfat from the milk solids, you would have ghee, or clarified butter. 

The whole process should take about 5-15 minutes, depending on your stove and how much butter you are browning.  It goes very quickly from perfectly golden brown to burnt, so keep a careful watch over it.  You may be tempted to turn up the heat and quicken the process, but please don't, the lower the heat the more even the browning.   Allow to cool to room temperature.  If needed, you can place in the fridge or freezer.  Stir every so often for even cooling.  Use like regular butter.


Beurre Noisette Chocolate Chip Cookies:

Makes about 52 smallish cookies (about 2 in. in diameter)

Ingredients:

  • 1 cup / 226g unsalted butter (2 sticks), browned and cooled to room temperature

  • 1 1/2 cups / 300g brown sugar (light or dark, your choice)

  • 2 eggs

  • 1 Tbsp / 15g vanilla extract

  • 2 1/2 cups / 300g all-purpose flour

  • 1 tsp baking soda

  • 1 tsp baking powder

  • 1 tsp salt

  • 12 oz / 340g semi-sweet chocolate chips or chunks

Directions:

  1. Preheat oven to 375F / 190C.

  2. In the bowl of a stand mixer or with a hand-held mixer, beat butter and brown sugar until light and fluffy, about 2-3 minutes. 

  3. Add eggs, one at a time, beating well after each addition.  Beat in vanilla.

  4. In a separate bowl, whisk together flour, baking soda, baking powder, and salt. 

  5. Stir flour mixture into butter mixture until incorporated, then add chocolate chips. 

  6. Place in small mounds on cookie sheet, about 1 inch in diameter, evenly spread out. 

  7. Bake for 6-8 minutes, or until edges are lightly golden brown and centers are still a tad wet looking.

Jenny's Notes:

  • These can easily be made gluten-free by substituting 3 1/4 cups GF oat flour for the 2 1/2 cups all-purpose flour.  You can make your own oat flour by blending GF oats in a food processor until a flour consistency is achieved.

cookies, dessert, chocolate chip cookies, browned butter
dessert
American
Yield: 48-52
Author:
Beurre Noisette Chocolate Chip Cookies

Beurre Noisette Chocolate Chip Cookies

These chocolate chip cookies are next level with beurre noisette (browned butter) and made with all brown sugar, no white sugar, making for a delectably rich and flavorful cookie.
Prep time: 35 MCook time: 8 MTotal time: 43 M

Ingredients:

  • 1 cup / 226g unsalted butter (2 sticks), browned and cooled to room temperature
  • 1 1/2 cups / 300g brown sugar (light or dark, your choice)
  • 2 eggs
  • 1 Tbsp / 15g vanilla extract
  • 2 1/2 cups / 300g all-purpose flour
  • 1 tsp baking soda
  • 1 tsp baking powder
  • 1 tsp salt
  • 12 oz / 340g semi-sweet chocolate chips or chunks

Instructions:

How to cook Beurre Noisette Chocolate Chip Cookies

  1. Preheat oven to 375F / 190C.
  2. In the bowl of a stand mixer or with a hand-held mixer, beat butter and brown sugar until light and fluffy, about 2-3 minutes.
  3. Add eggs, one at a time, beating well after each addition. Beat in vanilla.
  4. In a separate bowl, whisk together flour, baking soda, baking powder, and salt.
  5. Stir flour mixture into butter mixture until incorporated, then add chocolate chips.
  6. Place in small mounds on cookie sheet, about 1 inch in diameter, evenly spread out.
  7. Bake for 6-8 minutes, or until edges are lightly golden brown and centers are still a tad wet looking.

Notes:

These can easily be made gluten-free by substituting 3 1/4 cups GF oat flour for the 2 1/2 cups all-purpose flour. You can make your own oat flour by blending GF oats in a food processor until a flour consistency is achieved.

Calories

118.19

Fat (grams)

6.20

Sat. Fat (grams)

3.71

Carbs (grams)

15.51

Fiber (grams)

0.59

Net carbs

14.92

Sugar (grams)

9.99

Protein (grams)

1.25

Sodium (milligrams)

90.98

Cholesterol (grams)

17.87
Nutritional information is approximate. Based on 1 cookie.
Did you make this recipe?
Tag @jenevamorris on instagram and hashtag it #jennyblogs
Created using The Recipes Generator

CIAO COOKIE

CIAO COOKIE