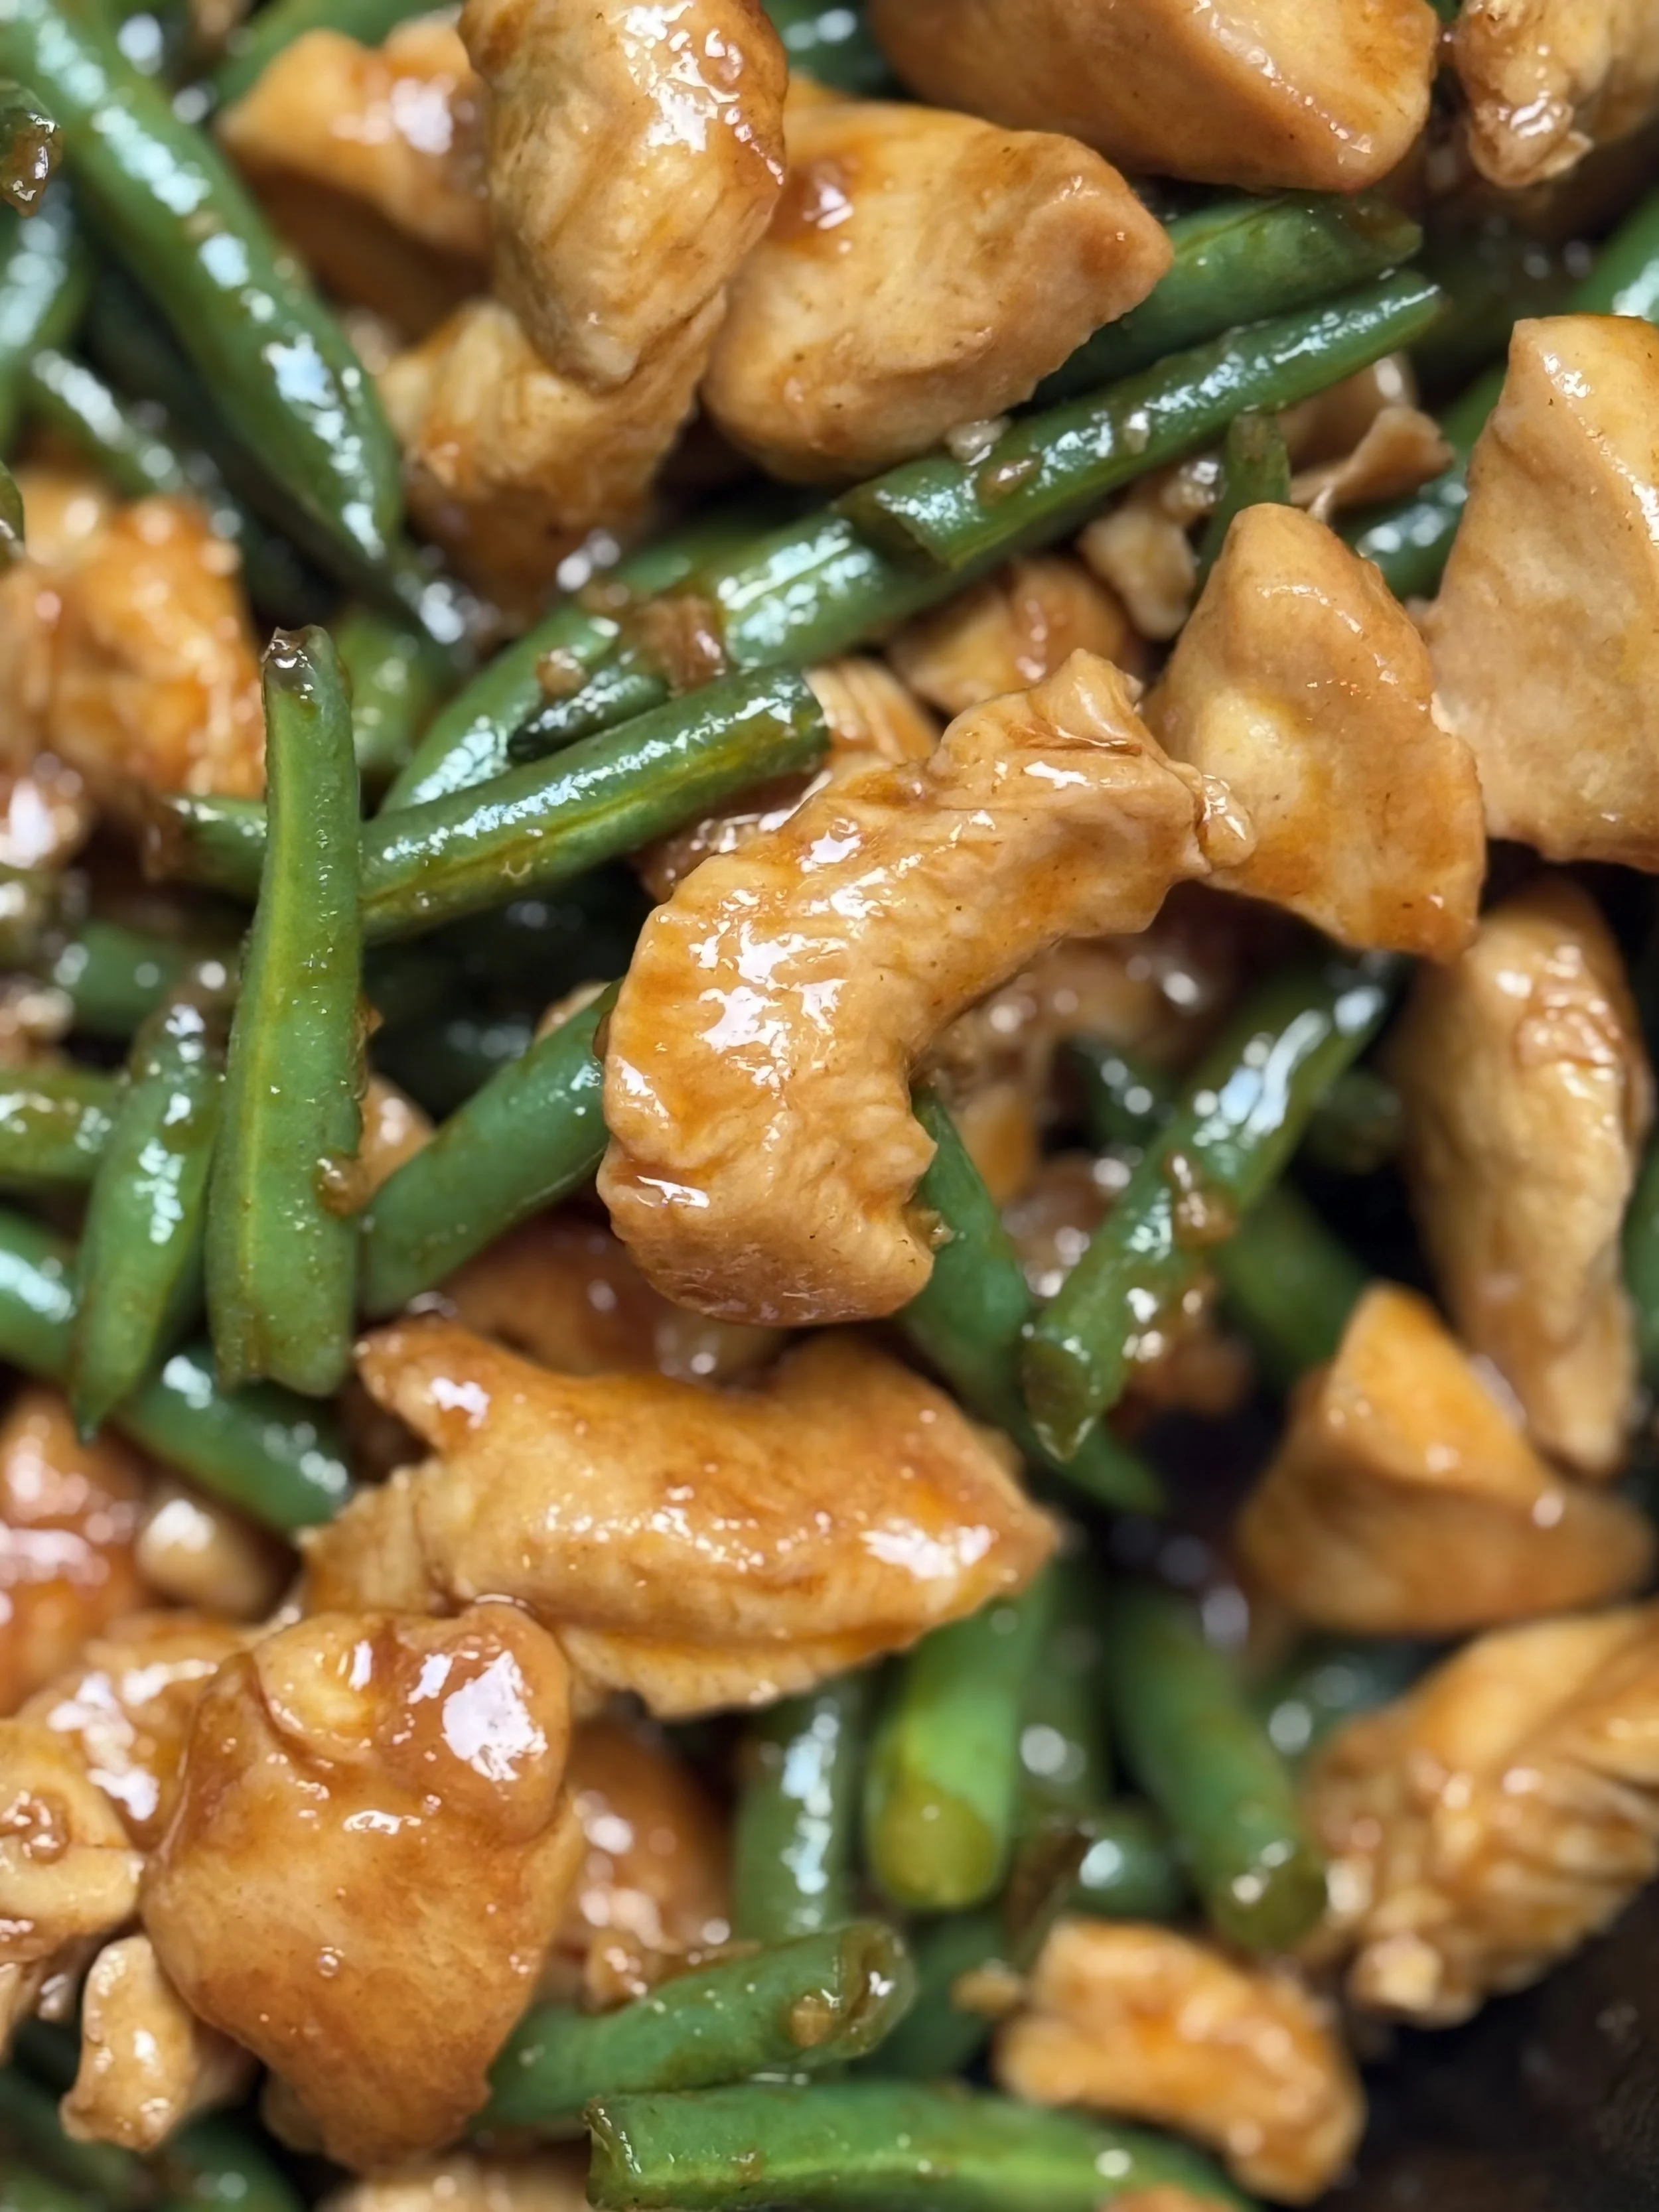
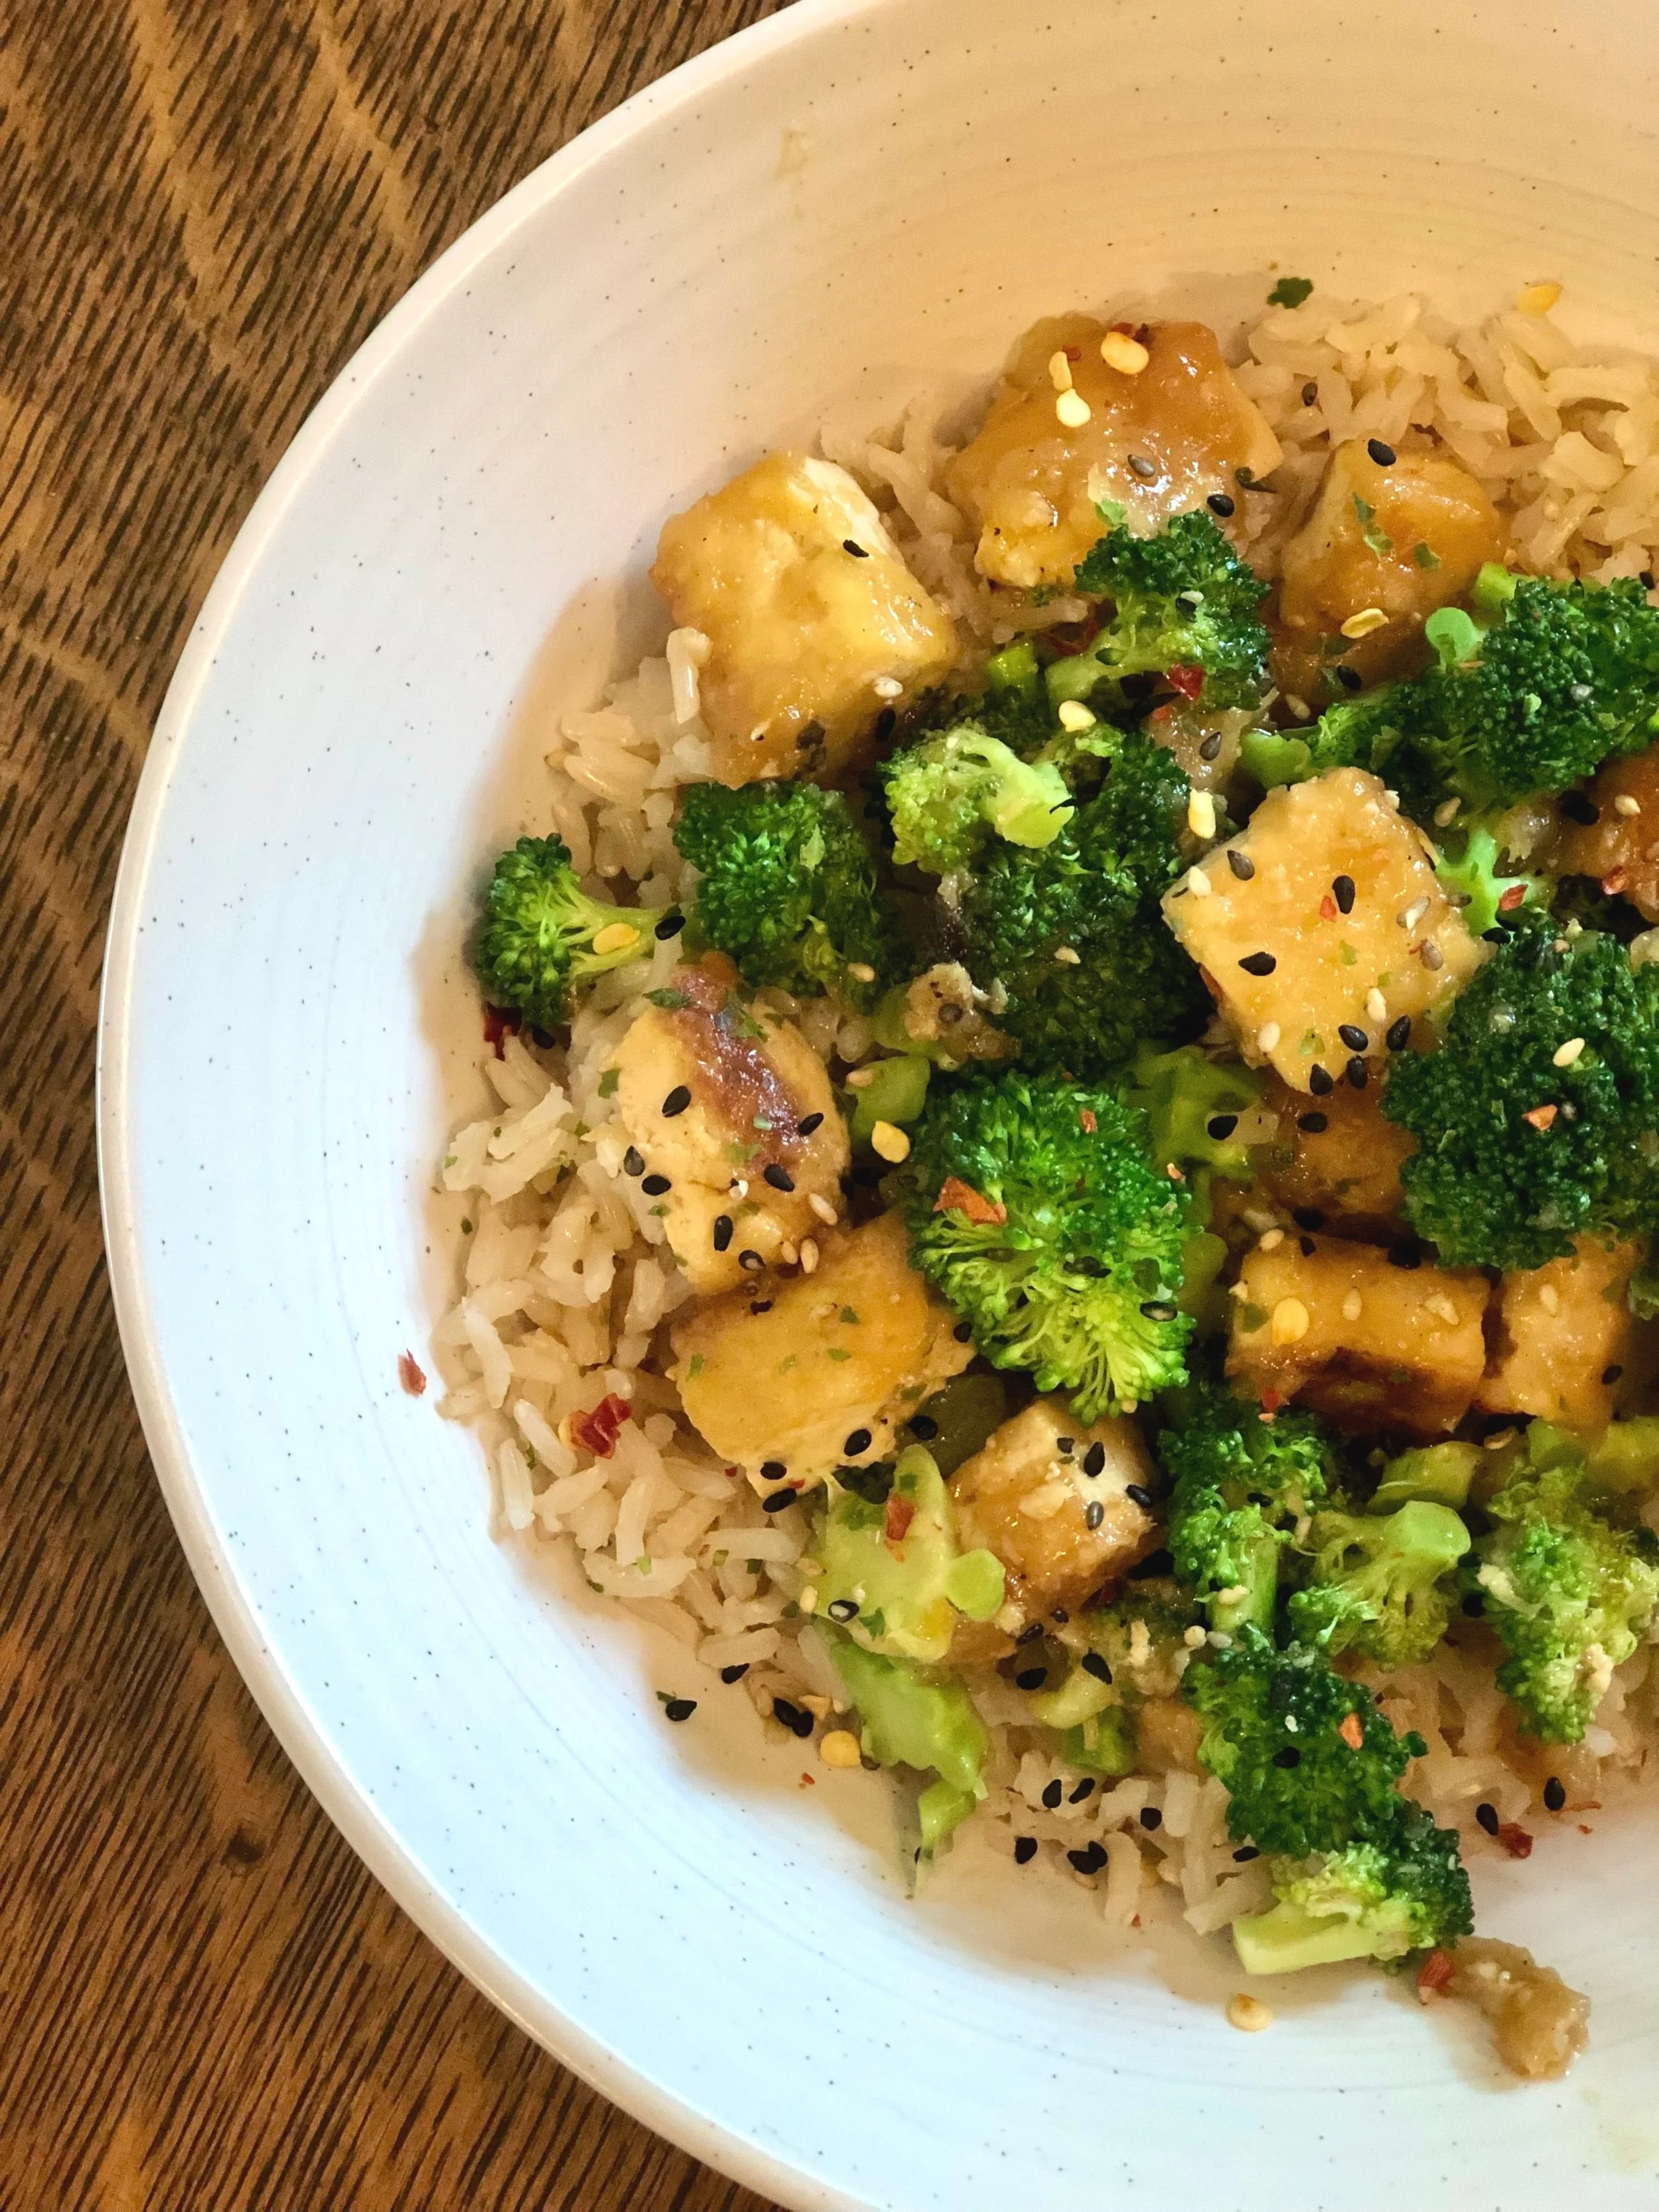
Smooth Potato and Veggie Soup

This soup couldn’t be simpler to make, simply chop up vegetables, boil them, and purée them. Tada! Dinner. It’s high on my list for easy meals that require little hands on prep, think 10 minutes or less. Feasible even with a newborn and other little kids demanding all your time!

It’s all vegetables, which makes it hearty and very nutritious. Once it’s puréed you can’t tell what’s in it which makes it easy to sneak in maybe some of those vegetables that your family isn’t so fond of. If I’m going to be really honest, veggie soups aren’t overly exciting, but I really enjoy this one. It’s difficult to ruin, even if you swap out different kinds of veggies. Make as written at first if you feel more comfortable, rather than branching out on your own right away. After the first time or two making this, you’ll quickly learn what you want more of or less of in the veggie department to suit you and your family’s tastes.

And, being all vegetables, this soup is vegetarian and vegan, gluten and dairy free. Friendly for many diets and dietary needs!

This post may contain affiliate links. If you make a purchase using these links, Jennyblogs may receive a small commission, at no extra cost to you. This helps to support Jennyblogs. For further information see the privacy policy. Grazie!


Smooth Potato and Veggie Soup

Serves about 4-6

Ingredients:

  • 1 quart / 1 liter chicken or vegetable broth

  • 2 cloves of garlic, peeled

  • 3 medium potatoes

  • 2 medium carrots

  • 2 stalks of celery

  • 1 small-medium broccoli crown

  • 1/2 medium onion

  • 2 fresh artichoke hearts, or 1 14 oz can, drained

  • salt and pepper, to taste

  • extra virgin olive oil, for drizzling, and crusty bread, optional

Directions:

  1. Rinse vegetables and chop all into chunks.

  2. Add all ingredients to a large pot over medium-high heat and brig to a boil.

  3. Allow to simmer for 30-45 minutes, or until all vegetables are tender when checked with a sharp knife. Check periodically to ensure it doesn’t boil dry, adding more water if necessary. Total time will depend on how large or small your vegetable chunks are.

  4. Once the vegetables are tender, transfer to a blender with enough broth to cover or almost cover them in the blender, or use an immersion blender to blend until smooth. If you desire a thinner soup, add more broth or water.

  5. Serve immediately with bread and a drizzle of olive oil, if desired. Store in the refrigerator or freeze.

Jenny’s Notes:

  1. You’ll notice the recipe is a bit vague, and I did that on purpose. If I wrote all the options or different ways I’ve made this soup, it would be quite confusing to read. So, you can find some variations down here.

  2. What kind of broth? Completely up to you. I prefer vegetable as this is a vegetable soup, but you could just as easily use chicken, beef, a combo, or your own homemade broth.

  3. Try using sweet potatoes for part or all of the potatoes.

  4. I don’t even bother to remove the skin from any of the potatoes or carrots. It all gets blended anyway, and it saves a lot of time while adding nutrition!

  5. The first time I made this with artichokes I hadn’t ever worked with a fresh artichoke before. I thought the center was bigger than it was, and thus ended up with some strands of fiber throughout the soup from the leaves. Not a deal breaker, but beware of those fibrous artichoke outer leaves. If you aren’t sure what exactly is the “center”, simply try biting the leaves. If it’s too fibrous and hard to chew, don’t blend it. The center will be small, as in, I-bought-that-whole-artichoke-just-for-that-tiny-thing? and yellow and almost melt in your mouth tender.

  6. Feel free to play with some spices to change things up! I like to add a Tbsp of turmeric, and sometimes some thyme or sage.

  7. Finally, add or subtract any vegetables you want! Basically as long as you have the same volume of vegetables to liquid, ish, you’ll end up with a vegetable soup. Ha. I love how simple it is. It’s just playing with flavors and textures!

Smooth Potato and Veggie Soup
Yield 4-6
Author
Prep time
15 Min
Cook time
30 Min
Total time
45 Min

Smooth Potato and Veggie Soup

Simple and nutritious purèed potato and vegetable soup

Ingredients

Instructions

  1. Rinse vegetables and chop all into chunks.
  2. Add all ingredients to a large pot over medium-high heat and brig to a boil.
  3. Allow to simmer for 30-45 minutes, or until all vegetables are tender when checked with a sharp knife. Check periodically to ensure it doesn’t boil dry, adding more water if necessary. Total time will depend on how large or small your vegetable chunks are.
  4. Once the vegetables are tender, transfer to a blender with enough broth to cover or almost cover them in the blender, or use an immersion blender to blend until smooth. If you desire a thinner soup, add more broth or water.
  5. Serve immediately with bread and a drizzle of olive oil, if desired. Store in the refrigerator or freeze.

Notes

  1. You’ll notice the recipe is a bit vague, and I did that on purpose. If I wrote all the options or different ways I’ve made this soup, it would be quite confusing to read. So, you can find some variations down here.
  2. What kind of broth? Completely up to you. I prefer vegetable as this is a vegetable soup, but you could just as easily use chicken, beef, a combo, or your own homemade broth.
  3. Try using sweet potatoes for part or all of the potatoes.
  4. I don’t even bother to remove the skin from any of the potatoes or carrots. It all gets blended anyway, and it saves a lot of time while adding nutrition!
  5. The first time I made this with artichokes I hadn’t ever worked with a fresh artichoke before. I thought the center was bigger than it was, and thus ended up with some strands of fiber throughout the soup from the leaves. Not a deal breaker, but beware of those fibrous artichoke outer leaves. If you aren’t sure what exactly is the “center”, simply try biting the leaves. If it’s too fibrous and hard to chew, don’t blend it. The center will be small, as in, I-bought-that-whole-artichoke-just-for-that-tiny-thing? and yellow and almost melt in your mouth tender.
  6. Feel free to play with some spices to change things up! I like to add a Tbsp of turmeric, and sometimes some thyme or sage.
  7. Finally, add or subtract any vegetables you want! Basically as long as you have the same volume of vegetables to liquid, ish, you’ll end up with a vegetable soup. Ha. I love how simple it is. It’s just playing with flavors and textures!


Nutrition Facts

Calories

240.61

Fat

4.33 g

Sat. Fat

0.72 g

Carbs

46.34 g

Fiber

8.9 g

Net carbs

37.42 g

Sugar

8.16 g

Protein

8.2 g

Sodium

1094.33 mg

Cholesterol

0 mg

Nutritional information is approximate, based on 1 serving if recipe serves 4, including olive oil drizzle.

potato soup, Armenian vegetable soup, vegan, vegetarian
dinner
American
Did you make this recipe?
Tag @jennyblogsandbakes on instagram and hashtag it #jennyblogs


Sticky Lemon Tofu

Crispy tofu with a zingy, sweet, and super flavorful sticky sauce over rice makes for a quick and easy weeknight dinner.

Serve with your favorite garnishes and you’ll feel like you’re eating takeout, but it’s actually much healthier!

Inspired by Chinese takeout “lemon chicken” but made with tofu instead. Meatless, nutritious, and you can choose to add veggies, as you wish.

The tofu can be baked or fried, depending on your preference, either way resulting in delicious, crispy bites of tofu that are just asking to be covered in a sticky lemon sauce. I prefer baking them, it’s healthier and the oven does the work while I work on the sauce. Either way is delicious and simple, though!


Sticky Lemon Tofu

Serves 2-3

Ingredients:

For the Crispy Tofu

  • 1 14oz / 400g block of firm or extra-firm tofu

  • 1 Tbsp / 14g oil

  • 1 Tbsp / 17g soy sauce

  • 1/4 cup / 40g cornstarch

For the Lemon Sauce

  • 1/2 cup / 119g chicken broth or water

  • 1/4 cup / 56g lemon juice

  • 2 Tbsp / 34g soy sauce

  • 3 Tbsp / 60g maple syrup

  • zest of 1 lemon

To sautè

  • 1 Tbsp / 14g oil

  • 2-3 green onions, sliced

  • 1 Tbsp grated or minced fresh ginger

  • 4 cloves of garlic, minced

For Serving

  • Rice

  • Garnishes such as sliced green onions, sesame seeds, red chili flakes, and/or lemon slices

Directions:

Make the Crispy Tofu

  1. Place tofu block between some paper towels and press to absorb extra water. Repeat until tofu feels dry and no more water comes out. You can also do this ahead of time by placing something heavy over the tofu and paper towels, such as a bowl or pot, and leave it for several minutes.

  2. Slice tofu into squares and toss together with the oil, soy sauce, and corn starch until evenly coated.

    Pan fry:

  3. Heat a large fry pan and add tofu. Fry for a few minutes until golden, then flip tofu over. Add more oil to pan as needed to get a nice golden crust on the tofu. Remove from heat when done.

    OR Bake:

  4. Disperse tofu cubes evenly onto a parchment paper or silpat lined baking sheet. Bake in a preheated oven at 400°F / 205°C for about 30 minutes, or until light golden and crispy. Ideally, flip tofu halfway through baking.

Make the sauce

  1. Whisk together all ingredients for the sauce; set aside.

Sauté

  1. Heat oil in a large fry pan over medium heat. (Can be the pan you used for the tofu if you pan-fried it).

  2. Add green onions, ginger, and garlic and sauté for 1-2 minutes, or until fragrant.

  3. Add lemon sauce ingredients to pan and bring to a simmer.

  4. Add in tofu, carefully stir to evenly coat tofu in sauce. Allow to simmer, stirring occasionally, until sauce thickens.

  5. Serve with rice and garnishes, as desired.

Jenny’s Notes:

  • Veggies can be added to this dish if desired. I like snow peas and broccoli, which can be added at the very end with the tofu into the sauce. Put a lid on and let the veggies steam for a few minutes, or until desired tenderness is achieved.

  • If pan frying the tofu, you can flip the tofu with tongs, or simply sauté/flip the tofu using the pan. The second way is faster, but requires a bit more skill and you have less control over which sides of the tofu land down.

  • Use whichever kind of cooking oil you prefer. I simply write “oil” since specifying often gets people thinking they must use a specific oil, when really you can use any high-heat cooking oil (peanut oil, avocado oil, some use olive oil, etc.)

  • Instead of maple syrup you can also use 1/4 cup / 50g of sugar or brown sugar. Or, 3 Tbsp / 63g of honey, which lends a slightly different flavor.

Sticky Lemon Tofu
Yield 2-3
Author
Prep time
15 Min
Cook time
40 Min
Total time
55 Min

Sticky Lemon Tofu

Crispy tofu nuggets tossed in a super flavorful sticky lemon sauce inspired by Chinese takeout Lemon Chicken, served over rice.

Ingredients

For the Crispy Tofu
For the Lemon Sauce
To sautè
For Serving

Instructions

Make the Crispy Tofu
  1. Place tofu block between some paper towels and press to absorb extra water. Repeat until tofu feels dry and no more water comes out. You can also do this ahead of time by placing something heavy over the tofu and paper towels, such as a bowl or pot, and leave it for several minutes.
  2. Slice tofu into squares and toss together with the oil, soy sauce, and corn starch until evenly coated.
  3. Pan fry:
  4. Heat a large fry pan and add tofu. Fry for a few minutes until golden, then flip tofu over. Add more oil to pan as needed to get a nice golden crust on the tofu. Remove from heat when done.
  5. OR Bake:
  6. Disperse tofu cubes evenly onto a parchment paper or silpat lined baking sheet. Bake in a preheated 400°F / 205°C for about 30 minutes, or until light golden and crispy. Ideally, flip tofu halfway through baking.
Make the sauce
  1. Whisk together all ingredients for the sauce; set aside.
Sauté
  1. Heat oil in a large fry pan over medium heat. (Can be the pan you used for the tofu if you pan-fried it).
  2. Add green onions, ginger, and garlic and sauté for 1-2 minutes, or until fragrant.
  3. Add lemon sauce ingredients to pan and bring to a simmer.
  4. Add in tofu, carefully stir to evenly coat tofu in sauce. Allow to simmer, stirring occasionally, until sauce thickens.
  5. Serve with rice and garnishes, as desired.

Notes

  • Veggies can be added to this dish if desired. I like snow peas and broccoli, which can be added at the very end with the tofu into the sauce. Put a lid on and let the veggies steam for a few minutes, or until desired tenderness is achieved.
  • If pan frying the tofu, you can flip the tofu with tongs, or simply sauté/flip the tofu using the pan. The second way is faster, but requires a bit more skill and you have less control over which sides of the tofu land down.
  • Use whichever kind of cooking oil you prefer. I simply write “oil” since specifying often gets people thinking they must use a specific oil, when really you can use any high-heat cooking oil (peanut oil, avocado oil, some use olive oil, etc.)
  • Instead of maple syrup you can also use 1/4 cup / 50g of sugar or brown sugar. Or, 3 Tbsp / 63g of honey, which lends a slightly different flavor.


Nutrition Facts

Calories

476.8

Fat

23.04 g

Sat. Fat

2.04 g

Carbs

47.45 g

Fiber

2.93 g

Net carbs

44.51 g

Sugar

20.62 g

Protein

21.78 g

Sodium

1742.63 mg

Cholesterol

1.18 mg

Nutritional information is approximate, based on 1 serving if recipe serves 2. Does not include rice or garnishes.

Sticky lemon tofu, chinese takeout lemon chicken
dinner
Asian
Did you make this recipe?
Tag @jennyblogsandbakes on instagram and hashtag it #jennyblogs

Herbed Six Cheese Pasta

Why, when we make macaroni and cheese, do we usually just add one cheese? Because it’s easy, yes. But have you ever added 2, 3 or even 6 different cheeses to your pasta? Because it’s wonderful and the flavor profile explodes. In a good way.

Here is one of my cheesy pasta recipes, made with yes, 6 different cheeses! You can easily mix up which cheeses you use, with whatever you have on hand. It creates a unique but divine pasta every time. The herbs I added in with the inspiration from herb cream cheese that I sometimes like to put on my toasted bagels. MMMMMMmmmmmmmm.

Now, one of my first thoughts when I see a number of cheeses (especially 6!!) in a dish is that it’s probably a really rich, high fat dish. Good for special occasions, not so much a weeknight dinner. The best thing about this pasta, is that it doesn’t use any more cheese than a regular, homemade, stove top macaroni and cheese. Actually, it uses less than some recipes! I like to use about 2 cups of shredded cheese (equal to about 8oz of cheese) for 1lb of pasta. This recipe also uses a total of 2 cups of shredded cheese. No heavy whipping cream, no half & half, just milk. It’s not overly indulgent, like so many recipes can be, while still tasting indulgent!

This pasta is cheesy, creamy, smoky, and should be cooking on your stove and in your tummy ASAP! :)

This post may contain affiliate links. If you make a purchase using these links, Jennyblogs may receive a small commission, at no extra cost to you. This helps to support Jennyblogs. For further information see the privacy policy. Grazie!

Recipe by Jenny. Inspired by Inspired with a Twist


Herbed Six Cheese Pasta

Serves 4-6

Ingredients:

  • 1 lb. / 500g pasta of your choice

  • 4 Tbsp / 56g oil or butter

  • 2 cloves garlic, minced

  • 1/4 cup / 30g all-purpose flour

  • 2 cups / 474g milk

  • 1/2 tsp smoked paprika

  • 1/2 tsp chopped fresh basil

  • 1/2 tsp chopped fresh oregano

  • 1/4 tsp chopped fresh thyme

  • 1/4 tsp chopped fresh rosemary

  • 1/8 tsp nutmeg

  • 1/2 cup / 56g shredded sharp cheddar cheese

  • 1/2 cup / 56g shredded mozzarella cheese

  • 1/4 cup / 25g shredded asiago cheese

  • 1/4 cup / 25g shredded parmesan cheese

  • 1/4 cup / 28g shredded smoked gruyère cheese

  • 2 oz / 57g cream cheese

Directions:

  1. In a large pot bring a good quantity of water to boil. Just before the water boils, salt the water. Stir to dissolve salt, then add in pasta. Cook pasta to al dente according to package directions. Drain, reserving about 2 cups of pasta water.

  2. While pasta is cooking, heat oil or butter in a large pot over medium-low heat. Add garlic and stir, for about 1 minute, until fragrant.

  3. Add flour and stir with a whisk, until all the oil or butter has been absorbed by the flour. Stir for an extra few seconds, to toast the flour.

  4. Slowly add in milk, a bit at a time, stirring constantly. The mixture will thicken, then slowly thin out as you add more milk.

  5. When all the milk has been added and the mixture comes to a simmer, add in all the spices and herbs.

  6. Add in all of the cheese and stir until melted and smooth. Turn off heat. Salt and pepper to taste.

  7. Add cooked pasta to the sauce, along with 1 cup of reserved pasta water. Stir well. Add in more pasta water until desired consistency is reached. Sauce will continue to thicken as it cools and sits. Serve.

Jenny’s Notes:

  • The cheese options for this pasta really are endless, no need to feel confined by the exact cheeses I have written here. I use different ones all the time! Cheddars, mozzarellas, Monterey or Colby Jack, gruyere, gouda, smoked cheeses, havarti, provolone, taleggio, Swiss…think of your favorites! Another I love to add? A blue cheese, like Gorgonzola. Mmmmm. It’s like one of my favorite Italian pizzas, quattro formaggi, a pizza with four cheeses, one of which is Gorgonzola.

  • If you don’t have fresh herbs available to you, you can easily sub in dried. As a general rule of thumb, use 1/3 the amount of dried in place of fresh. In this recipe, because the measurements are already quite small, I usually end up going with “generous 1/8th teaspoon”, or “pinch of this”, and it turns out wonderful!

  • If you enjoy especially rich pasta, you can use half & half or some cream in with the milk. I usually use 2% milk, still creates a luscious, cheesy, pasta, but without being overly indulgent!

Deluxe macaroni and cheese, best macaroni and cheese, six cheese pasta
Dinner, Pasta
American
Yield: 6-8
Author:
Herbed Six Cheese Pasta

Herbed Six Cheese Pasta

Creamy, smokey, cheesy pasta featuring 6 different cheeses with a sprinkling of fresh herbs and spices
Prep time: 10 MinCook time: 20 MinTotal time: 30 Min

Ingredients

Instructions

  1. In a large pot bring a good quantity of water to boil. Just before the water boils, salt the water. Stir to dissolve salt, then add in pasta. Cook pasta to al dente according to package directions. Drain, reserving about 2 cups of pasta water.
  2. While pasta is cooking, heat oil or butter in a large pot over medium-low heat. Add garlic and stir, for about 1 minute, until fragrant.
  3. Add flour and stir with a whisk, until all the oil or butter has been absorbed by the flour. Stir for an extra few seconds, to toast the flour.
  4. Slowly add in milk, a bit at a time, stirring constantly. The mixture will thicken, then slowly thin out as you add more milk.
  5. When all the milk has been added and the mixture comes to a simmer, add in all the spices and herbs.
  6. Add in all of the cheese and stir until melted and smooth. Turn off heat. Salt and pepper to taste.
  7. Add cooked pasta to the sauce, along with 1 cup of reserved pasta water. Stir well. Add in more pasta water until desired consistency is reached. Sauce will continue to thicken as it cools and sits. Serve.

Notes

  • The cheese options for this pasta really are endless, no need to feel confined by the exact cheeses I have written here. I use different ones all the time! Cheddars, mozzarellas, Monterey or Colby Jack, gruyere, gouda, smoked cheeses, havarti, provolone, taleggio, Swiss…think of your favorites! Another I love to add? A blue cheese, like Gorgonzola. Mmmmm. It’s like one of my favorite Italian pizzas, quattro formaggi, a pizza with four cheeses, one of which is Gorgonzola.
  • If you don’t have fresh herbs available to you, you can easily sub in dried. As a general rule of thumb, use 1/3 the amount of dried in place of fresh. In this recipe, because the measurements are already quite small, I usually end up going with “generous 1/8th teaspoon”, or “pinch of this”, and it turns out wonderful!
  • If you enjoy especially rich pasta, you can use half & half or some cream in with the milk. I usually use 2% milk, still creates a luscious, cheesy, pasta, but without being overly indulgent!


Nutrition Facts

Calories

574

Fat

24 g

Sat. Fat

14 g

Carbs

66 g

Fiber

3 g

Net carbs

63 g

Sugar

7 g

Protein

23 g

Sodium

419 mg

Cholesterol

68 mg

Nutritional information is approximate, based on 6 servings.

Did you make this recipe?
Tag @jennyblogsandbakes on instagram and hashtag it #jennyblogs

Tofu and Broccoli Stir Fry

This Tofu and Broccoli Stir Fry is deliciously salty, satisfying, and nutritious.

My family makes this recipe quite a bit, it’s quick and easy, providing protein and vegetables and a carb, if you serve it over rice.

If you’re watching your salt intake, you might prefer to use a low-sodium soy sauce and broth. Using low-sodium ingredients allows you to have more control over how salty your dish is, whether or not you actually may need low-sodium for health reasons.

This dish is also delicious meat-ified…by that I mean, with chicken instead of tofu. I’m not a vegetarian, and I love this recipe both ways. If making with chicken, you’ll want to cut it into cubes or bite-sized pieces. You can still coat the chicken in the cornstarch, and proceed with recipe as written. You’ll simply want to cook the chicken thoroughly, before adding in the garlic and ginger and finishing the stir fry. Voila! Meat-ified.

This post may contain affiliate links. If you make a purchase using these links, Jennyblogs may receive a small commission, at no extra cost to you. This helps to support Jennyblogs. For further information see the privacy policy. Grazie!


Tofu and Broccoli Stir Fry

Serves about 3-4

Ingredients:

  • 1 14oz / 400g container of extra-firm tofu

  • 2 Tbsp / 15g cornstarch

  • 1 cup / 237g vegetable or chicken broth

  • 3 Tbsp / 42g soy sauce

  • 2 tsp / 10g sugar

  • oil, for pan

  • 2 teaspoons grated fresh ginger

  • 2 garlic cloves, minced

  • 2 cups broccoli florets

Directions:

  1. Open and drain tofu. Wrap tightly in paper towels, place on a plate or cutting board, and place a weighted object on it, such as a bowl. Once the paper towel is soaked through, change them out for fresh paper towels. Repeat until paper towels remain mostly dry. Slice tofu into approx. 1/2” / 1cm cubes. Toss in a medium bowl with the cornstarch.

  2. Combine broth, soy sauce, and sugar; set aside.

  3. Generously drizzle an iron skillet or other non-stick pan with oil; place over medium-high heat.

  4. Fry tofu until golden brown and crispy, about 3-5 minutes. Flip the tofu, and fry other side until golden brown, another 3-5ish minutes.

  5. Lower heat to low; Add ginger and garlic and stir, until fragrant and sizzling, about a minute.

  6. Add in broth mixture and stir occasionally, until it starts to simmer.

  7. Add in broccoli, cover, and let sit for 2 minutes for “al dente” broccoli, or a couple more minutes for softer broccoli.

  8. Turn off heat and serve over rice.

Suggested toppings: red pepper flakes, sesame seeds, sliced green onions, etc.

Jenny’s Notes:

oven baked tofu

  • In an ideal world the tofu is prepared a bit in advance, so it has ample time to release as much water as possible. However, you can also wrap the tofu just 2x in paper towels. It only takes a couple minutes and still gets a good amount of water out. You may need more cornstarch in this case since the tofu will be moister, and that’s perfectly fine. Frying time may also take a few minutes longer, for the water to evaporate and get a proper crisp on the tofu.

  • If you prefer to bake tofu instead of frying: Prepare tofu as in step 1, than transfer onto a silpat or parchment paper lined cooking sheet. Bake in an oven preheated to 400°F / 205°C for 25-30 minutes, or until crisp and golden. Stir tofu once or twice during baking time. Add tofu into simmering sauce, let simmer for a few minutes, then add in broccoli to finish.

  • This is wonderful with red pepper flakes, sesame seeds, cilantro, and green onions sprinkled on top for garnish.

stir fry, tofu, broccoli, takeout, Chinese takeout, vegetarian dinner
dinner
Asian
Yield: 3-4
Author:
Tofu and Broccoli Stir Fry

Tofu and Broccoli Stir Fry

Crispy tofu with lightly crunchy broccoli in a salty stir fry sauce makes for a quick and satisfying dinner that is as good as take-out!
Prep time: 20 MinCook time: 15 MinTotal time: 35 Min

Ingredients

Instructions

  1. Open and drain tofu. Wrap tightly in paper towels, place on a plate or cutting board, and place a weighted object on it, such as a bowl. Once the paper towel is soaked through, change them out for fresh paper towels. Repeat until paper towels remain mostly dry. Slice tofu into approx. 1/2” / 1cm cubes. Toss in a medium bowl with the cornstarch.
  2. Combine broth, soy sauce, and sugar; set aside.
  3. Generously drizzle an iron skillet or other non-stick pan with oil; place over medium-high heat.
  4. Fry tofu until golden brown and crispy, about 3-5 minutes. Flip the tofu, and fry other side until golden brown, another 3-5ish minutes.
  5. Lower heat to low; Add ginger and garlic and stir, until fragrant and sizzling, about a minute.
  6. Add in broth mixture and stir occasionally, until it starts to simmer.
  7. Add in broccoli, cover, and let sit for 2 minutes for “al dente” broccoli, or a couple more minutes for softer broccoli.
  8. Turn off heat and serve over rice.
  9. Suggested toppings: red pepper flakes, sesame seeds, sliced green onions, etc

Notes

  • In an ideal world the tofu is prepared a bit in advance, so it has ample time to release as much water as possible. However, you can also wrap the tofu just 2x in paper towels. It only takes a couple minutes and still gets a good amount of water out. You may need more cornstarch in this case since the tofu will be moister, and that’s perfectly fine. Frying time may also take a few minutes longer, for the water to evaporate and get a proper crisp on the tofu.
  • If you prefer to bake tofu instead of frying: Prepare tofu as in step 1, than transfer onto a silpat or parchment paper lined cooking sheet. Bake in an oven preheated to 400°F / 205°C for 25-30 minutes, or until crisp and golden. Stir tofu once or twice during baking time. Add tofu into simmering sauce, let simmer for a few minutes, then add in broccoli to finish.
  • This is wonderful with red pepper flakes, sesame seeds, cilantro, and green onions sprinkled on top for garnish.


Nutrition Facts

Calories

223

Fat

11 g

Sat. Fat

1 g

Carbs

16 g

Fiber

3 g

Net carbs

13 g

Sugar

2 g

Protein

16 g

Sodium

1322 mg

Cholesterol

2 mg

Nutritional information is approximate, based on 3 servings, not including rice or garnishes.

Did you make this recipe?
Tag @jennyblogsandbakes on instagram and hashtag it #jennyblogs

Chicken Fricassée

Chicken fricassée is a French chicken stew, consisting of browned chicken and vegetables in a creamy mushroom sauce.

It starts with a simple pan fry of chicken in a skillet with butter, until they’re nice and brown. The chicken is removed from the pan so you can cook onions, carrots, mushrooms, garlic, and a bit of thyme. Flour, chicken broth, and white wine are added to make a slightly thick, hearty sauce. Finally, cream (or milk if you prefer a lighter or less expensive version) and a splash of lemon juice are added at the end to turn the sauce into a creamy, velvety wonder, perfect for serving over mashed potatoes.

The whole thing can be cooked on the stove or it can also be finished in the oven. It goes a little quicker on the stove, my preferred version. My mom, on the other hand, prefers to finish hers in the oven. She likes the hands-free time while it’s in the oven to clean up the kitchen, which is also useful!

This makes for a convenient rotation to weeknight dinners since most of the ingredients I always have on hand, save for the mushrooms. This can be made without the mushrooms if you so prefer, but honestly it’s one of my favorite parts so I make sure to add mushrooms to my grocery list!

I’m not normally a meat, carrot, and potato kind of girl, but ever since I first made this a few years ago it’s become a part of our regular dinner rotation, it’s so delicious and satisfying.

This post may contain affiliate links. If you make a purchase using these links, Jennyblogs may receive a small commission, at no extra cost to you. This helps to support Jennyblogs. For further information see the privacy policy. Grazie!

Recipe adapted from The Toasty Kitchen


Chicken Fricassée

Serves about 4

Ingredients:

Chicken fricassée over mashed potatoes

  • 2 Tbsp / 28g butter

  • 1 lb / 454g uncooked chicken breasts

  • 2-3 carrots, sliced into half moons

  • 1 onion, diced medium

  • 8 oz / 227g white button mushrooms, sliced

  • 2 cloves garlic, minced

  • 1/2 tsp dried thyme

  • 2 Tbsp / 15g flour

  • 1/2 cup / 119g dry white wine

  • 1 cup / 237g chicken broth

  • 1/2 cup / 119g heavy cream, half & half, or milk

  • 2 Tbsp / 28g fresh lemon juice

  • salt and pepper

Directions:

  1. Take the chicken breasts and lay them on a cutting board. Slice each chicken breast horizontally into two thinner breasts, slicing parallel to the cutting board. It’s like butterflying, but cut all the way through so you have two separate pieces.

  2. Heat the butter in a large pan or cast iron skillet over medium heat. Add all the pieces of chicken, and cook for a few minutes on each side until internal temperature reaches 165° / 74°C. Remove chicken from pan and set aside.

  3. Add carrots and onion to hot pan and cook several minutes, until starting to soften.

  4. Add mushrooms and cook for another few minutes, until mushrooms are cooked and have mostly released their water.

  5. Add garlic and thyme, cook for just another minute.

  6. Add flour and stir to coat all vegetables, cook another minute or so.

  7. Add the white wine to deglaze the pan.

  8. When the wine is almost evaporated, add the chicken broth; stir until sauce is smooth and slightly thickened.

  9. Remove pan from heat and stir in cream and lemon juice; season with salt and pepper to taste.

  10. Add chicken breasts back into sauce; serve. Goes great with mashed potatoes.

Jenny’s Notes:

  • Step 1 could be optional, you can keep your chicken breasts whole if you wish. I like cutting my chicken breasts into thinner pieces before cooking since a whole chicken breast is usually much bigger than a serving, and it takes longer to cook. Our butcher in Italy always cut our chicken breasts like this and I loved it, thinner pieces of meat that are done cooking in a matter of minutes.

  • If you prefer, bone-in chicken (legs, thighs, etc.) can be used. Adjust cooking time accordingly to ensure chicken is cooked through (165°F / 74°C)

  • I have made this before without the wine, and it was still wonderful. So if you don’t have any on hand or just prefer to cook without it, omit the wine with no worries.

  • To finish this dish in the oven, you’ll want to make the whole thing in a pan that is able to go into the oven, such as a cast iron skillet. Follow recipe as written up through step 8. Add chicken back into the pan (without adding cream or lemon juice) and place in an oven preheated to 350°F / 177°C. Bake uncovered for 35-45 minutes, or until sauce is bubbly. Remove from oven and stir in cream and lemon juice.

  • If you choose to finish in the oven, you can focus more on browning the chicken in the pan in step 2 rather than cooking it through, since it will be baked in the oven. Just make sure the chicken is fully cooked before you take it out of the oven at the end!

chicken breasts, chicken stew, french chicken dish, chicken fricassée, carrots, onions, mushrooms, white wine sauce
Dinner
French
Yield: 4
Author:
Chicken Fricassée

Chicken Fricassée

French chicken stew with carrots, onion, and mushrooms in a creamy white wine sauce
Prep time: 15 MinCook time: 35 MinTotal time: 50 Min

Ingredients

Instructions

  1. Take the chicken breasts and lay them on a cutting board. Slice each chicken breast horizontally into two thinner breasts, slicing parallel to the cutting board. It’s like butterflying, but cut all the way through so you have two separate pieces.
  2. Heat the butter in a large pan or cast iron skillet over medium heat. Add all the pieces of chicken, and cook for a few minutes on each side until internal temperature reaches 165° / 74°C. Remove chicken from pan and set aside.
  3. Add carrots and onion to hot pan and cook several minutes, until starting to soften.
  4. Add mushrooms and cook for another few minutes, until mushrooms are cooked and have mostly released their water.
  5. Add garlic and thyme, cook for just another minute.
  6. Add flour and stir to coat all vegetables, cook another minute or so.
  7. Add the white wine to deglaze the pan.
  8. When the wine is almost evaporated, add the chicken broth; stir until sauce is smooth and slightly thickened.
  9. Remove pan from heat and stir in cream and lemon juice; season with salt and pepper to taste.
  10. Add chicken breasts back into sauce; serve. Goes great with mashed potatoes.

Notes

  • Step 1 could be optional, you can keep your chicken breasts whole if you wish. I like cutting my chicken breasts into thinner pieces before cooking since a whole chicken breast is usually much bigger than a serving, and it takes longer to cook. Our butcher in Italy always cut our chicken breasts like this and I loved it, thinner pieces of meat that are done cooking in a matter of minutes.
  • If you prefer, bone-in chicken (legs, thighs, etc.) can be used. Adjust cooking time accordingly to ensure chicken is cooked through (165°F / 74°C)
  • I have made this before without the wine, and it was still wonderful. So if you don’t have any on hand or just prefer to cook without it, omit the wine with no worries.
  • To finish this dish in the oven, you’ll want to make the whole thing in a pan that is able to go into the oven, such as a cast iron skillet. Follow recipe as written up through step 8. Add chicken back into the pan (without adding cream or lemon juice) and place in an oven preheated to 350°F / 177°C. Bake uncovered for 35-45 minutes, or until sauce is bubbly. Remove from oven and stir in cream and lemon juice.
  • If you choose to finish in the oven, you can focus more on browning the chicken in the pan in step 2 rather than cooking it through, since it will be baked in the oven. Just make sure the chicken is fully cooked before you take it out of the oven at the end!


Nutrition Facts

Calories

304.93

Fat

12.69

Sat. Fat

6.48

Carbs

14.38

Fiber

2.31

Net carbs

12.05

Sugar

6.12

Protein

28.4

Sodium

494.26

Cholesterol

99.61

Nutritional Information is approximate. Based on 4 servings, using heavy cream

Did you make this recipe?
Tag @jennyblogsandbakes on instagram and hashtag it # jennyblogs

24 Hour Levain Pizza Dough

Margherita Pizza

Sourdough pizza!

My absolute favorite pizza dough recipe, and definitely worth the time to plan a day (or 2) ahead. At first glance the recipe might seem complicated (it is a 2 day recipe, after all), but it really is very simple, with no more than 1-2 minutes of kneading involved. With sourdough, time is your friend and does most of the work for you.

If you’ve ever made homemade pizza dough and wondered why it’s “good” but missing out on that chewy, wonderful crust texture that you get from the best pizzerias, this recipe will have you wondering no more. It’s chewy and flavorful and will have you whipping pizzas out of your home oven that taste about as close to your Italian vacation as can be possible! Which leads me to ask…

How’s it going? With your sourdough starter, I mean.

If you weren’t already dabbling in sourdough before 2020, everyone and their brother started a sourdough starter during all of the stay-home business and many varying lockdowns, ammiright?

Did your starter get off to success, or did it dwindle, never making it to its full, goopy, bubbly glory? Perhaps it’s sitting, forgotten, in the back of your fridge. Perhaps you’re a sourdough baking fiend, whipping out the loaves and baguettes like nobody’s business.

Or, just maybe, you’re like me, your friendly sourdough-user-but-not-an-expert, keeping the starter alive and using it occasionally but mostly as discard to flavor/boost other recipes. If this sounds familiar, then this recipe is perfect for you. Not too hard, I’ll try not to give you too much theory (yes, I do know some!), and, as long as you have a not-dead starter, basically foolproof.

Not convinced yet? This is the single pizza recipe I make most, by far, even though it takes 24+ hours, because it is that good and that simple. Actually, if I make pizza, I don’t even think about which crust I should make. I just make this one. Day 1 is really just stirring 3 ingredients together. That’s it.

Some Sourdough Tips

Did I mention I have experience but am not an expert on sourdough? Yes, so what follows is my experience and some of the most helpful sourdough tips I’ve learned over the past 5 years dabbling, that may help you too.

But where is the pizza? ;) Arugula Pizza

Keep in mind that sourdough is highly individual. Meaning, the time you give it, how active it is, the temperature of your house, types of flour you use, etc. will all affect your starter and your end product. For example, I’ve started sourdough starter on two separate continents with results that varied quite a bit. I’ve made this recipe several times with both my Italian and American starter. To be honest I always had more success with my American starter, it feels invincible where my Italian one always needed some tender care and coaxing. But maybe I subconsciously gave my Italian starter too much free reign thinking that it ought to know what to do, being Italian in the land of pizza, after all. Anyway, here goes nothing:

  1. When making sourdough breads, most recipes will assume or instruct you to have an active (freshly fed) starter. This means you probably fed your starter at least once the day before starting the recipe, and you’re not just taking your starter straight out of the fridge to start the recipe. Recipes that use NOT refreshed starters will often call themselves discard this or discard that.

    I USUALLY use my starter straight out of the fridge for this recipe. In fact, there may be a note somewhere with this recipe that says you can use your starter straight out of the fridge, making this not such a guilty confession. That’s another great thing about this recipe. And it turns out great. I will mention, though, that sometimes my Italian starter would yield a less fluffy crust, and I found more success if it was recently refreshed.

  2. I once read that it’s actually very hard to kill a (well-established) sourdough starter if it’s kept in the fridge. This relieved a great amount of guilt for me, as, if more than 1 week passed since I had last fed my starter, I had this constant nagging that every day more that passed my starter was dying and suffering. And while the sourdough starters of one person (me) are hardly a vast study, I would say this has turned out true. Even 1 month+ in the fridge and after just one feed it bounced back and was lively. Nice.

  3. Keep in mind the word “recipe” when associated with “sourdough” should be used loosely. Formula is a better word. The beauty, and frustrating part of sourdough is that it IS so variable. If something isn’t going right, in this recipe or any other with sourdough, go back to your starter, your little living friend. My two biggest mistakes with sourdough starter have been not giving a new starter enough time to get established, and not giving the actual dough enough time to rise. It can feel strange to let dough rise so many hours rather than the typical 1-2 hours with commercial yeast if that’s what you’re used to!

While the following recipe uses both volume and weight measurements, as is usual on this blog, I would encourage you in all baking but especially with sourdough to start using a scale. It makes everything easier, creates less dishes to wash, and is quicker and more accurate. When you’re working with sourdough it really does make most sense to use a scale. Scales are not expensive and you don’t need a top of the line one to do the job!

The Difference between “Sourdough Starter” and “Levain”

If these two terms confuse you, hopefully this explanation will help you.

Sourdough starter is your flour and water mixture that you keep in the fridge and feed.

Levain refers to the usually first part of a sourdough recipe where you add sourdough starter with more flour and water, that will end up as part of your bread product. Another way you can think of it, the levain is built from the starter and will always end up baked.

This post may contain affiliate links. If you make a purchase using these links, Jennyblogs may receive a small commission, at no extra cost to you. This helps to support Jennyblogs. For further information see the privacy policy. Grazie!

Recipe lightly adapted from Ken Forkish’s “The Elements of Pizza”


24+hr Levain Pizza Dough

Makes 2 large, 3 medium, or 5 small pizzas

Ingredients:

Day 1

  • 50g (2 Tbsp + 1 tsp) sourdough starter

  • 100g (1/3 cup + 4 tsp) water

  • 100g (3/4 cup + 2 tsp) bread flour or all-purpose flour

Day 2

  • 225g (scant 1 cup) water

  • 14g (2 1/2 tsp) salt

  • 250g (All of the levain [sourdough]) from day 1

  • 375g (scant 3 cups) all-purpose flour

Directions:

Day 1

  1. The evening before you intend to make pizzas, mix together in a medium bowl the sourdough starter, warm (100°F / 38°C) water, and flour.

  2. Cover the bowl and let it sit out on the countertop overnight.

Day 2

  1. Roughly 12 hours later, your starter from the day before should be bubbly, goopy, and active.

  2. Pour warm (90-95°F / 32°-38°C) water into a large bowl, add salt, and stir until salt has dissolved.

  3. Mix in all of the levain started the previous evening; it may not completely mix in, that’s ok. You can use a spoon or your hand with a “pincer” like motion, like a crab, helping the levain to break up into the water.

  4. Add flour and stir, with a spoon or by hand, just until dough forms into a mostly uniform mass. Continue for about 30 seconds, a shaggy looking dough ball is ok. Target dough temperature is 80°F / 27°C.

  5. Let dough rest for 20 minutes.

  6. Knead dough for 30 seconds - 1 minute on a lightly floured surface, dough should become very smooth and uniform. Shape into a ball and place seam side down into a lightly greased bowl; cover.

  7. Let dough rest at room temperature for about 3 hours.

  8. Turn dough out onto lightly floured surface and shape into desired number of balls (2 for larger pizzas, 3 for medium, or 5 for small), using a scale for consistency. Place shaped dough balls seam side down onto a lightly floured sheet tray, parchment paper, or silpat, keeping space between. Lightly flour tops and cover with plastic wrap; let rest for another 5 hours.

    After the 5 hours, the dough balls can either be refrigerated and used to make pizzas the next day (day 3), or continue and make pizzas!

Make Pizzas

  1. If you have a pizza stone, place it on the middle rack of your oven before turning it on.

  2. Preheat oven to 550°F / 288°C or the max of your oven.

  3. Roll with a rolling pin or toss a pizza dough ball to desired size, using lightly floured hands. Place dough round on parchment paper to easily transfer on and off the pizza stone.

  4. Bake about 5-7 minutes for small pizzas, 6-9 for medium, or 8-12 for large pizzas, using your eyes to test for readiness more than time.

Jenny’s Notes:

  • While I include the original temperature notes for ingredients from Ken Forkish’s original recipe, I will confess I don’t always take the time to measure or check them as I make this often enough in roughly the same environment/temperature house that I just go with it. It’s very educational to do so with new recipes and in new environments, and helps when sharing a sourdough recipe to keep the recipe as consistent as possible, keeping some of the factors (like temperature) the same.

  • The 8 hour rise time on day 2 as a mass, then as dough balls, (steps 7 and 8) doesn’t have to be precise, if you need to shape the dough after 2 hours, that’s perfectly fine, you just want a total time of about 8 hours, so you could rest the dough for 2 hours, shape, then rest for 6 hours.

  • If you refrigerate your dough and use it to make pizzas on what would be day 3, take dough out of the fridge about an hour before making/baking pizzas. In a pinch I’ve used the dough straight out of the fridge, but the dough will rise better and be fluffier if you don’t go cold turkey, heh.

  • If you’ve never used your oven at its maximum temperature and think that’s crazy, just keep in mind that pizzas made in wood burning pizza ovens like they are in Italy, are baked at temperatures of up to 900°F / 485°C, so your home oven at its max isn’t even going to get near the burst of heat that make the best pizzas!

pizza dough, levain, sourdough starter, homemade pizza
dinner
Italian, American
Yield: 3-5 pizzas
Author:
24 Hour Levain Pizza Dough

24 Hour Levain Pizza Dough

Homemade sourdough pizza crust in just 24 hours, with time doing most of the work for you!
Prep time: 35 MinCook time: 25 MinInactive time: 20 H & 20 MTotal time: 21 H & 20 M

Ingredients

Day 1
Day 2

Instructions

Day 1
  1. The evening before you intend to make pizzas, mix together in a medium bowl the sourdough starter, warm (100°F / 38°C) water, and flour.
  2. Cover the bowl and let it sit out on the countertop overnight.
Day 2
  1. Roughly 12 hours later, your starter from the day before should be bubbly, goopy, and active.
  2. Pour warm (90-95°F / 32°-38°C) water into a large bowl, add salt, and stir until salt has dissolved.
  3. Mix in all of the levain started the previous evening; it may not completely mix in, that’s ok. You can use a spoon or your hand with a “pincer” like motion, like a crab, helping the levain to break up into the water.
  4. Add flour and stir, with a spoon or by hand, just until dough forms into a mostly uniform mass. Continue for about 30 seconds, a shaggy looking dough ball is ok. Target dough temperature is 80°F / 27°C.
  5. Let dough rest for 20 minutes.
  6. Knead dough for 30 seconds - 1 minute on a lightly floured surface, dough should become very smooth and uniform. Shape into a ball and place seam side down into a lightly greased bowl; cover.
  7. Let dough rest at room temperature for about 3 hours.
  8. Turn dough out onto lightly floured surface and shape into desired number of balls (2 for larger pizzas, 3 for medium, or 5 for small), using a scale for consistency. Place shaped dough balls seam side down onto a lightly floured sheet tray, parchment paper, or silpat, keeping space between. Lightly flour tops and cover with plastic wrap; let rest for another 5 hours.
  9. After the 5 hours, the dough balls can either be refrigerated and used to make pizzas the next day (day 3), or continue and make pizzas!
Make Pizzas
  1. If you have a pizza stone, place it on the middle rack of your oven before turning it on.
  2. Preheat oven to 550°F / 288°C or the max of your oven.
  3. Roll with a rolling pin or toss a pizza dough ball to desired size, using lightly floured hands. Place dough round on parchment paper to easily transfer on and off the pizza stone.
  4. Bake about 5-7 minutes for small pizzas, 6-9 for medium, or 8-12 for large pizzas, using your eyes to test for readiness more than time.

Notes

  • While I include the original temperature notes for ingredients from Ken Forkish’s original recipe, I will confess I don’t always take the time to measure or check them as I make this often enough in roughly the same environment/temperature house that I just go with it. It’s very educational to do so with new recipes and in new environments, and helps when sharing a sourdough recipe to keep the recipe as consistent as possible, keeping some of the factors (like temperature) the same.
  • The 8 hour rise time on day 2 as a mass, then as dough balls, (steps 7 and 8) doesn’t have to be precise, if you need to shape the dough after 2 hours, that’s perfectly fine, you just want a total time of about 8 hours, so you could rest the dough for 2 hours, shape, then rest for 6 hours.
  • If you refrigerate your dough and use it to make pizzas on what would be day 3, take dough out of the fridge about an hour before making/baking pizzas. In a pinch I’ve used the dough straight out of the fridge, but the dough will rise better and be fluffier if you don’t go cold turkey, heh.
  • If you’ve never used your oven at its maximum temperature and think that’s crazy, just keep in mind that pizzas made in wood burning pizza ovens like they are in Italy, are baked at temperatures of up to 900°F / 485°C, so your home oven at its max isn’t even going to get near the burst of heat that make the best pizzas!


Nutrition Facts

Calories

591.5

Fat

1.59 g

Sat. Fat

0.24 g

Carbs

124.01 g

Fiber

4.39 g

Net carbs

119.62 g

Sugar

0.43 g

Protein

16.78 g

Sodium

1817.54 mg

Cholesterol

0 mg

Nutritional information is approximate. Based on 1 pizza dough ball if you make 3 medium sized dough balls.

Did you make this recipe?
Tag @jennyblogsandbakes on instagram and hashtag it #jennyblogs

Slata Tounsia - Tunisian Salad

Slata Tounsia, or Tunisian Salad, also called Salade Tunisienne, is a summertime classic in Tunisia.

Unlike most American salads that involve lettuce, there is no lettuce to be seen here, just tomato, cucumber, onion, apple, jalapeno peppers and a bright dressing that brings it all together and makes it irresistible. It’s simple, yet delicious.

It can be served as is as a side dish, or as it would be served traditionally, with tuna and hard boiled eggs, and olives, making it a well-rounded meal. I’m partial to the full-meal version, although my mom would probably be making fun of me since every time I call her and she asks what we’re having for dinner tuna, eggs, or both are probably involved. Hey, they’re good for you! Very mediterranean, you find lots of eggs and tuna in Italy as well.

The most classic version of the salad doesn’t include apple, even though many in Tunisia add it. We always add it because it gives such a happy and sweet element to the salad. I thought it sounded a bit strange at first, but it works really well.

Onion breath and how to avoid the worst of it

If you, like me, love onion but are hesitant to eat it raw if you have to go out in public anytime after, you know….”heyyyyyy guysssss I just ate onion!” you’ll be happy to hear that the dressing helps to cut the strength of the onion. Yes, you’ll still have some onion breath afterwards, but the vinegar and lemon in the dressing do wonders. If you really can’t deal with the onion breath, you can try soaking the onions for a few hours or overnight in the dressing (essentially making pickled onions) to cut their oniony strength even more. This salad I probably ate several times a week last summer when I was pregnant. I craved it but couldn’t deal with the onion breath afterwards, made me gag, haha, so we would leave the onions in the dressing for at least a few hours before finishing the salad.

To further reduce the after effects, I’m just going to go ahead and share some other ideas that I gathered off the internets and found to help. Nothing is foolproof, but it does help.

  1. Brush your teeth. This might seem obvious, but the sooner you can brush your teeth after eating onions or other insulting foods the better.

  2. Floss your teeth. Yep, just like brushing, get out all the stuff from the cracks for the cleanest and best chance at a fresh tasting mouth.

  3. Swish mouthwash.

  4. Chew gum.

  5. Eat other fruits, vegetables, and bread afterwards.

  6. Drink lots of water. I find lemon water to be especially pleasant and offsets the onion taste nicely.

  7. Drink milk. Kinda like when you eat spicy food, drinking milk can help flush out the taste/spice faster.

While it might be overkill to do all, my comfy little routine became brushing and flossing immediately after, drinking lemon water a few times, and chewing gum and rebrushing teeth as needed.

Anyway where were we? Oh yes, making slata tounsia. Enough villainizing the onions, who are friends.

Recipe from the husband


Slata Tounsia - Tunisian Salad

Serves 2 as a main dish or 3-4 as a side

Ingredients:

  • 2 tsp / 10g apple cider vinegar

  • juice from 1/2 a lemon

  • 1 tsp dried mint

  • 1 red onion, diced small

  • 2 cucumbers, diced small

  • 2 tomatoes, diced small

  • 1 apple, peeled if desired and diced small, optional

  • 8 jalapeño peppers, seeds removed and diced small

  • salt to taste

  • extra virgin olive oil, for drizzling

  • tuna, hard-boiled eggs, olives, for serving, optional

Directions:

IMG_3408.jpeg
  1. In a large bowl combine vinegar, lemon, and dried mint. Add the onion and mix to coat evenly. Allow to sit while you chop the rest of the vegetables and fruit.

  2. Add cucumbers, tomatoes, apple, jalapeño peppers, and salt to taste to the bowl with the onions. Taste, adding more salt as needed.

  3. To serve, drizzle with olive oil and arrange tuna and sliced hard-boiled eggs on top.

Jenny’s Notes:

  • While red onion is the best in this salad (and the prettiest!), other types of onions work as well.

  • red wine vinegar, white wine vinegar, or your favorite vinegar could be used in place of apple cider vinegar.

  • 8 jalapeño peppers might seem like a lot, but as long as you’re careful to remove all the seeds the salad will have a light kick but should not be overly spicy. Since peppers can vary in spiciness even if they’re the same variety, it’s always smart to have tasted/used the peppers before consuming them raw so you know what you’re getting yourself into. That said, you could use other types of peppers, spicier varieties if you’re brave or milder if spicy isn’t your thing.

Mediterranean cuisine, Tunisian dish, summer salad, slata tounsia, salade tunisienne
salad, side dish, main dish
Tunisian, Mediterranean
Yield: 2-4
Author:
Slata Tounsia

Slata Tounsia

A classic Tunisian summer salad made of cucumber, tomato, hot peppers, onion, and sometimes apple with a bright and simple dressing served with hard boiled eggs, tuna, and olives.
Prep time: 30 MinTotal time: 30 Min

Ingredients

Instructions

  1. In a large bowl combine vinegar, lemon, and dried mint. Add the onion and mix to coat evenly. Allow to sit while you chop the rest of the vegetables and fruit.
  2. Add cucumber, tomatoes, apple, jalapeño peppers, and salt to taste to the bowl with the onions. Taste, adding more salt as needed.
  3. To serve, drizzle with olive oil and arrange tuna and sliced hard-boiled eggs on top.

Notes

  • While red onion is the best in this salad (and the prettiest!), other types of onions work as well.
  • red wine vinegar, white wine vinegar, or your favorite vinegar could be used in place of apple cider vinegar.
  • 8 jalapeño peppers might seem like a lot, but as long as you’re careful to remove all the seeds the salad will have a light kick but should not be overly spicy. Since peppers can vary in spiciness even if they’re the same variety, it’s always smart to have tasted/used the peppers before consuming them raw so you know what you’re getting yourself into. That said, you could use other types of peppers, spicier varieties if you’re brave or milder if spicy isn’t your thing.

Nutrition Facts

Calories

183.34

Fat

7.96 g

Sat. Fat

1.13 g

Carbs

28.25 g

Fiber

6.65 g

Net carbs

21.61 g

Sugar

17.75 g

Protein

3.27 g

Sodium

111.39 mg

Cholesterol

1.86 mg

Nutritional info is approximate. Based on 2 servings that includes apple. Not including tuna, eggs, and olives.

Did you make this recipe?
Tag @jennyblogsandbakes on instagram and hashtag it #jennyblogs

Crispy Gnocchi with Brussels Sprouts

Made with pumpkin gnocchi

Made with pumpkin gnocchi

Think gnocchi with crispy sides, tender browned brussels sprouts with crispy edges, with a browned butter sauce and a bright hint of lemon.

I found this recipe thanks to New York Times’ Instagram account, and after the first OH YEAH THIS IS GOOD trial run I’ve made it several times since. It’s easy, the ingredient list isn’t scary long, and it has brussels sprouts so it’s totally healthy, right? Maybe not, but it’s rich and satisfying so you don’t need to eat a huge serving.

It starts with cooking and crisping up those little sprouts, then you trade out the sprouts to brown the gnocchi, then add butter, honey, lemon and a bit of red pepper flake spice and cook until the butter browns (when it smells like heaven); add the sprouts back in and grate a little parmesan cheese on top. Easy and impressive!

Brussels sprouts

Brussels sprouts often get a bad rap and I know people who will only eat them if they’re served with plenty of bacon. While I’m sure there do exist those people who truly dislike the sprouts, I believe that most people who claim to not like them just haven’t eaten them properly prepared. There’s nothing worse than limp or soggy brussels sprouts. Never ever boil them, yeah? They’re at their most delicious if they are pan fried or oven baked. Crispy brussels sprouts: yummy. Soggy brussels sprouts: yucky. If you or someone you know is a brussels sprout skeptic, this recipe may just be the one to win you over!

That said, if you are one of the true dislikers, you can switch out the brussels sprouts for other veggies like broccoli, cauliflower, cabbage, kale, or any of those cruciferous types.

Adaptations from the original recipe

While New York Times might think this recipe serves 4 people, I pretty consistently ate this in 2-3 sittings. Ahem. I added in the “3” part just to be generous.

I reduced the butter from 6 Tbsp to 4 Tbsp. 6 was just…a lot. You’re more than welcome to use that much if you’re looking for a very rich dish, but I think 4 was plenty, you could probably even get away with 2-3 Tbsp.

The original recipe calls for pan frying the brussels sprouts, but no matter how many times I’ve tried, it always took much longer for the brussels to cook than the specified 5-8 minutes. I would say up to 15-20 is closer. I’m sure part of it is that I don’t have a cast iron skillet. Otherwise, it can be more time efficient to roast the brussels sprouts in the oven while you’re preparing the gnocchi.

I reduced and changed the lemon aspect of the recipe. NYT says to peel thick strips of lemon zest, then chop, ending with about 2 tsp of zest. I personally found the lemon a little overpowering this way, so I compromised and was happy with the following adaptations: zesting a lemon with a regular zester, which creates a finer zest, and using only about 1/2-1 tsp of the finer zest, OR skipping the zest and adding in a splash of fresh lemon juice at the end. Either way a bit quicker and easier. One of my least favorite tasks in the kitchen is zesting citrus so sometimes I opt for a splash of lemon juice when I just don’t want to zest, ya know?

If you noticed I listed 1 lb of brussels sprouts as 500g, which are not equal weights. That’s because brussels sprouts often come in 500g packages in Italy. Since a pound is really only 454g, I rounded up for practicality’s sake. Yes, it bothers me to do so but I think it’s for the best, ahem. :)

This post may contain affiliate links. If you make a purchase using these links, Jennyblogs may receive a small commission, at no extra cost to you. This helps to support Jennyblogs. For further information see the privacy policy. Grazie!

Recipe adapted from New York Times


Crispy Gnocchi with Brussels Sprouts

Serves 2-3

Ingredients

  • 1/4 cup / 56g olive oil

  • 1 lb / 500g brussels sprouts

  • salt and pepper, to taste

  • 1/2 tsp lemon zest

  • 1/2 tsp red pepper flakes

  • 18 oz / 500g package of gnocchi

  • 4 Tbsp / 56g butter

  • 1/2 tsp honey

  • grated parmesan cheese, for serving

Directions:

  1. Clean and chop off the ends of the brussels sprouts, and any brown leaves. Slice into halves, or quarters if they’re particularly large.

  2. Cook the brussels sprouts OPTION 1, SKILLET:

    Heat 3 Tbsp / 42g of the oil in a large skillet over medium heat. Add brussels sprouts in an even layer, sprinkle with 1/2 tsp salt and some pepper. Sprinkle over lemon zest and cook for 10-15 minutes, stirring occasionally, or until sprouts are crispy and a nice golden brown.

    Add the red pepper flakes and stir, cook for another 3-4 minutes or until sprouts are crisp and tender.

    Transfer to a plate or bowl while you cook the gnocchi.

    OPTION 2, OVEN:

    Preheat oven to 450°F / 232°C.

    Toss the brussels sprouts with 3 Tbsp of oil, 1/2 tsp salt, some pepper, lemon zest, and red pepper to evenly coat; spread in an even layer on a baking sheet lined with parchment paper.

    Roast in the oven for about 15 minutes, or until crispy, golden, and tender. While roasting, prepare gnocchi.

  3. Add the remaining 1 tbsp / 14g of oil to a skillet over medium-high heat. Add gnocchi in an even layer and cook without stirring, 3-4 minutes or until golden brown underneath.

  4. Add butter and honey, season with salt and pepper. Cook until butter has melted and starts to turn golden brown and nutty smelling, this can take several minutes.

  5. Add the brussels sprouts to the skillet and cook just until everything is warmed through.

  6. Remove from heat and serve with a sprinkling of parmesan cheese.

Jenny’s Notes:

  • Use just 2 Tbsp / 28g butter for the lightest version of this!

  • Butter can go quickly from perfectly browned and nutty to burnt, so keep a close eye on it!

  • Whether you buy a package of gnocchi or make your own, different flavors are delicious in this recipe! Pictured in this post (first and last) are some pumpkin gnocchi, so good!

gnocchi, easy dinner, comfort food, brussels sprouts
dinner
American
Yield: 2-3
Author:
Crispy Gnocchi and Brussels Sprouts

Crispy Gnocchi and Brussels Sprouts

Crispy, pan-fried gnocchi and roasted brussels sprouts with parmesan cheese, a hint of lemon, spice, and honey.
Cook time: 40 MinTotal time: 40 Min

Ingredients

Instructions

  1. Clean and chop off the ends of the brussels sprouts, and any brown leaves. Slice into halves, or quarters if they’re particularly large.
  2. Cook the brussels sprouts OPTION 1, SKILLET:
  3. Heat 3 Tbsp / 42g of the oil in a large skillet over medium heat. Add brussels sprouts in an even layer, sprinkle with 1/2 tsp salt and some pepper. Sprinkle over lemon zest and cook for 10-15 minutes, stirring occasionally, or until sprouts are crispy and a nice golden brown.
  4. Add the red pepper flakes and stir, cook for another 3-4 minutes or until sprouts are crisp and tender.
  5. Transfer to a plate or bowl while you cook the gnocchi.
  6. OPTION 2, OVEN:
  7. Preheat oven to 450°F / 232°C.
  8. Toss the brussels sprouts with 3 Tbsp of oil, 1/2 tsp salt, some pepper, lemon zest, and red pepper to evenly coat; spread in an even layer on a baking sheet lined with parchment paper. Roast in the oven for about 15 minutes, or until crispy, golden, and tender. While roasting, prepare gnocchi.
  9. Add the remaining 1 tbsp / 14g of oil to a skillet over medium-high heat. Add gnocchi in an even layer and cook without stirring, 3-4 minutes or until golden brown underneath.
  10. Add butter and honey, season with salt and pepper. Cook until butter has melted and starts to turn golden brown and nutty smelling, this can take several minutes.
  11. Add the brussels sprouts to the skillet and cook just until everything is warmed through.
  12. Remove from heat and serve with a sprinkling of parmesan cheese.

Notes

  • Use just 2 Tbsp / 28g butter for the lightest version of this!
  • Butter can go quickly from perfectly browned and nutty to burnt, so keep a close eye on it!
  • Whether you buy a package of gnocchi or make your own, different flavors are delicious in this recipe! Pictured are some pumpkin gnocchi, so good!


Nutrition Facts

Calories

705.17

Fat

37.14 g

Sat. Fat

13.14 g

Carbs

81.25 g

Fiber

7.83 g

Net carbs

73.42 g

Sugar

4.94 g

Protein

15.02 g

Sodium

307.61 mg

Cholesterol

90.46 mg

Nutritional info is approximate. Based on 3 servings

Did you make this recipe?
Tag @jennyblogsandbakes on instagram and hashtag it # jennyblogs

Broccoli Cheddar Pasta

Adjustments.jpeg

If the name of this pasta sounds familiar, it’s because you might be thinking of Panera Bread’s Broccoli Cheddar Soup. That’s exactly what you should be thinking, because this pasta is an ode to the soup.

Growing up one of my favorite meals was what we called “broccoli carrot cheese soup”. I would only get it every now and then, as my mom’s version included the likes of Velveeta cheese and didn’t line up with what she normally fed her family. No matter how much broccoli and carrots you put in the soup, they just won’t offset the mysterious substance that is Velveeta Cheese.

My childhood love of the soup led me to think, why couldn’t you recreate it as a pasta? You know, make the cheesy soup a little thicker so it’s like a sauce, then add pasta? Basically macaroni and cheese with broccoli and carrots. But you know, sans Velveeta.

Seemed like a great idea to me! While it normally takes at least a few tries, if not many, when I’m creating a new recipe or idea, this was one of the few instances where the first try turned out pretty great. Some things are just meant to be, ya know?

While the classic soup uses cheddar, I don’t use cheddar when I make this in Italy. Cheddar is only sold in select stores in Italy, almost always in slices, and is not the cheapest. For these reasons, I use my go-to melty cheese, Fontal. And a bit of Parmesan, because Italy. Cheddar is the original choice for the soup, and is often used as a melting cheese in many recipes, and one of my favorites to use when I’m making this in the States. On the other hand, you don’t have to use Fontal or cheddar, use your favorite melting cheese!

This post may contain affiliate links. If you make a purchase using these links, Jennyblogs may receive a small commission, at no extra cost to you. This helps to support Jennyblogs. For further information see the privacy policy. Grazie!

Recipe by Jenny Nicole


Broccoli Cheddar Pasta

Serves 3-4

Adjustments.jpeg

Ingredients:

  • 8oz / 250g (1/2 package) short pasta, such as shells, fusilli, macaroni, etc.

  • 2 Tbsp / 28g butter

  • 1 head of broccoli, chopped into small pieces

  • 2 medium carrots, sliced into half or quarter moons

  • 3 Tbsp / 23g all-purpose flour

  • 1/2 cup / 118g vegetable broth or water

  • 1 cup / 237g milk

  • 1/4 tsp turmeric

  • salt and pepper, to taste

  • 1 cup / 114g shredded cheddar, fontal, or similar cheese

  • 1/4 cup / 25g grated Parmesan cheese

Directions:

  1. Bring water to boil in a large pot and cook pasta according to directions. In the meantime you can start the sauce.

  2. In a large pot over medium heat, melt butter. Add broccoli and carrots and cover with a lid, stir frequently. Cook until vegetables start to become tender, about 12-15 minutes.

  3. Remove lid and turn heat down to low. Add flour and stir until it has coated the vegetables.

  4. Add broth and stir until thickened.

  5. Add milk, 1/4 cup at a time, stirring constantly. Allow mixture to start to thicken each time before adding the next 1/4 cup of milk.

  6. Add turmeric, salt and pepper, and cheeses; stir until all the cheese is melted and the sauce is homogeneous.

  7. Once the pasta is cooked, drain it, reserving some of the pasta water.

  8. Add the pasta to the sauce and stir to evenly coat. If a thinner sauce is desired, add some of the reserved pasta water.

Jenny’s Notes:

  • You can cook the broccoli and carrots in a couple different ways:

    • Sauté/steam them as in the recipe above

    • Steam them and make the sauce separately, adding the steamed veggies to the sauce after the cheese

    • Boil them with the pasta. If you choose this boiling method, you can add the veggies at the same time as the pasta which will result in very soft veggies, or add them in half way through to retain a bit of bite. Drain pasta and veggies as you normally would the pasta, then add all to sauce.

broccoli carrot cheese soup, broccoli cheddar pasta
Dinner, pasta
American
Yield: 3-4
Author:
Broccoli Cheddar Pasta

Broccoli Cheddar Pasta

Cheesy pasta with plenty of broccoli and carrots, just like the beloved Broccoli Cheddar soup!
Prep time: 10 MinCook time: 25 MinTotal time: 35 Min

Ingredients

Instructions

  1. Bring water to boil in a large pot and cook pasta according to directions. In the meantime you can start the sauce.
  2. In a large pot over medium heat, melt butter. Add broccoli and carrots and cover with a lid, stir frequently. Cook until vegetables start to become tender, about 12-15 minutes.
  3. Remove lid and turn heat down to low. Add flour and stir until it has coated the vegetables.
  4. Add broth and stir until thickened.
  5. Add milk, 1/4 cup at a time, stirring constantly. Allow mixture to start to thicken each time before adding the next 1/4 cup of milk.
  6. Add turmeric, salt and pepper, and cheeses; stir until all the cheese is melted and the sauce is homogeneous.
  7. Once the pasta is cooked, drain it, reserving some of the pasta water.
  8. Add the pasta to the sauce and stir to evenly coat. If a thinner sauce is desired, add some of the reserved pasta water.

Notes

You can cook the broccoli and carrots in a couple different ways:

  • Sauté/steam them as in the recipe above
  • Steam them and make the sauce separately, adding the steamed veggies to the sauce after the cheese
  • Boil them with the pasta. If you choose this boiling method, you can add the veggies at the same time as the pasta which will result in very soft veggies, or add them in half way through to retain a bit of bite. Drain pasta and veggies as you normally would the pasta, then add all to sauce.

As in just about all recipes, if you really love cheese you can always add more! Or less, for that matter.

Nutrition Facts

Calories

507.33

Fat

25.49 g

Sat. Fat

14.46 g

Carbs

48.60 g

Fiber

6.33 g

Net carbs

42.27 g

Sugar

3.16 g

Protein

22.70 g

Sodium

781.05 mg

Cholesterol

71.17 mg

Nutritional information is approximate. Based on 3 servings.

Did you make this recipe?
Tag @jennyblogsandbakes on instagram and hashtag it #jennyblogs
In these photos i used whole wheat radiatori pasta

In these photos i used whole wheat radiatori pasta


Labor Eggplant Parmesan

This Eggplant Parmesan is, apparently, labor-inducing magic.

Adjustments.jpg

If you’re pregnant and at full term (39 weeks), there’s an Italian restaurant that serves an Eggplant Parmesan that could help you go into labor, or so say hundreds of women. Too good to be true? Probably. I was certainly a skeptic. But it didn’t keep me from being curious!

The best part? They have the recipe up on their website so you don’t have to go to Georgia to have your baby!

Please note: If you are not expecting a baby, this recipe won’t make you go into labor. That’s good news, so everyone can enjoy this dish.

What’s the deal with this Eggplant Parmesan?

Down in Cobb County, Georgia, this Italian restaurant, Scalini’s, has their walls lined with photos of women and their babies, hundreds of them. What do they have in common? They all ate Scalini’s famous Eggplant Parmesan within 48 hours of going into labor. You can visit their site here and read some of the moms’ testimonies.

We know it can’t be the restaurant or their atmosphere, since the recipe is online and many moms from all over have made this and have their own Eggplant Parmesan babies!

By now I can’t even remember how I first came across this story. In fact, you may already know about it, it’s been on What to Expect, Today’s Parent, and others.

It seemed comically incredible to me, and I immediately decided I would have to make this a bit later on in my pregnancy. I of course gave no stock to its magical labor powers, reading the testimonies it seemed like a lot of coincidences. If you’re past your due date and you go into labor, uh, sorry but how do you know it was the eggplant? Chances are you would’ve gone into labor anyway! Or so I was inclined to think. But like eating spicy food, dancing, curb-walking, and any other means a woman might resort to for getting labor going, it seemed harmless and fun, one more thing to try. And I think women like to actively get labor on because not only are we uncomfortable and can’t wait to meet baby, but we also like to feel like we’re doing something and not just sitting around like…glowing whales?

My Eggplant Parmesan Labor Story

One fine September eve when I was 40+3 weeks pregnant I decided it was time to have some fun and try this parmigiana. It had only reached about 90°F/32°C that day, so naturally the first thing I decided to do would be to turn on the oven.

The whole making of this dish took me longer than I anticipated, so many eggplant slices! So after several hours on my feet in a hot kitchen I was feeling quite tuckered out. I had had plans with my husband to go out for our nightly passeggiata and it kept getting later and later. Finally the parmigiana was out of the oven and ready, so good. Worth it!

I later went out onto our little patio to cool down in the evening air and make some calls. No one answered, and I had this strange forlorn feeling, like something was about to happen and I couldn’t get ahold of anyone. My mom eventually called me back, and we laughed and talked until late. I had started having some more regular Braxton-Hicks shortly before and during the call, and I joked that maybe I should start practicing with my pregnancy app contraction timer so the first time I’m not trying to use it is in actual labor.

We hung up at almost 1am my time, on the premise that I should sleep. On reentering the apartment I saw the parmigiana again and had to eat another couple bites. I had barely laid down when I felt what was unmistakably a real contraction. Some more ensued and I started keeping track for real on the contraction timer. They were coming regularly and the more I moved the faster and harder they came. I didn’t get a wink of sleep as a contraction would wake me up anytime my eyes started to close, and eventually my body decided to evict all of the Eggplant Parmesan. A few hours later we were at the hospital. Almost exactly 24 hours after eating this Eggplant Parm my son was born. Am I believer now? I just might be, or yet another coincidence…

What is Eggplant Parmesan?

An Italian dish known as Parmigiana di Melanzane or often simply parmigiana, it consists of layers of deep fried eggplant, tomato sauce, and cheese. It’s as heavy and wonderfully delectable as it sounds.

Eggplant Parmesan is a rather labor intensive dish (no pun intended!). The eggplants need to be salted and sit for an hour, the marinara sauce needs to simmer for an hour, then there is the breading and frying of the eggplant, and the actual assembly and baking. To make things easier you can make the marinara ahead. You can also make the whole dish ahead of time, it makes for wonderful leftovers OR you can refrigerate it or freeze it before baking. One Italian recipe I was reading even went as far as to claim that time itself was one of the most important ingredients for an unbeatable parmigiana, time for the flavors to meld after it’s assembled and baked.

This particular recipe is a family recipe from Scalini’s restaurant. From what I know of Parmigiana, this is pretty close to the original dish, albeit slightly Americanized. I don’t mean that scathingly, as not everything that’s not the original is automatically bad. Often people tend to fall on two sides of this “issue.” They don’t know/don’t care what the difference is, or they’re righteously indignant that a restaurant could call itself Italian and serve, say, Fettuccine Alfredo. I do, however, think it’s important to understand what the original dish is meant to be, while appreciating that it may evolve into something different, especially as it’s served in different countries over the years. An Italian restaurant in Italy is naturally going to be different than an Italian restaurant in America, each having different clientele, differing availability of ingredients. This being a family recipe handed down in an Italian immigrant family, I’m sure they know the following stuff better than I!

That said, the main differences between the classic recipe and this one, are the following:

  • In Italy the eggplants in parmigiana are typically deep fried: I’ve mostly seen them fried as is, but some do batter in flour, egg, or both before frying. Scalini’s batters in flour, egg, and bread crumbs, but only directs to sauté.

  • The marinara usually would be simmered with salt, pepper, and onion, with fresh basil added in the last few minutes. Scalini’s uses oregano and several other spices. This right here is often what tips me off to an “Americanized” dish: we love to add more spice, more cheese, etc. Again, it’s not wrong, just different. I happen to think both ways can be delicious.

  • Scalini’s uses a generous amount of ricotta alongside parmesan and romano, the classic usually calls for just Parmigiano and mozzarella, although some use caciocavallo and yet others use provolone or a scamorza bianca.

In other Italian recipes for Parmigiana di Melanzane I’ve seen some of the following suggestions:

  • As far as the classic recipe goes, you can leave the skin on the eggplant, peel it, or peel it in stripes, depending on your preference. I recommend leaving it on for 3 main reasons: The skin is where most of the nutrients are, where most of the flavor and texture is, and it’s easier to leave it on.

  • Choose firm, ripe, dark purple globe eggplants.

  • While this recipe doesn’t specify, it’s often recommended to remove some of the extra water from the fresh mozzarella as well. Simply squeeze the mozzarella between paper towels until the paper towels remain mostly dry. This could be skipped if you choose a drier cheese such as caciocavallo or provolone in place of the mozzarella. Others recommend using a mozzarella closer to its expiration date, when it has naturally lost some of its water. (See note below though, as it may be why Scalini’s doesn’t say to remove the water.)

  • Some recipes in Italian say to layer in this order: eggplant, mozzarella, sauce, parmesan. They say finishing with mozzarella on top may cause it to become too dry and burn. You’ll notice this recipe finishes with mozzarella only on top. I didn’t have problems with the mozzarella burning, but I also didn’t remove too much water from the mozzarella first so that could be why.

The recipe below is Scalini’s exact recipe, to best preserve its baby’s-a-comin’ magic. Some of the directions I may have re-worded to make them a bit more clear. You’ll also find my usual recipe notes at the bottom, some of the questions I came across while making this and ideas to make things easier.

This post may contain affiliate links. If you make a purchase using these links, Jennyblogs may receive a small commission, at no extra cost to you. This helps to support Jennyblogs. For further information see the privacy policy. Grazie!


Eggplant Parmesan alla Scalini’s

Serves about 8-12

Ingredients:

For the Eggplant Parmesan

  • 3 medium eggplants, washed

  • 1 cup / 120g flour

  • 6 eggs, beaten

  • 4 cups / 400g fine Italian bread crumbs, seasoned

  • olive oil for sautéing

  • 8 cups marinara sauce, recipe below

  • 2 cups / 500g ricotta cheese

  • 1/2 cup / 50g grated Romano cheese

  • 1/2 cup / 50g grated Parmesan cheese

  • 1/2 lb / 227g fresh mozzarella, grated

For Scalini’s Marinara Sauce

  • 3 Tbsp / 42g olive oil

  • 1 cup onion, chopped

  • 2 Tbsp chopped garlic

  • 8 cups chopped tomatoes, fresh or canned

  • 1/2 cup chopped fresh parsley

  • 1 tsp oregano

  • 1 tsp crushed red pepper flakes

  • 1/8 cup chopped fresh sweet basil

  • pinch of thyme

  • pinch of rosemary

  • 1 tsp salt

  • 1 tsp black pepper

Directions:

Make the Eggplant Parmesan:

Oven preheated to 375°F / 190°C. 9x13in / 23x33cm or similar size baking dish.

  1. Slice the eggplant into 1/4in / 1/2cm slices.

  2. Line eggplant slices on paper towels. Lightly salt them, cover with more paper towels, and place something heavy on top of them. This will drain excess moisture. Allow to sit for about an hour.

  3. When the hour is up, heat a small amount of oil in a large frying pan over medium heat. Take one slice of eggplant and dip in flour, then dip in beaten eggs, then dredge in breadcrumbs. Place in hot pan and cook on each side until golden brown. Repeat with remaining slices of eggplants, adding more oil to pan as needed.

  4. In the baking dish, spread enough marinara sauce to generously cover the bottom. Add a layover of eggplants, then spread some ricotta, Romano, and Parmesan cheese over eggplants. Repeat layers until within about 1/8in / 1/4cm from the top.

  5. Evenly sprinkle mozzarella over top.

  6. Bake for about 25 minutes or until hot and bubbling. Let sit for 10 minutes before serving.

Make the Marinara Sauce

  1. In a large pot over medium heat, lightly sauté onions in oil for a few minutes.

  2. Add garlic and cook for another minute.

  3. Add tomatoes and bring to a boil.

  4. Turn heat to low and add remaining ingredients; stir and cover. Simmer for 1 hour, stirring occasionally.

Jenny’s Notes:

  • Scalini’s recipe doesn’t specify what size baking dish to use, so I guessed. I halved this recipe and used an 8x8in / 20x20cm baking dish and ended up with quite a few eggplant slices leftover. I did not halve the marinara recipe and made the full 8 cups, hoping to have leftover. However I didn’t have much leftover. If you’re making the full 9x13ish recipe above, you might want to consider making more than 8 cups sauce. Any leftovers you can use on pasta, as a dip for breadsticks or garlic bread, on pizza, or anything else you like marinara on.

  • The hour that the eggplant is sitting and sweating is a good moment to make the marinara. Then the marinara can simmer for its hour while you start frying the eggplant. Otherwise you can make the marinara sauce 1-2 days ahead.

  • Cup and Tbsp measurements are a bit less common than indicating the amount of vegetable/fruit, 1 onion, 1/2 an onion, etc. If you don’t feel like measuring the onion and garlic, I used 1 medium-large onion and 6 garlic cloves and it turned out great.

  • Seasoned Italian breadcrumbs are not a thing in Italy, only plain breadcrumbs exist, so that is what I used. I could have added a bit of dried oregano, basil, parsley, garlic and onion powder to make my own Italian breadcrumbs, but I opted not to since the marinara is already quite generously spiced.

  • I ended up needing quite a bit more flour and even breadcrumbs than called for, this will all depend on the size of your eggplants. The important part here is making sure all the eggplant slices get breaded rather than following the recipe precisely.

  • When it comes to sautéing the eggplant, you may want to use 2 pans simultaneously to fry them up, to make it go quicker. Otherwise, you could choose to deep fry them as is traditional (but use a frying oil such as refined peanut oil, not olive oil for deep frying) or bake them. I baked some of mine and thought it worked nicely and saved a lot of time. I’ve also read of Italians grilling the eggplant for a lighter version.

  • 1/8in seems like a very close and precise measurement for filling the baking dish, you can play it by, uh, eye, and stop where you feel comfortable. I left a touch more space so the marinara wouldn’t bubble over while baking.

Labor inducing, how to induce labor, eggplant parmesan, authentic Italian recipe, Eggplant parmigiana, Parmigiana alla melanzane, Scalini's
dinner
Italian
Yield: 8-10
Author:
Eggplant Parmesan alla Scalini's

Eggplant Parmesan alla Scalini's

Thinly sliced eggplant breaded and fried layered with a flavorful, homemade marinara and plenty of ricotta, parmesan, romano, and mozzarella. An Italian classic.
Prep time: 1 H & 20 MCook time: 1 H & 25 Minactive time: 1 H & 10 MTotal time: 3 H & 55 M

Ingredients

For the Eggplant Parmesan
For Scalini’s Marinara Sauce

Instructions

Make the Eggplant Parmesan
  1. Oven preheated to 375°F / 190°C. 9x13in / 23x33cm or similar size baking dish.
  2. Slice the eggplant into 1/4in / 1/2cm slices.
  3. Line eggplant slices on paper towels. Lightly salt them, cover with more paper towels, and place something heavy on top of them. This will drain excess moisture. Allow to sit for about an hour.
  4. When the hour is up, heat a small amount of oil in a large frying pan over medium heat. Take one slice of eggplant and dip in flour, then dip in beaten eggs, then dredge in breadcrumbs. Place in hot pan and cook on each side until golden brown. Repeat with remaining slices of eggplants, adding more oil to pan as needed.
  5. In the baking dish, spread enough marinara sauce to generously cover the bottom. Add a layover of eggplants, then spread some ricotta, Romano, and Parmesan cheese over eggplants. Repeat layers until within about 1/8in / 1/4cm from the top.
  6. Evenly sprinkle mozzarella over top.
  7. Bake for about 25 minutes or until hot and bubbling. Let sit for 10 minutes before serving.
Make the Marinara Sauce
  1. In a large pot over medium heat, lightly sauté onions in oil for a few minutes.
  2. Add garlic and cook for another minute.
  3. Add tomatoes and bring to a boil.
  4. Turn heat to low and add remaining ingredients; stir and cover. Simmer for 1 hour, stirring occasionally.

Notes:

  • Scalini’s recipe doesn’t specify what size baking dish to use, so I guessed. I halved this recipe and used an 8x8in / 20x20cm baking dish and ended up with quite a few eggplant slices leftover. I did not halve the marinara recipe and made the full 8 cups, hoping to have leftover. However I didn’t have much leftover. If you’re making the full 9x13ish recipe above, you might want to consider making more than 8 cups sauce. Any leftovers you can use on pasta, as a dip for breadsticks or garlic bread, on pizza, or anything else you like marinara on.
  • The hour that the eggplant is sitting and sweating is a good moment to make the marinara. Then the marinara can simmer for its hour while you start frying the eggplant. Otherwise you can make the marinara sauce 1-2 days ahead.
  • Cup and Tbsp measurements are a bit less common than indicating the amount of vegetable/fruit, 1 onion, 1/2 an onion, etc. If you don’t feel like measuring the onion and garlic, I used 1 medium-large onion and 6 garlic cloves and it turned out great.
  • Seasoned Italian breadcrumbs are not a thing in Italy, only plain breadcrumbs exist, so that is what I used. I could have added a bit of dried oregano, basil, parsley, garlic and onion powder to make my own Italian breadcrumbs, but I opted not to since the marinara is already quite generously spiced.
  • I ended up needing quite a bit more flour and even breadcrumbs than called for, this will all depend on the size of your eggplants. The important part here is making sure all the eggplant slices get breaded rather than following the recipe precisely.
  • When it comes to sautéing the eggplant, you may want to use 2 pans simultaneously to fry them up, to make it go quicker. Otherwise, you could choose to deep fry them as is traditional (but use a frying oil such as refined peanut oil, not olive oil for deep frying) or bake them. I baked some of mine and thought it worked nicely and saved a lot of time. I’ve also read of Italians grilling the eggplant for a lighter version.
  • 1/8in seems like a very close and precise measurement for filling the baking dish. I left a touch more space so the marinara wouldn’t bubble over while baking.


Calories

689.69

Fat (grams)

27.88

Sat. Fat (grams)

11.16

Carbs (grams)

79.97

Fiber (grams)

10.93

Net carbs

69.04

Sugar (grams)

16.07

Protein (grams)

33.24

Sodium (milligrams)

1434.96

Cholesterol (grams)

189.44

Nutritional Information is approximate. Based on the recipe as written, or approximately a 9x13in / 23x33cm dish providing 8 servings.

Did you make this recipe?
Tag @jennyblogsandbakes on instagram and hashtag it #jennyblogs

Coconut Curry Lentil Soup

Adjustments.jpeg

I was never a big fan of lentils growing up, but the past couple of years I’ve really been appreciating their nutritious versatility. So when I saw a recipe called “Best Lentil Soup” I wanted to try it. At the same time I was very skeptical. Best? In the whole wide world? I kinda doubt it. But now I want to try it to see just how good it is, because it probably is good. But best is a really big word.

Do you know what? This is a really good lentil soup. I’m taking out that word “best” because I certainly have not tried all the lentil soups in the world, and don’t feel that this soup could accurately make that claim without trying hundreds more lentil soups. But it IS delicious. It’s creamy, comforting, and leaves your tummy feeling all warm and fuzzy and satisfied. It has a bit of zing from ginger and curry, and a bit of acidity from fresh lemon to round off the creamy coconut base. Plus it comes together quickly and is freezer friendly.

So if you, like me, are craving and enjoying all the comforting food and clothes and activities that come with fall, then you should try out this soup!

This post may contain affiliate links. If you make a purchase using these links, Jennyblogs may receive a small commission, at no extra cost to you. This helps to support Jennyblogs. For further information see the privacy policy. Grazie!

Recipe lightly adapted from Love and Lemons


Coconut Curry Lentil Soup

Serves 4-6

Ingredients:

Adjustments.jpeg
  • 2 Tbsp / 28g oil

  • 1 medium onion, finely chopped

  • 4 garlic cloves, minced

  • 3 Tbsp fresh ginger, grated

  • 1 Tbsp mild curry powder

  • 1/4 tsp crushed red pepper flakes

  • 28oz / 800g canned fire-roasted or regular diced tomatoes

  • 1 cup dry lentils

  • 2 1/2 cups / 593g water

  • 1 14oz / 400g can coconut milk

  • Salt and pepper to taste

  • Generous handful of cilantro, roughly chopped

  • Lemon or lime wedges, for serving

Directions:

  1. Heat oil in a large pot over medium heat. Add onion and cook until translucent and soft, about 5 minutes, stirring occasionally.

  2. Add garlic, ginger, curry powder, and red pepper flakes. Cook until fragrant, 1-2 minutes, stirring frequently.

  3. Add in the tomatoes, lentils, water, coconut milk, a generous pinch of salt and pepper. Bring to a boil then turn down heat. Cover and simmer for 25-35 minutes, or until lentils are tender, stirring occasionally. Taste and adjust salt and pepper, as desired.

  4. Turn off heat and stir in cilantro. Serve with lemon wedges and crusty bread, rice, or your choice of side.

Jenny’s Notes:

  • This can also be made in the crockpot! Simply add all ingredients except for cilantro and lemon to a slowcooker and cook on low 6-8 hours or on high 3-4 hours, until lentils are tender. Stir in cilantro just before serving.

  • The length of time until lentils are tender will depend on the type you are using, whether brown, green, red, etc., and all work just fine in this recipe.

  • If soup becomes too thick, add more water as needed to thin it out.

Vegan, gluten-free, curry, best lentil soup
Dinner, soup
American
Yield: 4-6
Author: Jennyblogs
Print
Coconut Curry Lentil Soup

Coconut Curry Lentil Soup

Creamy coconut curry lentil soup with lemon and cilantro
Prep time: 15 MinCook time: 35 MinTotal time: 50 Min

Ingredients

  • 2 Tbsp / 28g oil
  • 1 medium onion, finely chopped
  • 4 garlic cloves, minced
  • 3 Tbsp fresh ginger, grated
  • 1 Tbsp mild curry powder
  • 1/4 tsp crushed red pepper flakes
  • 28oz / 800g canned fire-roasted or regular diced tomatoes
  • 1 cup dry lentils
  • 2 1/2 cups / 593g water
  • 1 14oz / 400g can coconut milk
  • Salt and pepper to taste
  • Generous handful of cilantro, roughly chopped
  • Lemon or lime wedges, for serving

Instructions

  1. Heat oil in a large pot over medium heat. Add onion and cook until translucent and soft, about 5 minutes, stirring occasionally.
  2. Add garlic, ginger, curry powder, and red pepper flakes. Cook until fragrant, 1-2 minutes, stirring frequently.
  3. Add in the tomatoes, lentils, water, coconut milk, a generous pinch of salt and pepper. Bring to a boil then turn down heat. Cover and simmer for 25-35 minutes, or until lentils are tender, stirring occasionally. Taste and adjust salt and pepper, as desired.
  4. Turn off heat and stir in cilantro. Serve with lemon wedges and crusty bread, rice, or your choice of side.

Notes:

  • This can also be made in the crockpot! Simply add all ingredients except for cilantro and lemon to a slowcooker and cook on low 6-8 hours or on high 3-4 hours, until lentils are tender. Stir in cilantro just before serving.
  • The length of time until lentils are tender will depend on the type you are using, whether brown, green, red, etc., and all work just fine in this recipe.
  • If soup becomes too thick, add more water as needed to thin it out.


Calories

470.36

Fat (grams)

29.45

Sat. Fat (grams)

19.52

Carbs (grams)

42.84

Fiber (grams)

8.43

Net carbs

34.41

Sugar (grams)

4.14

Protein (grams)

15.62

Sodium (milligrams)

160.15

Cholesterol (grams)

0.00
Nutritional information is approximate. Based on 4 servings.
Did you make this recipe?
Tag @jennyblogsandbakes on instagram and hashtag it #jennyblogs
Created using The Recipes Generator
Adjustments.jpeg

Homemade Italian Dressing

Simple goodness: Arugula tossed with Homemade Italian Dressing

Simple goodness: Arugula tossed with Homemade Italian Dressing

Have you ever thought to make homemade Italian dressing? I certainly hadn’t, until this summer, as it’s usually something I buy. Why bother making it homemade when it’s cheap and I really don’t use it that often? Except for pasta salad, and I’ve been allll about the pasta salads this summer.

First I wanted the classic creamy pasta salad (dressing made with mayo and mustard), then the Italian dressing pasta salad, then I started going off and making up my own, like this Greek Pasta Salad I posted a couple weeks ago. But you know what’s ironic? You can’t find Italian dressing in Italy. Italian dressing is very American. Italians dress their salads with a quality olive oil, salt and pepper, generally speaking. One time I was in Switzerland grocery shopping and saw American dressing. I’m American and had no idea what it was. It was creamy, maybe like Ranch? Haha. I was amused. I wonder if that’s how Italians feel about Italian dressing.

Being in Italy with no Italian dressing ready made at the store, I figured I would see if I could find a homemade recipe. Surreeee there are plenty on the interwebs! And easy enough ingredients, you probably have them all on hand, as I did. Olive oil, vinegar, some spices…I looked at several different recipes, looked up the ingredients for “classic” Kraft Italian dressing, and combined a few of them to create a bit of my own version. It’s tangy and got the job done! Success. Made a delicious pasta salad and had a bit leftover even to dress some regular ol’ salads.

It probably won’t taste exactly like the store bought version, but maybe better if you’re not a die-hard Kraft fan? Some of the ingredients listed on the Kraft Zesty Italian dressing are a bit vague, like “spice,” which can be hard to replicate, but the bright side is that you can control the quality and freshness of ingredients going into your dressing. Better yet, no preservatives at all!

Great for salads, pasta salad, marinades for all types of proteins!

This post may contain affiliate links. If you make a purchase using these links, Jennyblogs may receive a small commission, at no extra cost to you. This helps to support Jennyblogs. For further information see the privacy policy. Grazie!

Recipe adapted from Kraft, Five Heart Home, and the Whole Cook


Homemade Italian Dressing

Makes about 1 cup dressing

I clearly need to figure out how to attractively photograph liquids…and find my whisk. (Recently moved apartments.) But hey, forks work, too!

I clearly need to figure out how to attractively photograph liquids…and find my whisk. (Recently moved apartments.) But hey, forks work, too!

Ingredients:

  • 3/4 cup / 168g extra virgin olive oil

  • 1/4 cup / 60g red or white wine vinegar

  • 1 tsp / 5g lemon juice

  • 1 tsp / 7g honey

  • 3/4 tsp dried basil

  • 1/2 tsp dried oregano

  • 1/2 tsp garlic powder

  • 1/2 tsp salt

  • 1/4 tsp onion powder

  • 1/4 tsp crushed red pepper

  • 1/4 tsp black pepper

  • 1/4 cup / 25g grated parmesan cheese, optional

Directions:

  1. Whisk or shake all ingredients together; taste and adjust seasonings as desired.

  2. Store in fridge, shake well before using.

Jenny’s Notes:

  • This is one of those very versatile and very easily adjustable recipes, no one says you have to follow this one to a T! If you don’t have red or white wine vinegar, use what you have on hand. Even the olive oil can be switched out for what you have. While olive oil will give you the heartiest flavor, technically Kraft uses a bunch of rather junkier oils that don’t add much to the flavor profile (soybean, canola), but oils do tone the vinegar in dressings/vinaigrettes. The spices can be upped if you want a very zesty dressing, or you can add another teaspoon of honey to help tone it down a bit.

  • You could also finely dice red bell pepper to add to this instead of the crushed red pepper, but that seemed like more work than I wanted to put in for this “whip up” type recipe. Plus, I like the touch of added spice, even if not original.

Homemade Italian dressing recipe, copycat Zesty Kraft Dressing, Greek dressing
Condiment
American
Yield: 8
Author: Jennyblogs
Print
Homemade Italian Dressing

Homemade Italian Dressing

Homemade zesty Italian dressing is simple, uses pantry ingredients, and doesn't have any preservatives like store-bought versions.
Prep time: 10 MinTotal time: 10 Min

Ingredients:

  • 3/4 cup / 168g extra virgin olive oil
  • 1/4 cup / 60g red or white wine vinegar
  • 1 tsp / 5g lemon juice
  • 1 tsp / 7g honey
  • 3/4 tsp dried basil
  • 1/2 tsp dried oregano
  • 1/2 tsp garlic powder
  • 1/2 tsp salt
  • 1/4 tsp onion powder
  • 1/4 tsp crushed red pepper
  • 1/4 tsp black pepper
  • 1/4 cup / 25g grated parmesan cheese, optional

Instructions:

  1. Whisk or shake all ingredients together; taste and adjust seasonings as desired.
  2. Store in fridge, shake well before using.

Notes:

This is one of those very versatile and very easily adjustable recipes, no one says you have to follow this one to a T! If you don’t have red or white wine vinegar, use what you have on hand. Even the olive oil can be switched out for what you have. While olive oil will give you the heartiest flavor, technically Kraft uses a bunch of rather junkier oils that don’t add much to the flavor profile (soybean, canola), but oils do tone the vinegar in dressings/vinaigrettes. The spices can be upped if you want a very zesty dressing, or you can add another teaspoon of honey to help tone it down a bit. You could also finely dice red bell pepper to add to this instead of the crushed red pepper, but that seemed like more work than I wanted to put in for this “whip up” type recipe. Plus, I like the touch of added spice, even if not original.

Calories

204.62

Fat (grams)

21.89

Sat. Fat (grams)

3.39

Carbs (grams)

1.58

Fiber (grams)

0.14

Net carbs

1.44

Sugar (grams)

0.75

Protein (grams)

0.98

Sodium (milligrams)

202.78

Cholesterol (grams)

2.69
Nutritional information is approximate. Based on 8 servings of 2 Tbsp each and includes parmesan cheese.
Did you make this recipe?
Tag @jenevamorris on instagram and hashtag it #jennyblogs
Created using The Recipes Generator

Greek Pasta Salad

IMG_3827.jpg

It’s August. It’s hot. I’ve already made all the different classic versions of pasta salad and have moved on to making up my own versions. Hot dishes are out when hot weather is in!

Well, most of the time. I say this a bit sheepishly as I’m about to eat a big plate of aglio, olio, peperoncino pasta. That’s not only hot, it’s also lightly spicy. It’s about 100°F out and no, we don’t have air conditioning. Sometimes you just know what you want to eat (especially as a pregnant person) and that’s ok. At least, that’s what I keep telling myself. :D

I’ve also been really into Greek everything. I’ve been making lots of Greek wraps, Greek salads, learned what a traditional Greek salad is, and made a 7+ layer Greek dip! I’ll have a recipe up for the Greek dip soon, it’s very easy to whip up and nutritious to boot! And if you hadn’t already noticed, today’s recipe is a Greek pasta salad! I actually saw a similar idea to this on Instagram recently and decided I needed to eat that. I noticed the recipe used a dressing with ingredients similar to what we’d call Italian dressing in America (oil, vinegar, basil, oregano, garlic, etc) and I decided I wanted to try a hummus dressing. And it was delicious! Hummus mixed with some plain yogurt makes for a creamy and wonderful twist to this pasta salad. You can make homemade hummus, or use whatever brand and flavor you prefer!

Enjoy, my friends, and stay cool!

This post may contain affiliate links. If you make a purchase using these links, Jennyblogs may receive a small commission, at no extra cost to you. This helps to support Jennyblogs. For further information see the privacy policy. Grazie!

A recipe by Jenny Nicole


Greek Pasta Salad

Serves 3-4

Adjustments.jpeg

Ingredients:

  • 8oz / 250g short pasta of choice, fusilli, penne, shells, etc.

  • 3/4 cup / 185g plain yogurt

  • 3/4 cup / 185g hummus, flavor of choice

  • 1 Tbsp / 14g red wine vinegar

  • 1/4 tsp dried oregano

  • 1/4 tsp dried basil

  • 1 cucumber, diced

  • 1/2 red or green bell pepper, diced

  • 1/2 cup / 90g pitted kalamata olives, sliced if large

  • 1 cup / 150g cherry tomatoes, halved or quartered

  • 2/3 cup / 100g crumbled feta cheese

  • drizzle of extra virgin olive oil, for finishing

Directions:

  1. Cook pasta one minute less than according to directions, nicely al dente, drain and rinse in cold water to stop it from continuing to cook. Cool in fridge while you make the dressing.

  2. In a large bowl, stir together yogurt, hummus, vinegar, and spices.

  3. Add pasta, all the chopped vegetables, and cheese; stir until everything is evenly coated in dressing.

  4. Refrigerate until chilled, at least 2 hours. The longer the pasta sits the more the flavors will meld and the sauce be absorbed by the pasta, creating the ideal pasta salad! Just before serving, drizzle with olive oil.

Jenny’s Notes:

  • If you have fresh herbs on hand, use about 1 tsp each of finely chopped fresh basil and fresh oregano!

  • The quantity of vegetables is really up to you and easy to adjust in simple recipes like this, measurements are approximate.

  • While you might think Greek yogurt would be better adapted to this “Greek” pasta salad, plain/soupier yogurt actually works better because as the pasta sits, it absorbs the dressing. If you use already thick Greek yogurt, the dressing will probably end up too thick. If Greek yogurt is all you have, you can simply add a few tablespoons of water or milk to thin up the dressing to your liking. This can also be done if you make/buy a particularly thick brand of hummus, or just want the dressing thinner anyway!

  • The photos you see in this post I actually used a gluten-free penne pasta made from red lentils and brown rice. I had never tried it before but it is an excellent pasta, I would never have known it’s gluten-free. Probably also because it was made by my favorite pasta brand here in Italy, Rummo. If you live here or can find it in the States, I highly recommend it! Although I think I’ve only seen it at World Market for way more than I pay here in Italy. Bummer.

Pasta salad, cold pasta, summer pasta, summer dish, Greek, hummus dressing
Pasta, Side dish
American
Yield: 3-4
Author: Jennyblogs
Print
Greek Pasta Salad

Greek Pasta Salad

A twist on the classic pasta salad with a creamy, herbed hummus dressing, vegetables, and Feta cheese.
Prep time: 20 MCook time: 20 MTotal time: 40 M

Ingredients:

  • 8oz / 250g short pasta of choice, fusilli, penne, shells, etc.
  • 3/4 cup / 185g plain yogurt
  • 3/4 cup / 185g hummus, flavor of choice
  • 1 Tbsp / 14g red wine vinegar
  • 1/4 tsp dried oregano
  • 1/4 tsp dried basil
  • 1 cucumber, diced
  • 1/2 red or green bell pepper, diced
  • 1/2 cup / 90g pitted kalamata olives, sliced if large
  • 1 cup / 150g cherry tomatoes, halved or quartered
  • 2/3 cup / 100g crumbled feta cheese
  • drizzle of extra virgin olive oil, for finishing

Instructions:

  1. Cook pasta one minute less than according to directions, nicely al dente, drain and rinse in cold water to stop it from continuing to cook. Cool in fridge while you make the dressing.
  2. In a large bowl, stir together yogurt, hummus, vinegar, and spices.
  3. Add pasta, all the chopped vegetables, and cheese; stir until everything is evenly coated in dressing.
  4. Refrigerate until chilled, at least 2 hours. The longer the pasta sits the more the flavors will meld and the sauce be absorbed by the pasta, creating the ideal pasta salad! Just before serving, drizzle with olive oil.
  5. Jenny’s Notes:

Notes:

If you have fresh herbs on hand, use about 1 tsp each of finely chopped fresh basil and fresh oregano! The quantity of vegetables is really up to you and easy to adjust in simple recipes like this, measurements are approximate. While you might think Greek yogurt would be better adapted to this “Greek” pasta salad, plain/soupier yogurt actually works better because as the pasta sits, it absorbs the dressing. If you use already thick Greek yogurt, the dressing will probably end up too thick. If Greek yogurt is all you have, you can simply add a few tablespoons of water or milk to thin up the dressing to your liking. This can also be done if you make/buy a particularly thick brand of hummus, or just want the dressing thinner anyway!

Calories

486.29

Fat (grams)

26.16

Sat. Fat (grams)

8.20

Carbs (grams)

46.18

Fiber (grams)

7.25

Net carbs

38.93

Sugar (grams)

8.71

Protein (grams)

18.81

Sodium (milligrams)

779.53

Cholesterol (grams)

33.37
Nutritional information is approximate; based on 3 servings.
Did you make this recipe?
Tag @jenevamorris on instagram and hashtag it #jennyblogs
Created using The Recipes Generator
IMG_3831.jpg

Sticky Sesame Tofu

Adjustments.jpeg

Lightly pan-fried, crispy tofu nuggets tossed in a sweet and salty, sticky sesame sauce and served over rice. Extra delicious when served with hot pepper flakes, green onion, sesame seeds, and broccoli.

This Sticky Sesame Tofu is like Sesame Chicken and General Tso’s Chicken all wrapped up in one. Except it’s tofu, and not chicken, which makes it a vegan recipe. I’m not vegan, I just happen to love tofu. BUT this recipe can also be made with chicken! Simply pan fry it until cooked through, then proceed with the recipe as written.

Some notes about this recipe:

  1. The tofu I would get in Italy, seems to come in 380g packages instead of the 400-450gish (14-16oz) like in the States, which means that recipe proportions will be a tiny bit different. The photos you see on this post are when I used the Italian 380g package of tofu, but I used to make half the sauce recipe as written below. If you are using a smaller than 380g block of tofu, you could consider cutting this recipe in half, to keep it more “sticky” and less saucy.

  2. Tofu in Italy also comes in a vacuum-packed container and not in water like in the States. This means the tofu starts out less watery and is easier to dry. Usually one heavy duty napkin or paper towel is sufficient for pressing.

This post may contain affiliate links. If you make a purchase using these links, Jennyblogs may receive a small commission, at no extra cost to you. This helps to support Jennyblogs. For further information see the privacy policy. Grazie!

Recipe adapted from Alexa Fueled Naturally


Adjustments.jpeg

Sticky Sesame Tofu

Serves 3-4

Ingredients:

For the Crispy Tofu

  • 1 box / roughly 400g firm or extra firm tofu, drained

  • 1/2 cup / 60g cornstarch

  • 2 Tbsp / 28g peanut oil or other high-heat oil, plus more as needed

For the Sticky Sesame Sauce

  • 1/2 cup / 120g soy sauce or tamari

  • 6 Tbsp / 90g tomato purée

  • 6 Tbsp / 76g brown sugar, or 6 Tbsp / 120g maple syrup

  • 2 Tbsp / 30g rice vinegar

  • 2 tsp sriracha or 1 tsp red pepper flakes

  • 2 tsp freshly grated ginger or 1/4 tsp ground ginger

  • 2 tsp / 10g cooking oil

  • 4 cloves garlic, finely chopped

  • 2 tsp / 10g sesame oil

For Serving (optional):

  • rice

  • steamed broccoli

  • avocado, sesame seeds, sliced green onion, lime wedges, red pepper flakes, cilantro

Directions:

Make the Crispy Tofu

  1. Place tofu block between some paper towels and press to absorb extra water. Repeat until tofu feels dry and no more water comes out. You can also do this ahead of time by placing something heavy over the tofu and paper towels, such as a bowl or pot, and leave it for several minutes.

  2. Place corn starch in a medium bowl. Slice tofu into squares and toss in the corn starch until evenly coated.

    Pan fry:

  3. Heat oil in a large fry pan and add tofu. Fry for a few minutes until golden, then flip tofu over. You can do this with tongs, or simply sauté/flip the tofu. The second way is faster, but requires a bit more skill and you have less control over which sides of the tofu land down. Add more oil to the pan as needed to get a nice golden crust on the tofu. Remove from heat when done.

    OR Bake:

  4. Disperse tofu cubes evenly onto a parchment paper or silpat lined baking sheet. Bake in a preheated 400°F / 205°C for about 30 minutes, or until light golden and crispy. Ideally, flip tofu halfway through baking.

Make the Sticky Sesame Sauce:

  1. While the tofu is frying or baking, prepare the sauce. In a bowl stir together soy sauce, tomato purée, brown sugar, rice vinegar, sriracha, and ginger.

  2. Heat cooking oil in a medium pan over medium-low heat. Add tgarlic and cook until just starting to turn golden, 1-2 minutes.

  3. Add the soy sauce mixture and cook for 3-4 minutes, stirring occasionally, until sauce just starts to thicken. Stir in the sesame oil.

  4. Add tofu to sauce and toss until evenly covered; serve immediately with rice, broccoli, and garnishes, if desired.

Jenny’s Notes:

  • If you don’t have rice vinegar, use any vinegar you have on hand.

  • You can add more sriracha or red pepper flakes if you want it extra spicy, or omit if you don’t like spice.

  • If not serving all the tofu right away, it’s best to store it separately from the sauce if you wish to keep the tofu crispy.

vegan, sticky sesame sauce, tofu, Sesame chicken tofu, General Tso's chicken tofu, sweet and sour
Dinner, Main
Asian
Yield: 2-3
Author:
Sticky Sesame Tofu

Sticky Sesame Tofu

Lightly pan-fried or baked, crispy tofu nuggets tossed in a sweet and salty, sticky sesame sauce and served over rice. Tastes like Sesame Chicken or General Tso's Chicken, but vegan!
Prep time: 10 MinCook time: 20 MinTotal time: 30 Min

Ingredients

For the Crispy Tofu
For the Sticky Sesame Sauce
For Serving (all optional):

Instructions

Make the Crispy Tofu
  1. Place tofu block between some paper towels and press to absorb extra water. Repeat until tofu feels dry and no more water comes out. You can also do this ahead of time by placing something heavy over the tofu and paper towels, such as a bowl or pot, and leave it for several minutes.
  2. Place corn starch in a medium bowl. Slice tofu into squares and toss in the corn starch until evenly coated.
  3. Pan fry:
  4. Heat oil in a large fry pan and add tofu. Fry for a few minutes until golden, then flip tofu over. You can do this with tongs, or simply sauté/flip the tofu. The second way is faster, but requires a bit more skill and you have less control over which sides of the tofu land down. Add more oil to the pan as needed to get a nice golden crust on the tofu. Remove from heat when done.
  5. OR Bake:
  6. Disperse tofu cubes evenly onto a parchment paper or silpat lined tray. Bake in a preheated 400°F / 205°C for about 30 minutes, or until light golden and crispy. Ideally, flip tofu halfway through baking.
Make the Sticky Sesame Sauce:
  1. While the tofu is frying, prepare the sauce. In a bowl stir together soy sauce, tomato purée, brown sugar, rice vinegar, sriracha, and ginger.
  2. Heat the cooking oil in a medium pan over medium-low heat. Add the garlic and cook until just starting to turn golden, 1-2 minutes.
  3. Add the soy sauce mixture and cook for 3-4 minutes, stirring occasionally, until sauce just starts to thicken. Stir in the sesame oil.
  4. Add tofu to the sauce and toss until evenly covered; serve immediately with rice, broccoli, and garnishes, if desired.

Notes

  • If you don’t have rice vinegar, use any vinegar you have on hand.
  • You can add more sriracha or red pepper flakes if you want it extra spicy, or omit if you don’t like spice.
  • If not serving all the tofu right away, it’s best to store it separately from the sauce if you wish to keep the tofu crispy.

Nutrition Facts

Calories

528.96

Fat

23.06 g

Sat. Fat

3.34 g

Carbs

75.64 g

Fiber

3.65 g

Net carbs

71.48 g

Sugar

39.53 g

Protein

8.86 g

Sodium

3296.34 mg

Cholesterol

0 mg

Nutritional information is approximate. Based on 2 servings of tofu with sauce, not including rice or garnishes

Did you make this recipe?
Tag @jennyblogsandbakes on instagram and hashtag it #jennyblogs
IMG_3749.jpeg

White Bean Carrot Burgers

Summer is almost upon us, and with the warm weather comes all the best summer foods. In America that usually means all the cookouts, potato salads, watermelon, lemonade, corn on the cob…

White Bean Burger with spring greens, pickled onions, and melted and caramelized goat cheese

White Bean Burger with spring greens, pickled onions, and melted and caramelized goat cheese

You know what the ironic part is? Growing up, or really until I moved to Italy, I wouldn’t have considered the classic American barbecue foods as personal favorites. At all. I could easily pass on hot dogs, hamburgers, potato salads, corn on the cob. I do love watermelon and lemonade, though! It wasn’t until being in Italy for awhile that I started to crave these American foods, especially in the summer. Nostalgia for the homeland. And that’s saying something, coming from the person that, as long as I wasn’t offending a host, would make myself a hamburger, but without the burger. Yes yes, I am aware that I’m weird. I love hamburger condiments! But the burger takes away from them. And yet they need a vessel. What’s a girl to do?

Veggie burgers!

I’ve always loved veggie burgers. Give me all the fake meat, vegetable, or bean burgers! And condiments. Oh yes. (For my meat-loving friends, you would be proud to know that yesterday for the first time in my life, I ordered a non-vegetarian burger from a restaurant. I split it with my husband, but still. I enjoyed it, and more importantly, it was my idea!)

There are so many good veggie burgers out there, and I love how everyone and every restaurant seems to have their own take on them. So many different vegetables to choose from, and different ways to prepare them.

I recently had a hankering for some black bean burgers. Alas, I had no black beans, only white beans, and this was during the lockdown in Italy, so I couldn’t just walk to the store for some beans on a whim. White bean burgers it would have to be. I didn’t have a white bean burger recipe handy, but I tried the one i’m sharing with you today and found it very tasty!

It’s very simple, mostly white beans, carrots, onion, bread crumbs, and an egg to hold it together. It’s the perfect vessel for all your favorite condiments, or eaten as is, without a bun.

My one recommendation? Make these pickled onions to go with the White Bean Burgers! Did you know you can assemble pickled onions in less than 5 minutes with ingredients you most likely already have on hand, and you can use them after they’ve sat for only 30 minutes?! Seriously, too simple, you will never hesitate to add pickled veggies to your dishes again!

Pickled Onion

  • 1 red onion, thinly sliced

  • 2 Tbsp / 28g red wine vinegar

  • 2 Tbsp / 28g water

  • 1/2 tsp salt

  • 1/4 tsp sugar

  1. Mix all ingredients briefly, then let sit until needed, preferably 30+ minutes, swirling the onions in the vinegar mixture occasionally. Likewise, you can also cover and keep in the fridge for up to a week.

  2. This recipe is easily doubled, tripled, etc. for your needs. You can also use other types of onions, but red onions are the prettiest in my opinion!

That’s my one recommendation. Serve these burgers with pickled onions. If I were to give you more than one, I might suggest avocado, a fried egg, some sprouts, goat cheese…

This post may contain affiliate links. If you make a purchase using these links, Jennyblogs may receive a small commission, at no extra cost to you. This helps to support Jennyblogs. For further information see the privacy policy. Grazie!

Recipe adapted from Smitten Kitchen


White Bean Burgers

Serves 2-4

IMG_3356.jpg

Ingredients:

  • olive oil

  • 1 small onion, diced

  • 2 tsp / 10g tomato paste

  • 3/4 tsp salt

  • dash black pepper

  • 1/2 cup grated carrot, about 1 medium

  • 2 tsp / 10g apple cider vinegar

  • 1/4 cup / 25g breadcrumbs

  • 1 15oz can / 425g white beans such as cannellini, navy, etc., drained

  • 1 egg

  • burger buns, condiments, as desired

Directions:

IMG_3360.jpg
  1. Add a bit of olive oil to a large fry pan over low heat. Add the onion and cook until softened and starting to turn golden, about 8-10 minutes.

  2. Add tomato paste, salt, pepper, and carrots, stirring frequently, until carrots soften and start to turn golden, about another 8-10 minutes.

  3. Add vinegar and stir, using it to deglaze the pan and get off any bits stuck to the bottom. Once the vinegar is evaporated, turn off heat and scrape mixture into a medium bowl.

  4. Add breadcrumbs and white beans, mixing well and smashing the beans. Smash well or leave a bit chunky, as you wish. Taste and add more salt and pepper, as desired.

  5. Add the egg and mix well. The mixture should be soft but able to make a patty, but not soupy or crumbly. If the mixture seems too wet, add another 2 Tbsp or so of breadcrumbs and let mixture sit for a few minutes to allow the breadcrumbs to absorb some of the moisture.

  6. Heat 1-2 Tbsp olive in a large fry pan over medium heat. While the pan is heating up, shape up the bean mixture into about 4 medium patties. Fry however many patties can comfortably fit into the pan at one time, about 3-4 minutes on each side or until golden brown and firmed up.

  7. Serve immediately with buns and condiments.

Jenny’s Notes:

  • The bean mixture can be made a day or two in advance and stored in the fridge until ready to fry. The burgers can also be fried and frozen for quick meals.

  • To make these burgers vegan, you can try using a chia or flax egg instead of the regular egg. I haven’t personally tried this, but in theory it should work! Let me know if you do.

vegetarian, veggie burger, white beans, white bean burger, healthy burgers, pickled onions
Vegetarian, sandwiches
American
Yield: 2-4
Author:
Print
White Bean Carrot Burgers

White Bean Carrot Burgers

Easy to whip up white bean burgers with carrot, they pair perfectly with your favorite buns and condiments for a healthier cook out!
Prep time: 10 MCook time: 30 MTotal time: 40 M

Ingredients:

  • olive oil
  • 1 small onion, diced
  • 2 tsp / 10g tomato paste
  • 3/4 tsp salt
  • dash black pepper
  • 1/2 cup grated carrot, about 1 medium
  • 2 tsp / 10g apple cider vinegar
  • 1/4 cup / 25g breadcrumbs
  • 1 15oz can / 425g white beans such as cannellini, navy, etc., drained
  • 1 egg
  • burger buns, condiments, as desired

Instructions:

  1. Add a bit of olive oil to a large fry pan over low heat. Add the onion and cook until softened and starting to turn golden, about 8-10 minutes.
  2. Add tomato paste, salt, pepper, and carrots, stirring frequently, until carrots soften and start to turn golden, about another 8-10 minutes.
  3. Add vinegar and stir, using it to deglaze the pan and get off any bits stuck to the bottom. Once the vinegar is evaporated, turn off heat and scrape mixture into a medium bowl.
  4. Add breadcrumbs and white beans, mixing well and smashing the beans. Smash well or leave a bit chunky, as you wish. Taste and add more salt and pepper, as desired.
  5. Add the egg and mix well. The mixture should be soft but able to make a patty, but not soupy or crumbly. If the mixture seems too wet, add another 2 Tbsp or so of breadcrumbs and let mixture sit for a few minutes to allow the breadcrumbs to absorb some of the moisture.
  6. Heat 1-2 Tbsp olive in a large fry pan over medium heat. While the pan is heating up, shape up the bean mixture into about 4 medium patties. Fry however many patties can comfortably fit into the pan at one time, about 3-4 minutes on each side or until golden brown and firmed up.
  7. Serve immediately with buns and condiments.

Notes:

The bean mixture can be made a day or two in advance and stored in the fridge until ready to fry. The burgers can also be fried and frozen for quick meals. To make these burgers vegan, you can try using a chia or flax egg instead of the regular egg. I haven’t personally tried this, but in theory it should work! Let me know if you do.

Calories

469.92

Fat (grams)

10.68

Sat. Fat (grams)

2.08

Carbs (grams)

69.20

Fiber (grams)

15.37

Net carbs

53.83

Sugar (grams)

4.95

Protein (grams)

26.37

Sodium (milligrams)

1035.03

Cholesterol (grams)

93.00
Nutritional information is approximate. Based on 1 veggie burger if you make two larger patties, no bun or condiments.
Did you make this recipe?
Tag @jenevamorris on instagram and hashtag it #jennyblogs
Created using The Recipes Generator

Copycat Lipton Onion Dip

What if I told you that there is a way to enjoy Onion Dip but with less guilt? No preservatives, corn syrup, caramel color, and other ingredients you’re not quite sure what they are?

Because there IS a way! And it’s very simple. Not that you get much simpler than mixing sour cream with a Lipton onion packet, but it’s pretty darn close.

For this recipe I use yogurt, as I do even if I mix a Lipton packet, because yogurt is actually good for you, sour cream is usually more found on diet naughty lists.

I first made this during lockdown, and while I couldn’t find beef broth granules, just “classic” powdered broth, it came out satisfactorily close to the real thing. As I was explaining on the Healthier Lipton Onion Dip post, I had inherited two Lipton onion mixes from a friend who moved away from Florence. My husband had never had such a thing before and requested it again. When he requested it a third time, I had to break it to him gently…”honey, there were only two packets, and I don’t think we can find Lipton around Florence.”

Since people requesting a specific food/dessert/recipe from me to make is like a love language for me, I was not about to let a request go unfulfilled. So I began a hunt for the necessary ingredients and a recipe to go off of that doesn’t just make bulk powdered onion mix (there are many of those but I don’t make Onion dip all THAT often) but just a recipe for the standard 16oz/two cups of dip.

Thanks to Daring Gourmet for providing just that! Recipe with a few of my usual tweaks below.

This post may contain affiliate links. If you make a purchase using these links, Jennyblogs may receive a small commission, at no extra cost to you. This helps to support Jennyblogs. For further information see the privacy policy. Grazie!


Copycat Lipton Onion Dip

IMG_3177.jpg

Makes about 2 cups of dip

Ingredients:

  • 2-4 tsp beef broth granules

  • 2 Tbsp dried minced onions

  • 1 tsp onion powder

  • 1/4 tsp pepper

  • 1/8 tsp paprika

  • 16oz / 454g regular or Greek plain yogurt

  • fresh or dried dill, more dried minced onions, for topping, optional

  • washed sliced veggies, potato chips, etc, for dipping

Directions:

  1. In a medium bowl, combine 2 tsp of broth granules with the rest of the spices.

  2. Stir in the yogurt and mix well. Taste; if you desire the dip to be saltier, add another teaspoon of broth granules and stir. Taste again, adding the last teaspoon of broth, if desired. Refrigerate for about two hours before serving.

  3. Top with dill and more onions, if desired, and serve with veggies, potato chips, pita, or whatever dippers you like!

Jenny’s Notes:

  • While beef broth is probably closest to the real taste, I have never found beef broth granules here in Italy and get away with using the “classic” broth flavor or even vegetable broth granules. It still tastes delicious! Check labels for MSG, it often gets sneaked into these types of things.

  • If using low-sodium broth granules you will be better able to control the sodium, and can even add a bit more broth for more flavor without the dip becoming too salty.

  • The refrigeration is not strictly necessary, but it gives some time for the flavors to meld and the onions to rehydrate a bit. If you simply can’t wait that long to dig in or need it ASAP for a party, go ahead and use it straight away.

  • 1/8 tsp celery seed, and 1/4 tsp dried parsley can also be added. I don’t usually add them just because I don’t have celery seed on hand here and don’t personally think dried parsley adds any kind of flavor value to dishes. It does add a touch of green, though!

Lipton Onion soup mix, Lipton Onion dip, French onion dip, copycat Lipton onion dip, beef broth, yogurt, veggie dip
appetizer
American
Yield: 4
Author:
Print
Copycat Lipton Onion Dip

Copycat Lipton Onion Dip

Classic Lipton Onion Dip made from scratch, creating a delicious and nutritious snack to be served with veggies, potato chips, or your favorite dippers.
Prep time: 10 MCook time: Total time: 10 M

Ingredients:

  • 2-4 tsp beef broth granules
  • 2 Tbsp dried minced onions
  • 1 tsp onion powder
  • 1/4 tsp pepper
  • 1/8 tsp paprika
  • 16oz / 454g regular or Greek plain yogurt
  • fresh or dried dill, more dried minced onions, for topping, optional
  • washed sliced veggies, potato chips, etc, for dipping

Instructions:

  1. In a medium bowl, combine 2 tsp of broth granules with the rest of the spices.
  2. Stir in the yogurt and mix well. Taste; if you desire the dip to be saltier, add another teaspoon of broth granules and stir. Taste again, adding the last teaspoon of broth, if desired. Refrigerate for about two hours before serving.
  3. Top with dill and more onions, if desired, and serve with veggies, potato chips, pita, or whatever dippers you like!

Notes:

While beef broth is probably closest to the real taste, I have never found beef broth granules here in Italy and get away with using the “classic” broth flavor or even vegetable broth granules. It still tastes delicious! Check labels for MSG, it often gets sneaked into these types of things. If using low-sodium broth granules you will be better able to control the sodium, and can even add a bit more broth for more flavor without the dip becoming too salty. The refrigeration is not strictly necessary, but it gives some time for the flavors to meld and the onions to rehydrate a bit. If you simply can’t wait that long to dig in or need it ASAP for a party, go ahead and use it straight away. 1/8 tsp celery seed, and 1/4 tsp dried parsley can also be added. I don’t usually add them just because I don’t have celery seed on hand here and don’t personally think dried parsley adds any kind of flavor value to dishes. It does add a touch of green, though!

Calories

89.67

Fat (grams)

1.93

Sat. Fat (grams)

1.17

Carbs (grams)

11.95

Fiber (grams)

1.33

Net carbs

10.61

Sugar (grams)

9.31

Protein (grams)

6.84

Sodium (milligrams)

105.53

Cholesterol (grams)

6.81
Nutritional information is approximate. Based on 1/2 cup dip with 1 cup sliced veggies.
Did you make this recipe?
Tag @jenevamorris on instagram and hashtag it #jennyblogs
Created using The Recipes Generator

Healthier Lipton Onion Dip

IMG_3184.jpg

Lipton Onion Dip. Too easy to whip up, pop open a bag of potato chips, and have a summer favorite ready to rock and roll.

Unfortunately, it’s not very healthy. At all. Reading the ingredients usually leaves me wishing I hadn’t so I can enjoy my snacking in peace. Then the recipe on the side of the Lipton box has you mix it with a tub of sour cream and dip potato chips. Yum. But ouch.

I have actually eaten this very few times in my life, growing up in a “healthy” household (thankful for that!) usually meant if I was eating onion dip, someone else had made and brought it to a party. But recently, when a friend moved away from Florence and gave me a few boxes of stuff and food, I found myself with two packets of Lipton Onion soup/dip mix. Not part of my usual diet, but hey, I’m not one to turn my nose up at free food, being an overly-budget minded person. Plus, part of the fun of having a non-American husband is getting to share with him all the joys and junk foods of America that you just can’t find in the rest of the world. Heck, Lipton probably has some ingredients that are banned in the EU, haha! And you know what? He loved it. And requested it again.

How to healthify Lipton Onion dip? Not too hard. Doesn’t cure all the wonky ingredients, but let’s say we’re righting two of three wrongs. ;)

First, potato chips are delicious, but so are veggies dipped in onion dip! Honestly, if you are an onion dip lover, you’ve probably figured this out a long time ago.

Second easy way to healthify it? Use yogurt instead of sour cream. Regular and Greek both work, as the dip thickens as it sits. (Does anyone ever actually make it the full two hours it’s supposed to sit in the fridge before eating?) I might even like it better than sour cream! Not to mention that sour cream is usually only found in the tiny Mexican food section at my local grocery store. And not refrigerated. Weird.

If you’d like a completely guilt-free Onion Dip snacking experience, try out this Copycat Lipton Onion Dip, made from scratch!

This post may contain affiliate links. If you make a purchase using these links, Jennyblogs may receive a small commission, at no extra cost to you. This helps to support Jennyblogs. For further information see the privacy policy. Grazie!

A “recipe” by Jenny and probably a thousand other people who already prepare their Onion dip this way. :)


Healthier Lipton Onion Dip

Makes about 2 cups of dip

IMG_3174.jpg

Ingredients:

  • 1 packet Lipton onion soup/dip

  • 16 oz / 454g plain Greek or regular yogurt

  • Washed and sliced veggies, carrots, celery, cucumber, broccoli, cauliflower, radishes, bell peppers, etc etc

  • Fresh or dried dill and onion powder, optional

Directions:

  1. Add Lipton onion dip to yogurt and mix well.

  2. Cover and refrigerate for at least 2 hours, to thicken and let flavors meld.

  3. Top with dill and a dash or two of onion powder, if desired, and serve with veggies. And maybe just one or two potato chips. :)

Lipton Onion soup dip, Onion dip, yogurt, onion, veggie dip, yogurt veggie dip, healthier lipton dip
Appetizers
American
Yield: 2 cups dip
Author:
Print
Healthier Lipton Onion Dip

Healthier Lipton Onion Dip

A healthier version of the classic Lipton Onion dip, by mixing with yogurt instead of sour cream and using veggies instead of potato chips!
Prep time: 5 MCook time: Total time: 5 M

Ingredients:

  • 1 packet Lipton onion soup/dip
  • 16 oz / 454g plain Greek or regular yogurt
  • Washed and sliced veggies, carrots, celery, cucumber, broccoli, cauliflower, radishes, bell peppers, etc etc
  • Fresh or dried dill and onion powder, optional

Instructions:

  1. Add Lipton onion dip to yogurt and mix well.
  2. Cover and refrigerate for at least 2 hours, to thicken and let flavors meld.
  3. Top with dill and a dash or two of onion powder, if desired, and serve with veggies. And maybe just one or two potato chips. :)

Calories

112.03

Fat (grams)

1.92

Sat. Fat (grams)

1.16

Carbs (grams)

16.91

Fiber (grams)

1.72

Net carbs

15.19

Sugar (grams)

9.36

Protein (grams)

7.33

Sodium (milligrams)

873.86

Cholesterol (grams)

6.81
Nutritional information is approximate. Based on 4 servings of 1/2 cup dip with 1 cup of vegetables.
Did you make this recipe?
Tag @jenevamorris on instagram and hashtag it #jennyblogs
Created using The Recipes Generator

Parmesan Pan-Fried Chicken

Adjustments.jpeg

Happy quarantine day I-don’t-know-what-number! 44? 46? Regardless, I think we’re all open to new dinner ideas at this point and really looking forward to being able to go to restaurants again.

One thing that has made this quarantine a little easier is having access to yummy food and snacks, so I don’t miss going out too much. I’m thankful for a space I can make and create food, grocery stores, and for my mom who taught me so much about being in the kitchen.

But. That doesn’t mean some nights I don’t miss the ease of take out, especially the pizzeria behind my house, or being able to sit down in a nice space and then people bring you whatever you choose to eat in exchange for some money. Restaurants are so cool, you guys.

That’s where today’s Parmesan Pan-Fried Chicken comes into play. It’s easy, ready in 10-15 minutes, and so delicious. It’s no fuss, because there is no egg or flour breading. This also makes for a lighter fried chicken, just a thin, flavorful crust and not nearly as much guilt as traditional fried chicken. And less dishes to wash! All you need are some chicken breasts, bread crumbs, oregano, garlic powder, salt, and parmesan cheese, plus a frying pan with a bit of butter.

I originally stumbled across this idea when making a chicken quinoa casserole, which uses a similar breading technique with the chicken: using simply a wet chicken breast before dipping in a breadcrumb mixture instead of the more common flour and egg battering. I thought, what happens if I do the same thing, but instead of putting it in the casserole, fry it in some butter? Well, this simple, delicious chicken was the result, and I’m happy to share the recipe with you today.

This post may contain affiliate links. If you make a purchase using these links, Jennyblogs may receive a small commission, at no extra cost to you. This helps to support Jennyblogs. For further information see the privacy policy. Grazie!

A recipe by Jenny


Parmesan Pan-Fried Chicken

Serves 4-6

Ingredients:

  • 1/2 cup / 62g bread crumbs

  • 1/4 cup / 25g grated parmesan cheese

  • 1/2 tsp dried oregano

  • 1/4 tsp garlic powder

  • 1/4 tsp salt

  • dash of pepper

  • 2 Tbsp butter

  • 4 uncooked boneless skinless chicken breasts, about 1.5 lbs / 680g

Directions:

Adjustments.jpeg
  1. In a medium bowl, mix together bread crumbs, cheese, garlic, oregano, salt and pepper.

  2. In a large frying pan, melt 2 Tbsp butter over medium-high heat. Wet a chicken breast with water and press one side, then the other, into the bread crumb mixture. You can use your fingers to press on more of the mixture on areas that get missed. Place coated chicken into frying pan. Repeat with remaining chicken.

  3. Cook on each side 5-7 minutes or until cooked through and golden brown. Internal temperature should read at least 165F / 75C. If the chicken starts to darken too quickly, lower the temperature.

Jenny’s Notes:

  • If your frying pan isn’t big enough to accomodate all of the chicken, you can cook it in batches, starting with less butter, and adding more between each batch of chicken.

  • Here in Italy I always buy meat from our butcher, who slices chicken breasts horizantally so they are twice as thin as the chicken breasts you get at the store. That said, I had to guess a bit at the quantity for the coating, as I’ve never made this with larger chicken breasts. I know how much I need to make for 3 thinner chicken breasts, but that’s not going to be helpful to many people. If you have leftover coating, you can store it in the fridge for up to 2 days, but I wouldn’t keep it much longer as raw chicken has touched it.

  • You can use more butter for richer fried chicken, or less, for an even lighter fried chicken.

chicken, pan fried, fried chicken, parmesan cheese, oregano, garlic, 15 minute dinners, quick dinners
dinner, poultry
American
Yield: 4-6
Author:
Parmesan Pan-Fried Chicken

Parmesan Pan-Fried Chicken

The easiest fried chicken with no egg or flour battering, just wet the chicken and dip in spiced bread crumbs and parmesan cheese. Fry in butter and you have a crispy, delicious chicken ready in 15 minutes.
Prep time: 5 MCook time: 14 MTotal time: 19 M

Ingredients:

  • 1/2 cup / 62g bread crumbs
  • 1/4 cup / 25g grated parmesan cheese
  • 1/2 tsp dried oregano
  • 1/4 tsp garlic powder
  • 1/4 tsp salt
  • dash of pepper
  • 2 Tbsp butter
  • 4 uncooked boneless skinless chicken breasts, about 1.5 lbs / 680g

Instructions:

  1. In a medium bowl, mix together bread crumbs, cheese, garlic, oregano, salt and pepper.
  2. In a large frying pan, melt 2 Tbsp butter over medium-high heat. Wet a chicken breast with water and press one side, then the other, into the bread crumb mixture. You can use your fingers to press on more of the mixture on areas that get missed. Place coated chicken into frying pan. Repeat with remaining chicken.
  3. Cook on each side 5-7 minutes or until cooked through and golden brown. Internal temperature should read at least 165F / 75C. If the chicken starts to darken too quickly, lower the temperature.

Notes:

If your frying pan isn’t big enough to accomodate all of the chicken, you can cook it in batches, starting with less butter, and adding more between each batch of chicken. Here in Italy I always buy meat from our butcher, who slices chicken breasts horizantally so they are twice as thin as the chicken breasts you get at the store. That said, I had to guess a bit at the quantity for the coating, as I’ve never made this with larger chicken breasts. I know how much I need to make for 3 thinner chicken breasts, but that’s not going to be helpful to many people. If you have leftover coating, you can store it in the fridge for up to 2 days, but I wouldn’t keep it much longer as raw chicken has touched it. You can use more butter for richer fried chicken, or less, for an even lighter fried chicken.

Calories

337.55

Fat (grams)

12.62

Sat. Fat (grams)

6.01

Carbs (grams)

12.31

Fiber (grams)

0.80

Net carbs

11.51

Sugar (grams)

0.98

Protein (grams)

41.18

Sodium (milligrams)

506.17

Cholesterol (grams)

122.64
Nutritional information is approximate. Based on 4 servings.
Did you make this recipe?
Tag @jenevamorris on instagram and hashtag it #jennyblogs
Created using The Recipes Generator

White Bean Potato Soup

This soup is packed full. Packed full of flavor, packed full of vegetables and good stuff, and therefore packed full of nutrients. Did I mention it’s also vegan? Because it is, at least if you don’t sprinkle any of that wonderful cheese over the soup at the end.

Adjustments.jpeg

While I love beans, and I love potatoes, and just about everything else in this soup, I honestly wasn’t expecting it to be as good as it was. It is so full of flavor and so satisfying, and I didn’t even have any wine on hand to add!

This soup boasts, besides beans and potatoes, onions, carrots, garlic, kale, with a hint of rosemary, spice, and white wine to tie it all together.

While the main soup season might be coming to an end, I decided to finally post this recipe because

1. during these crazy coronavirus times it seems everyone and their brother are baking bread up the wazoo and revving their sourdough starters, at least judging by social media and the shortage of flours and yeast in the stores…and this soup pairs wonderfully with some good homebaked bread!!

2. this soup has many ingredients, but most are pantry staples which makes this ideal to whip up for dinner without having to go to the store. Even if you’re missing one or two things, this soup is so flavorful you can easily swap out vegetables or omit one with a still tasty result.

3. many of these ingredients are also cheap, which means you get a hardy meal for just a few dollars, which is helpful in these uncertain financial times

4. we’ve had an unusually cold few nights and days for April here in Florence, which made me think of this soup..

5. soups are so easy, and recipes like this are rewarding for my friends who may be deciding to expand their cooking skills with all the newfound time on their hands.

This post may contain affiliate links. If you make a purchase using these links, Jennyblogs may receive a small commission, at no extra cost to you. This helps to support Jennyblogs. For further information see the privacy policy. Grazie!

Recipe slightly adapted from Clever Eats


White Bean Potato Soup

Serves 4-6

Ingredients:

Adjustments.jpeg
  • 1 Tbsp oil

  • 1 medium onion, diced

  • 1 stalk of celery, diced

  • 1 carrot, diced

  • 2 garlic cloves, minced

  • 2 15oz / 400g cans of white beans, drained (any kind, such as cannellini or navy)

  • 2 potatoes, cut into small chunks

  • 1 Tbsp / 16g tomato paste

  • 1/2 tsp dried rosemary or 1 Tbsp chopped fresh

  • 1/2 tsp sweet paprika

  • 1/4 tsp cayenne pepper, optional

  • 1/2 cup / 119g white wine, or more broth or water

  • 7oz / 200g fresh or frozen spinach or kale, lightly chopped

  • 2 cups / 474g vegetable broth

  • salt and pepper, to taste

  • extra virgin olive oil and parmesan or pecorino cheese, for finishing

Directions:

  1. In a large stockpot or dutch oven, heat oil over medium heat. Add onion, celery, and carrot and cook, stirring occasionaly, until onion begins to turn translucent.

  2. Add the garlic, then add the beans, potatoes, tomato paste, rosemary, paprika, and cayenne pepper. Cook for a minute or two, stirring frequently.

  3. Add the wine and stir until it is almost evaporated.

  4. Add kale, broth, and salt and pepper to taste.

  5. Raise heat and bring soup to a boil, then cover and reduce heat to low. Cook for about 15 minutes, or until potatoes are tender.

  6. Ladle soup into serving bowls, top with parmesan or pecorino cheese and drizzle with olive oil. Serve with warm, crusty bread. Buon appetito!

Adjustments.jpeg

Jenny’s Notes:

  • If you prefer to cook dry beans instead of using canned, as I do, a good rule of thumb is to take half the weight of called for canned beans and cook that amount of dry beans. Different dry beans absorb slightly different amounts of water, but generally speaking they double in weight when cooked. So if you need 800g as in this recipe, I would cook 400g of dry beans.

  • You can choose to peel your potatoes before chopping or leave skin on, either way is fine if you ask me! Leaving skin on is easier and more nutritious (more fiber!), just be sure to wash them well before using.

  • If you have a rosemary plant, you can also add a clean sprig straight to the soup, then remove when you are ready to serve the soup.

  • In a pinch, you can always just use water instead of broth, although you will lose some flavor depth. If you have any bouillon cubes, you can also dissolve those into the soup following the bouillon dosing instructions.

white bean soup, potatoes, kale, spinach, vegan, healthy, vegetarian, carrots, white wine, spinach, celery, onion, garlic
Soup, Dinner
American
Yield: 4-6
Author:
White Bean Potato Soup

White Bean Potato Soup

A hearty and nutritious soup bursting with flavor, featuring white beans, potato, kale, onion, garlic, carrots, and celery with a touch of rosemary and a splash of white wine.
Prep time: 15 MinCook time: 35 MinTotal time: 50 Min

Ingredients

Instructions

  1. In a large stockpot or dutch oven, heat oil over medium heat. Add onion, celery, and carrot and cook, stirring occasionaly, until onion begins to turn translucent.
  2. Add the garlic, then add the beans, potatoes, tomato paste, rosemary, paprika, and cayenne pepper. Cook for a minute or two, stirring frequently.
  3. Add the wine and stir until it is almost evaporated.
  4. Add kale, broth, and salt and pepper to taste.
  5. Raise heat and bring soup to a boil, then cover and reduce heat to low. Cook for about 15 minutes, or until potatoes are tender.
  6. Ladle soup into serving bowls, top with parmesan or pecorino cheese and drizzle with olive oil. Serve with warm, crusty bread. Buon appetito!

Notes

If you prefer to cook dry beans instead of using canned, as I do, a good rule of thumb is to take half the weight of called for canned beans and cook that amount of dry beans. Different dry beans absorb slightly different amounts of water, but generally speaking they double in weight when cooked. So if you need 800g as in this recipe, I would cook 400g of dry beans. You can choose to peel your potatoes before chopping or leave skin on, either way is fine if you ask me! Leaving skin on is easier and more nutritious (more fiber!), just be sure to wash them well before using. If you have a rosemary plant, you can also add a clean sprig straight to the soup, then remove when you are ready to serve the soup.In a pinch, you can always just use water instead of broth, although you will lose some flavor depth. If you have any bouillon cubes, you can also dissolve those into the soup following the bouillon dosing instructions.

Nutrition Facts

Calories

426.89

Fat

8.57

Sat. Fat

1.21

Carbs

65.80

Fiber

14.44

Net carbs

51.36

Sugar

5.02

Protein

20.23

Sodium

542.01

Cholesterol

1.07
Nutritional information is approximate. Based on 4 servings and includes using wine and toppings.
Did you make this recipe?
Tag @jenevamorris on instagram and hashtag it jennyblogs

Butternut Squash and Sage Pasta

It’s fall and not only has the Charlie Brown Great Pumpkin arrived, but so have all the gourds!

Adjustments.jpeg

There are many types but the good news is they are all delicious (opinion) and are often quite interchangeable. Unless you’re making spaghetti squash. Then you need spaghetti squash. Also, spaghetti squash is super delicious with marinara and parmesan cheese. I’m hungry now!

In fact today’s recipe is, in a way, spaghetti squash. The principal difference is that instead of the noodles being spaghetti squash the actual spaghetti is covered in a wonderfully flavored, creamy, cheesy, butternut squash sauce! With sage, apple, onion, celery, and basically all of the best autumn flavors in one. Even just the first step of this dish, sautéeing onions in butter, made me so happy and nostalgic. Why? Because onions cooking in butter reminds me of my mom’s stuffing recipe. And it’s the best, obviously.

Making this pasta is quite simple, cooking some veggies on the stove and then blending them at the end. Finish some spaghetti in the sauce, sprinkle with Pecorino Romano cheese and you’ve got yourself a delectably seasonal meal!

I love it so much. In fact, it makes quite a bit of sauce so I am able to stick some in the fridge AND freezer! The quantity of sauce may vary slightly depending on how thick or thin you like your sauce and how exact you are with vegetable ingredients. I tend to be over-generous on portions.

This post may contain affiliate links. If you make a purchase using these links, Jennyblogs may receive a small commission, at no extra cost to you. This helps to support Jennyblogs. For further information see the privacy policy. Grazie!

Recipe adapted from Jake Cohen at the feedfeed


Butternut Squash and Sage Pasta

Serves 4-6 with leftover sauce for another meal

Ingredients:

  • 4 Tbsp / 56g butter

  • 1 medium onion, chopped

  • 1 1/2 pounds / 675g peeled and chopped butternut squash

  • 2-3 stalks celery, chopped

  • 1 apple, chopped

  • generous Tbsp of chopped fresh sage

  • 3/4 cup / 178g milk

  • 1 lb / 500g package spaghetti

  • 1/2 cup / 50g shredded parmigiano reggiano

  • 1/2 cup / 50g shredded fontal or other good melting cheese

  • 1/2 cup / 50g shredded pecorino romano, plus more for finishing

  • salt and pepper to taste


Directions:

Adjustments.jpeg
  1. In a large pan over medium heat, melt butter. Add onions, stirring occasionally, until mostly translucent, about 5 minutes.

  2. Add squash, celery, apple, and sage; continue to cook until things start to caramelize, about 5 minutes.

  3. Add milk. Stir and cover, allowing to cook until vegetables are tender, about 10 minutes. Note: The milk may look a bit curdled, which is fine since everything will be blended in the end.

  4. While the vegetables are simmering, place a large pot of water over high heat. Just before boiling, salt the water. When the water is boiling and salt has dissolved, add pasta and cook according to package directions.

  5. When the vegetables are tender, either blend with an immersion blender or transfer to a blender. Blend until smooth. Stir in the three cheeses and salt and pepper to taste.

  6. When the pasta is cooked al dente, drain, reserving 1 cup / 237g of pasta water. Return pasta to pan and toss in desired quantity of sauce. If the sauce is too thick, add reserved pasta water until desired consistency is reached.

  7. Serve with a generous dusting of pecorino romano.

Jenny’s Notes:

  • This recipe makes a generous amount of sauce, so you can choose to refrigerate the leftovers (will probably be enough for another 4-6 servings) for a few days or stick it in the freezer for a future quick dinner!

  • Feel free to use other kinds of squash or even pumpkin! The other night when I made this the store had run out of Butternut so I selected another Tuscan variety and it was lovely! Just keep in mind that the different squashes may have different starch levels and may affect how thick or thin the sauce will end up, which you can adjust by adding the pasta water at the end.

  • Play with the cheeses you use! Parmigiano reggiano, or parmesan, is a wonderfully nutty, aged cheese that you probably already have because it is amazing on almost everything. Fontal is an inexpensive but wonderful melting cheese which I generally have on hand, but you could also use gruyere, gouda, fontina, cheddar, etc. The one I recommend you splurge on would be the Pecorino Romano, which is an aged sheep’s milk cheese. There are many different varieties, those aged in walnut leaves or with truffles, young or aged, easily identified by the word “pecorino” usually followed by it’s defining factor. Pecorino Romano is one of the most exported cheeses from Italy and is aged a minimum of 5 months, giving it a wonderful sharp flavor that pairs so well with our velvety, squashy pasta today.

pasta, fall recipe, butternut squash, sage, seasonal pasta, pecorino romano, butternut squash sauce
dinner, pasta
American
Yield: 4-6 + extra sauce for another meal
Author: Jennyblogs
Print
Butternut Squash and Sage Pasta

Butternut Squash and Sage Pasta

A perfectly seasonal pasta with a creamy, cheesy butternut squash and sage sauce.
Cook time: 40 MinTotal time: 40 Min

Ingredients:

  • 4 Tbsp / 56g butter
  • 1 medium onion, chopped
  • 1 1/2 pounds / 675g peeled and chopped butternut squash
  • 2-3 stalks celery, chopped
  • 1 apple, chopped
  • generous Tbsp of chopped fresh sage
  • 3/4 cup / 178g milk
  • 1 lb / 500g package spaghetti
  • 1/2 cup / 50g shredded parmigiano reggiano
  • 1/2 cup / 50g shredded fontal or other good melting cheese
  • 1/2 cup / 50g shredded pecorino romano, plus more for finishing
  • salt and pepper to taste

Instructions:

  1. In a large pan over medium heat, melt butter. Add onions, stirring occasionally, until mostly translucent, about 5 minutes.
  2. Add squash, celery, apple, and sage; continue to cook until things start to caramelize, about 5 minutes.
  3. Add milk. Stir and cover, allowing to cook until vegetables are tender, about 10 minutes. Note: The milk may look a bit curdled, which is fine since everything will be blended in the end.
  4. While the vegetables are simmering, place a large pot of water over high heat. Just before boiling, salt the water. When the water is boiling and salt has dissolved, add pasta and cook according to package directions.
  5. When the vegetables are tender, either blend with an immersion blender or transfer to a blender. Blend until smooth. Stir in the three cheeses and salt and pepper to taste.
  6. When the pasta is cooked al dente, drain, reserving 1 cup / 237g of pasta water. Return pasta to pan and toss in desired quantity of sauce. If the sauce is too thick, add reserved pasta water until desired consistency is reached.
  7. Serve with a generous dusting of pecorino romano.

Notes:

This recipe makes a generous amount of sauce, so you can choose to refrigerate the leftovers (will probably be enough for another 4-6 servings) for a few days or stick it in the freezer for a future quick dinner! Feel free to use other kinds of squash or even pumpkin! Just keep in mind that the different squashes may have different starch levels and may affect how thick or thin the sauce will end up, which you can adjust by adding the pasta water at the end. Play with the cheeses you use! Parmigiano reggiano, or parmesan, is a wonderfully nutty, aged cheese that you probably already have because it is amazing on almost everything. Fontal is an inexpensive but wonderful melting cheese which I generally have on hand, but you could also use gruyere, gouda, fontina, cheddar, etc. The one I recommend you splurge on would be the Pecorino Romano, which is an aged sheep’s milk cheese. There are many different varieties, those aged in walnut leaves or with truffles, young or aged, easily identified by the word “pecorino” usually followed by it’s defining factor. Pecorino Romano is one of the most exported cheeses from Italy and is aged a minimum of 5 months, giving it a wonderful sharp flavor that pairs so well with our velvety, squashy pasta today.

Calories

375.87

Fat (grams)

23.82

Sat. Fat (grams)

14.35

Carbs (grams)

68.67

Fiber (grams)

8.85

Net carbs

59.83

Sugar (grams)

13.66

Protein (grams)

21.97

Sodium (milligrams)

691.50

Cholesterol (grams)

66.70
Nutritional information is approximate. Based on 4 servings.
Did you make this recipe?
Tag @jennyblogsandbakes on instagram and hashtag it #jennyblogs
Created using The Recipes Generator
Adjustments.jpeg