Oil Pie Crust

Last Updated July 31, 2024

Pie crusts are a baking staple, but one that can be intimidating, even if you’ve made them before. Once you master how to make crust, however, a whole world of baking and cooking opens up to you: sweet pies, savory pies, quiches, galettes, home-made pop tarts, etc.

The ingredients for pie crusts couldn’t be more simple. Flour, salt, fat, and water for a basic crust. They differ mostly in what kind of fat is used. Top choices are:

  • Lard - tends to be a more traditional choice, many family recipes handed down include lard. It’s supposed to make a very tender, melt-in-your mouth crust. I prefer to avoid it because of its health value, or lack thereof.

  • Shortening - one of the cheaper options, and is easier to work with, making it a good choice for those that want their crust to hold up and make designs or cutouts. Another I prefer to avoid because it is a very unhealthy fat.

  • Butter - usually touted for having the best flavor. Since butter easily melts while it’s being worked with, it can be slightly more finicky than the previous two to keep tender, and less reliable for designs and cutouts.

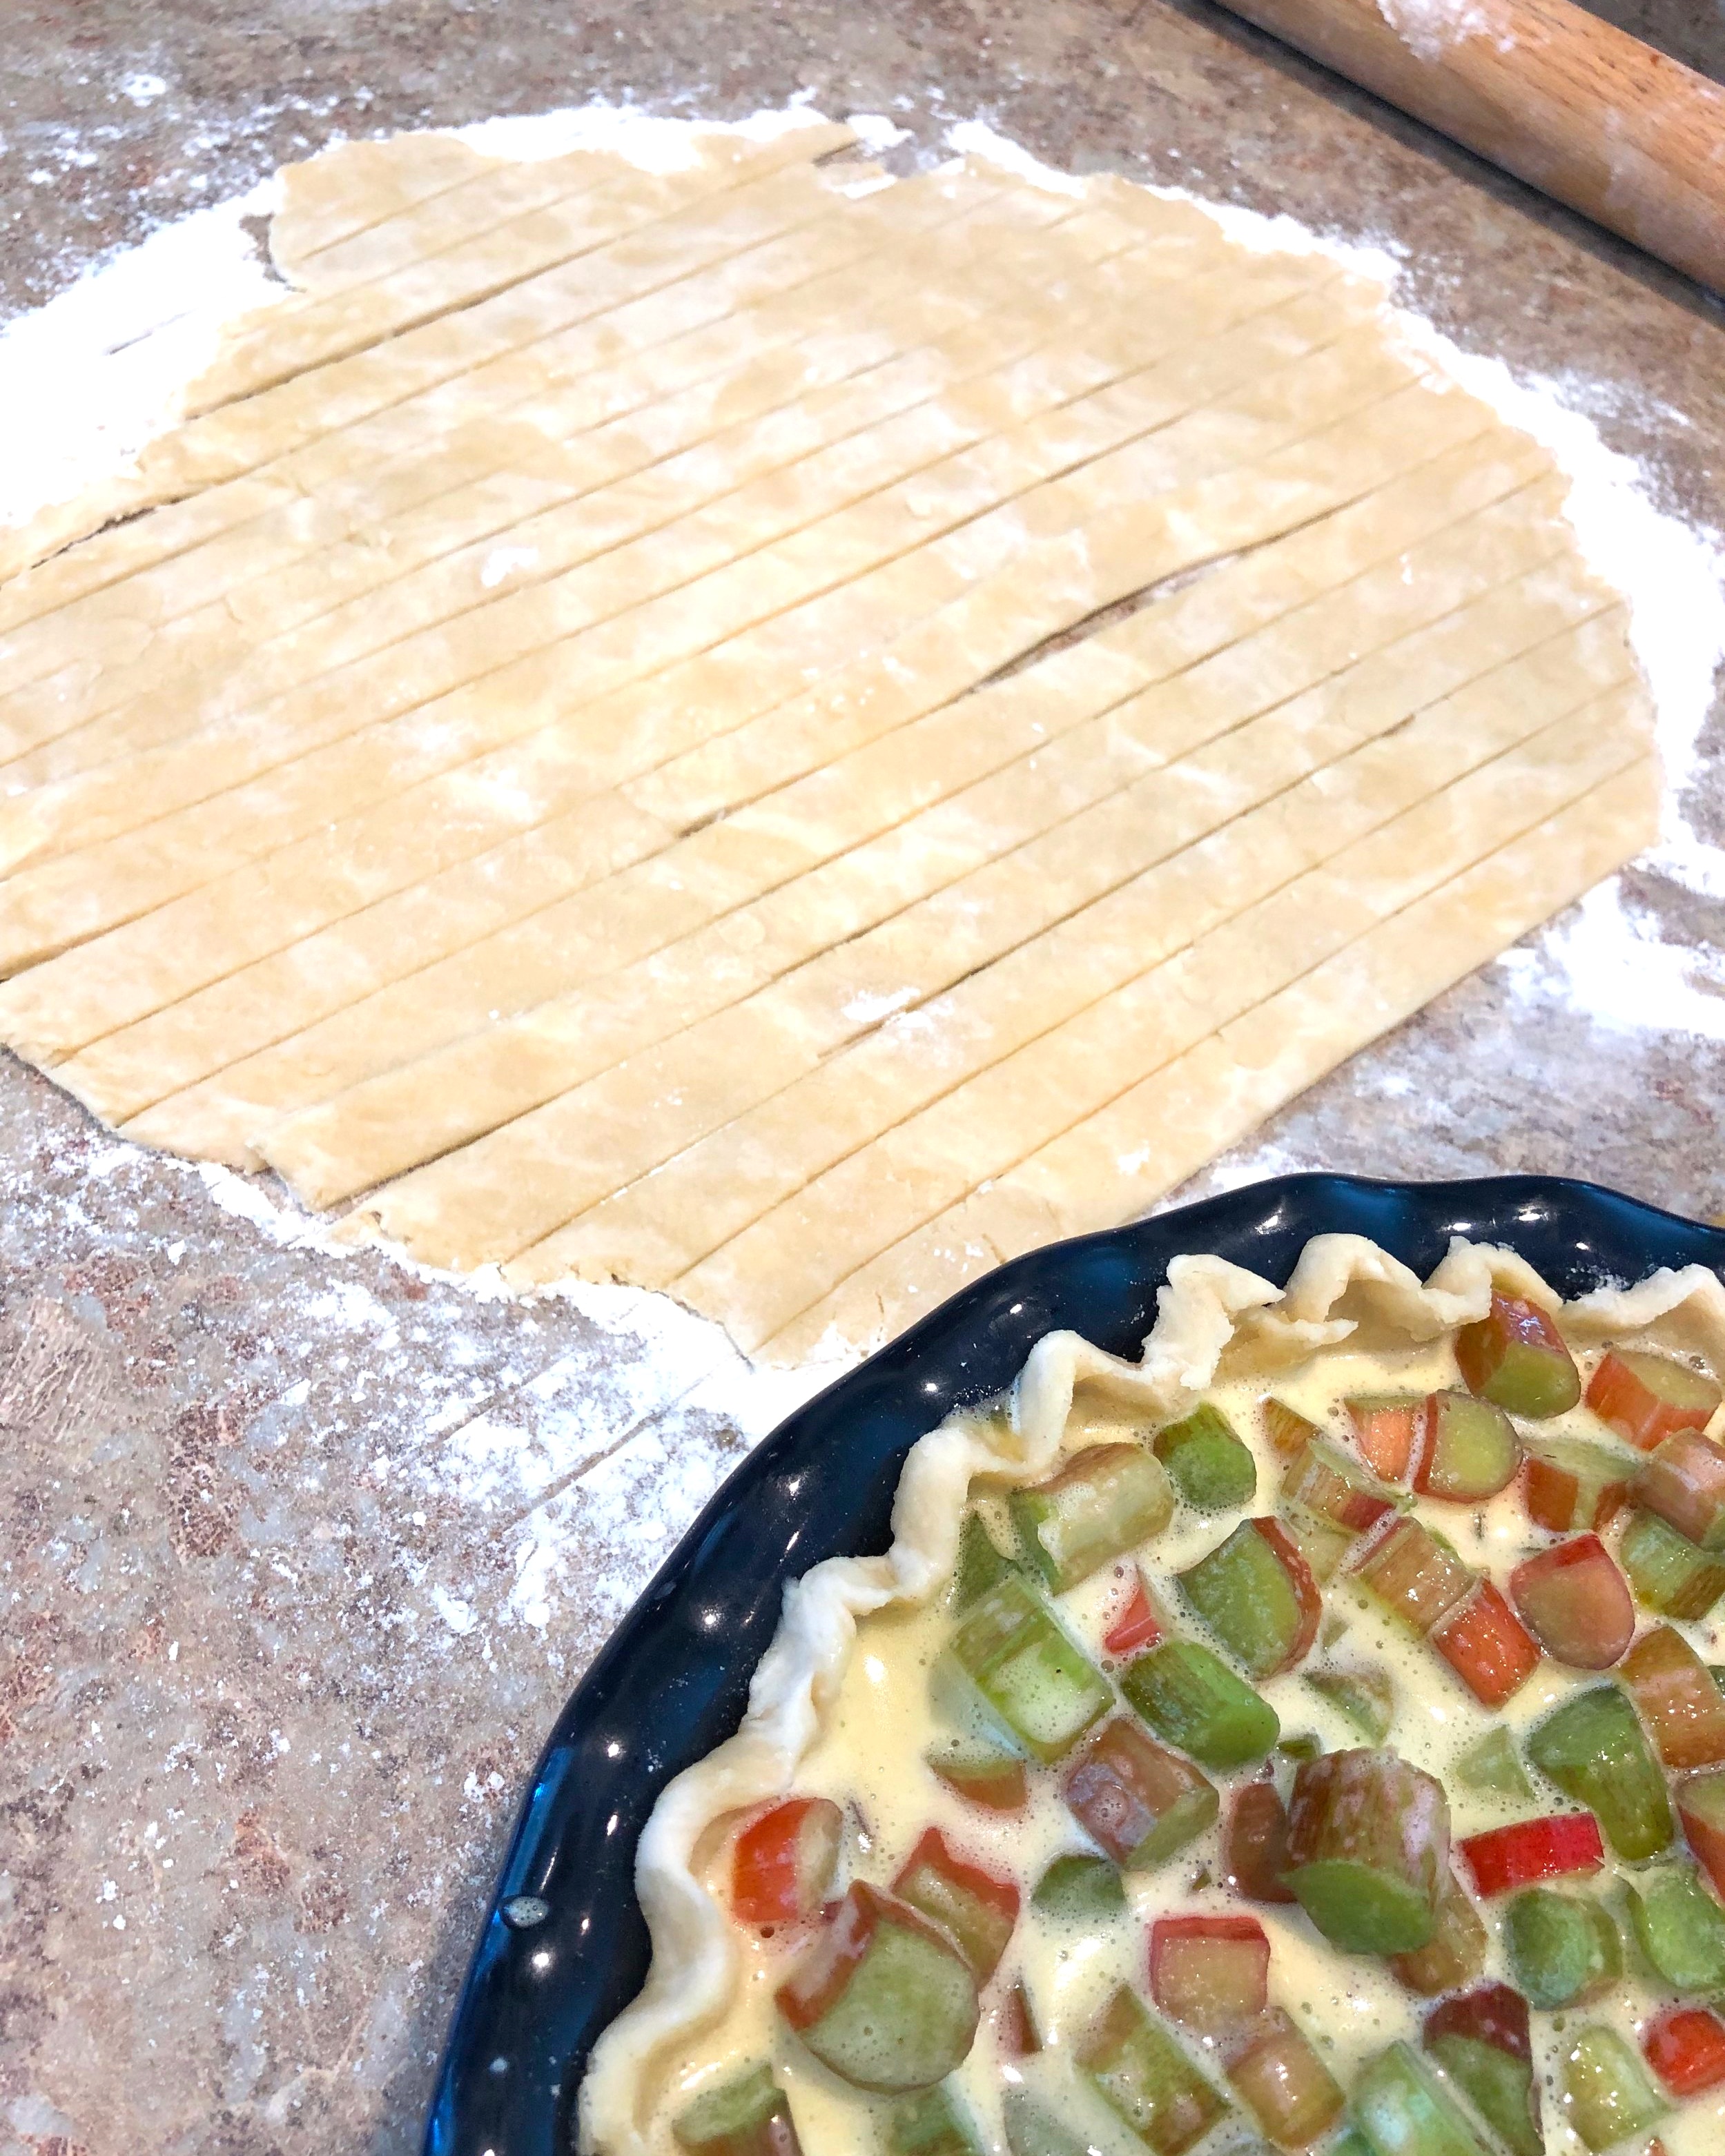
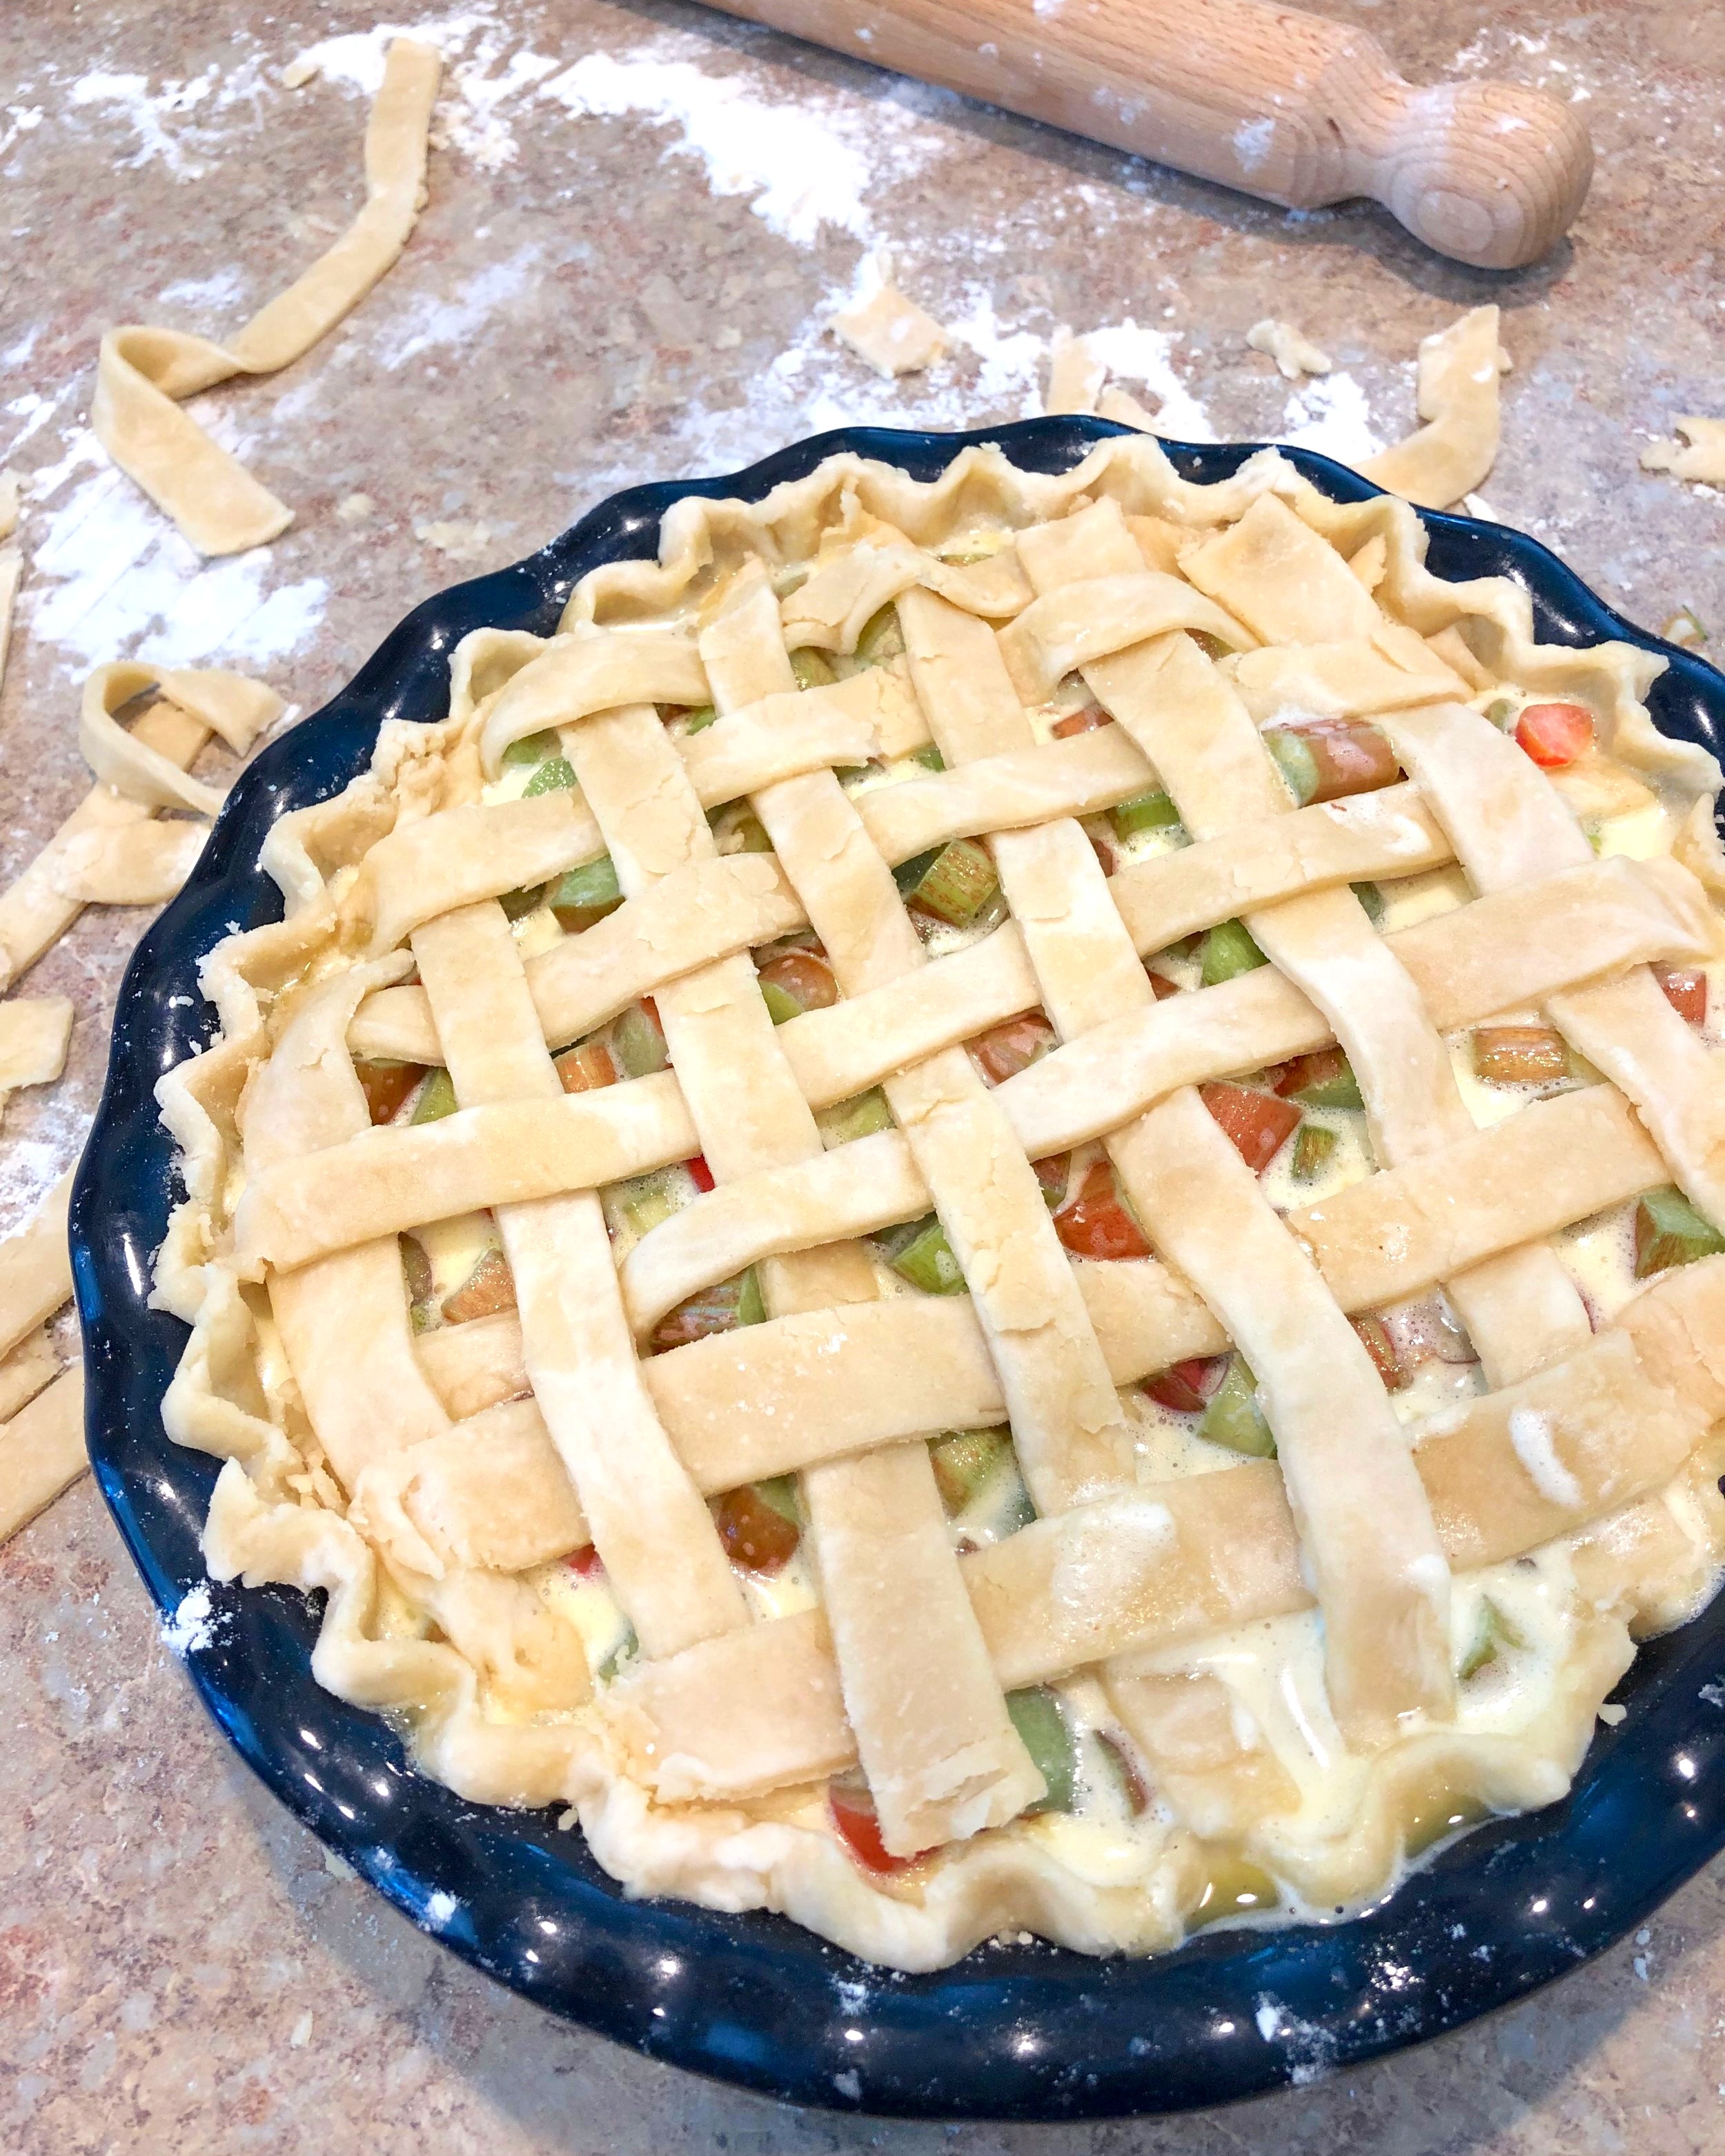
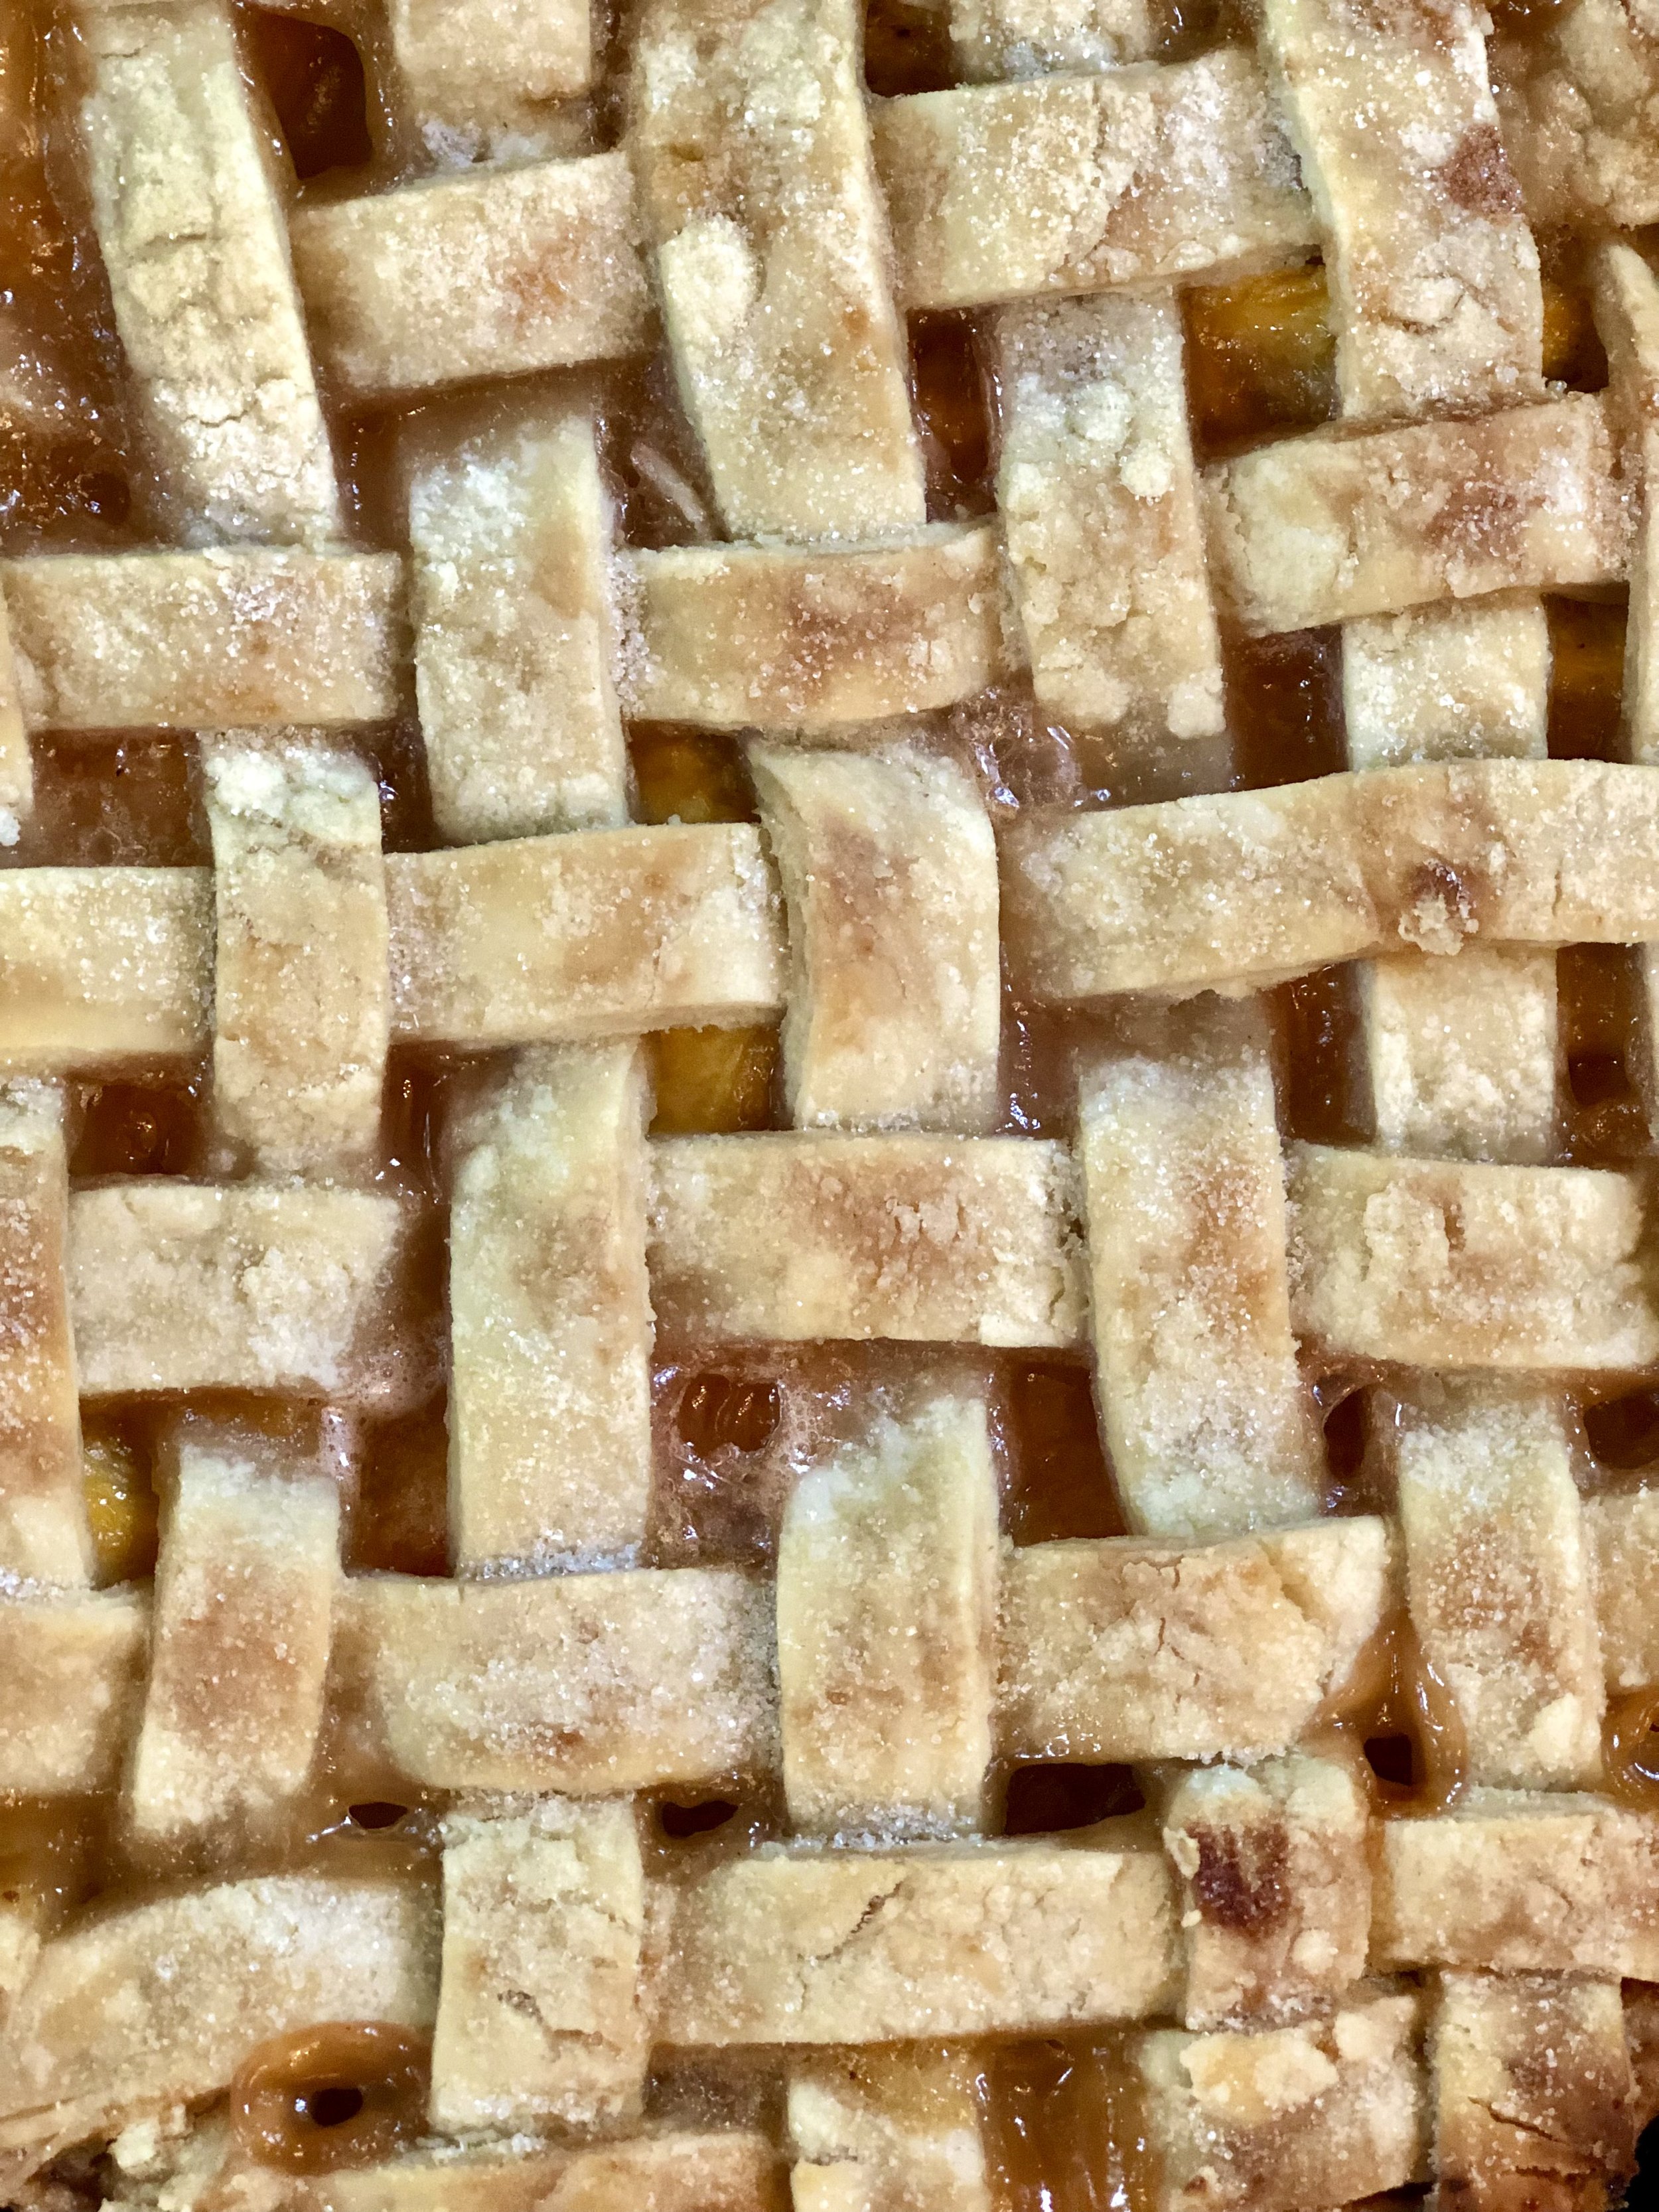
  • Oil - the trickiest to work with by far, few are the people I know who make oil crusts. Actually, my mom may be the only one I know who only makes oil crusts. It’s the healthiest option, as a lot of oils have good fats and you can choose which oil you want to use. I tend to go for a neutral flavored oil, like refined olive oil or peanut oil, but you could even go for extra virgin olive oil, especially if used for a savory pie! You can taste extra virgin olive oil, but yum! Oil crusts are almost useless when it comes to making designs and cutouts. With experience and patience you can get a lattice crust out of it, but if you go this route know it may not turn out and will look lovely and rustic.

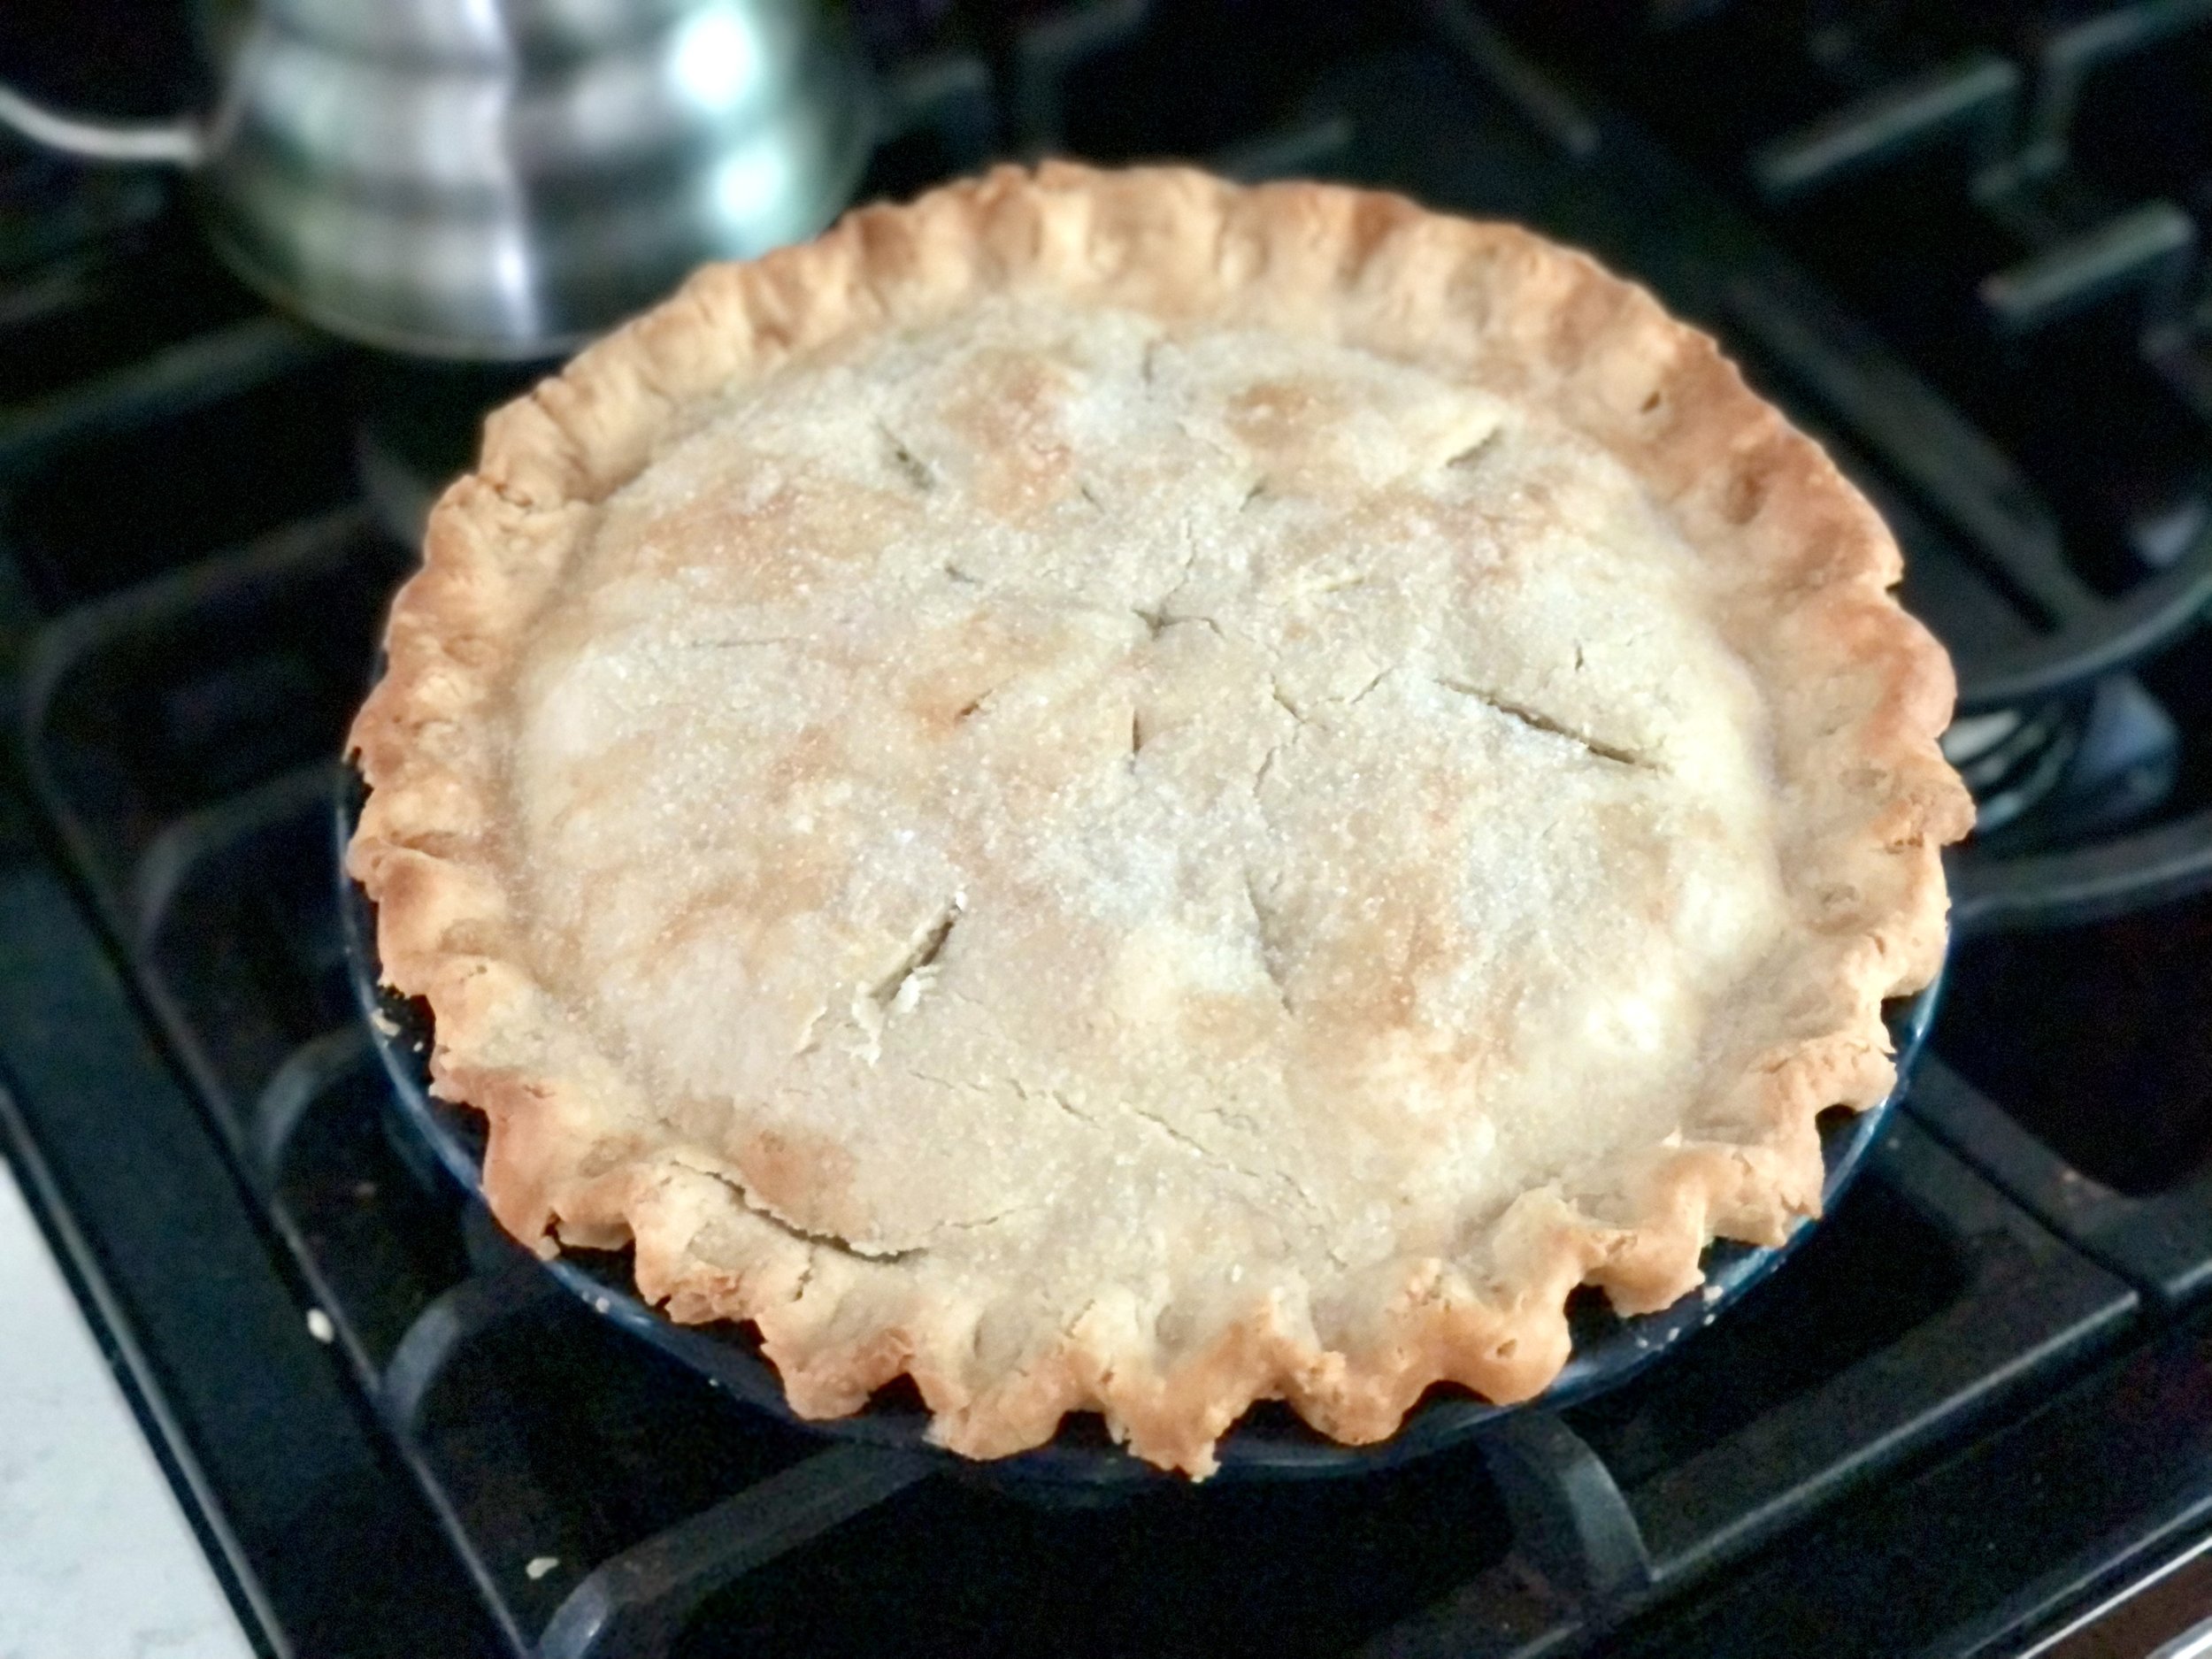
Today we’re talking about oil crusts, the most fearful, yet arguably healthiest, of them all. While they can be notoriously tricky in my family to get a consistently tender crust, I’ve been working on my family’s recipe a lot over the past 2 years especially and have discovered a few tricks. I feel the recipe is just about foolproof, so I’ve decided to finally share it with you!

I’ll warn you, it is still not an “easy” pie crust to work with, but with a little patience, can yield a wonderful and very tender, melt-in-your-mouth crust. I’ll give you all the tricks and knowledge that I know of!

Flour Matters

What brand and what kind of flour you use DOES matter. While all-purpose flour is generally all-purpose, it’s helpful to know what the protein content is of the flour that you’re using. For pie crusts and other delicate baked goods, you may want to get some pastry flour for the best results.

For awhile there we were using Good & Gather’s organic all-purpose flour. Gradually, we both noticed our baked goods weren’t turning out like they used to. We kept chalking it up to bad baking days, or this or that. We finally came to the conclusion that the Good & Gather flour was always the common denominator in things turning out…with unusual results. We switched to King Arthur flours and all our recipes suddenly started turning out wonderfully.

Until the next few crusts we made. A little crusty. Tough. Then we realized, that’s because King Arthur’s all-purpose flour has a protein content of 11.7%. Some might say, a medium-strength bread flour. Bread flour’s have a higher protein content, which helps to develop gluten for bread. This is why bread’s are kneaded, to help develop that gluten. But you do NOT want gluten developing in a pie crust, which is why you mix minimally and use a low-protein flour. All-purpose flours are generally seen as well, all-purpose. High enough protein content to make decent breads, low enough to be able to still make cakes, cookies, etc. With King Arthur’s all-purpose flour having a higher than average protein content, this is why our crusts were turning out tough. For this reason, we now like to use Bob’s Red Mill pastry flour specifically for our pie crusts and those desserts of the most delicate nature.

Use Enough Oil

The single biggest difference between a potentially hard/crunchy crust, and a tender, melt-in-your-mouth crust? Making sure you are using sufficient fat, in this instance, oil. Once you add the oil, practically all the flour should be saturated. Like wet sand. Not some wet, a little dry. Not mostly dry. Well saturated. Which also means you may need less water. Adding less water can mean less mixing, which is another important aspect.

Don’t Over Mix

Never over-mix a pie crust once the water is added. Just a few turns with a spoon or spatula should suffice.

If Time, Let it Rest

Another trick is to let the dough rest before rolling it out. I’ve found success with two rests, if time allows. When you first add the water, let the mixture sit for a few minutes. Don’t mix the water in, just let it sit. Then gently mix. This gives the water more time to penetrate deep into the flour/oil, thus reducing the amount of time you may need to mix it.

A second rest, once you’ve gently mixed the dough, can be helpful. Form the dough into a ball, press into a disc, and wrap in plastic wrap. Let rest for anywhere from 10 minutes to overnight. The more time you give it, the more time the gluten has to relax and again, the water to absorb evenly throughout the dough. When you mix flour with water, gluten starts to form. This is good if you are making bread, helps give it a strong structure so it can rise, but bad if you are making crust. It will be tough. Neither of these rests are essential, but can be helpful, especially if you struggle with tough crusts.

How Do I Know How Much Water to Use?

The more you make this recipe the more you will become familiar with just how much water you need. The brand of flour you use, your kitchen, the temperature, humidity, elevation, season, etc. can all affect how much water you need. For example, in my kitchen, I almost always use exactly 5 Tbsp of water when I make this. However, in your kitchen, you may need 7. Somewhere else, maybe only 4. Each time you make your crust it becomes easier, knowing better how much water to add, what the consistency should look/feel like. Sometimes it can be hard to tell in the mixing stage, and despite your best guess, you may find your crust is too dry or too wet. That’s ok, just roll with it (aha literally), and make a note for next time. Once you’ve started rolling out your dough it’s too late to be adding more water, but you CAN add more flour while rolling it out if it’s a touch too wet. Carefully. Just enough at a time so that the dough isn’t sticking to the surface or the rolling pin. The first time making a recipe, especially a more technical one like a crust, is always the trickiest.

How Do You Transfer the Rolled Out Pie Dough into the Pie Plate?

It’s true, this step is more challenging when dealing with a more delicate oil pie crust, but certainly doable.

Option 1: First, I recommend rolling out the dough on a silpat, or even a large cutting board. Once it’s rolled to size, carefully slide a thin spatula under the edges of the dough, to ensure it hasn’t glued itself to the surface you rolled it out on. Place the pie plate upside down directly onto the crust, centered. Slide one hand under the silpat or cutting board, place the other hand on the bottom of the pie plate, and quickly flip all. Then gently peel off the silpat, or remove the cutting board. Some flour may go flying, but this is the way I’ve had most consistent success keeping an intact oil pie crust.

Option 2: Fold the dough in half once it’s been rolled out, then transfer it to one side of the pie plate. Unfold the crust, and adjust/repair as needed. With an oil crust, it’s common for it to “crack” where you folded it, but that’s easily repaired if it’s a bottom crust.

Option 3: Starting at one end of the rolled out dough, carefully and loosely roll the dough around the rolling pin. Slide it over to the pie plate, and unroll.

Some of these tips are repeated in the “Jenny’s Notes” section immediately following the recipe, so you can reference them should you choose to print the recipe. :)

This post may contain affiliate links. If you make a purchase using these links, Jennyblogs may receive a small commission, at no extra cost to you. This helps to support Jennyblogs. Where possible, links are prioritized to small businesses, and American companies and products made in the USA for American readers. For further information see the privacy policy. Grazie!

Recipe from my mom


Oil Pie Crust

Makes 1 top and 1 bottom crust for a standard 8 inch / 20cm pie

Ingredients:

  • 3 3/4 cup / 450g all-purpose flour

  • 1 tsp / 5g salt

  • 3/4 cup / 168g neutral-flavored oil

  • 5-7 Tbsp / 70-98g ice water

Directions:

  1. In a large bowl, whisk together flour and salt.

  2. Stir in oil until flour is evenly moistened. It should look like wet sand with very little to no dry flour in the bottom of the bowl.

  3. Take your ice water and start by measuring 5 Tbsp / 70g evenly over flour mixture. Gently stir until just moistened. Be very careful not to over mix. If there is still a lot of drier oil mixture at the bottom of the bowl and it can’t be formed into a ball without crumbling, add more water, 1 Tbsp at a time, mixing until just combined.

  4. Divide dough into two equal pieces.

  5. On a generously floured surface, (a silpat makes for easy transfer to pie plate) roll out one half of the dough into a circle about 2 inches / 5cm larger than your pie plate.

  6. Carefully transfer dough to pie plate and press in.

  7. Repeat the rolling out process for the other half of dough. Add your pie filling and transfer top crust over pie. Trim any excess overhang from top and bottom crusts.

  8. Fold edge of top crust under edge of bottom crust, pressing and sealing together. Crimp with fingers or press with a fork. Use a knife or fork to poke some vent holes into the top.

  9. Bake according to pie recipe.

Jenny’s Notes:

  • To help ensure you don’t over-mix the dough when you add the water, you can allow the crust to sit for a few minutes after you sprinkle over the 5 Tbsp of water, BEFORE mixing. Optional, but helpful.

  • Another optional, but helpful tip to ensure a tender crust: After the water has been gently mixed in, gently form dough into a ball, then flatten into a disc and wrap in plastic film. Place in refrigerator for anywhere from 10-30+ minutes, even overnight. The more time it sits the more the moisture from the water will evenly distribute throughout the dough, simultaneously allowing any gluten that formed while mixing the dough a chance to “relax”, thus creating a more tender crust.

  • While rolling out the dough, occasionally turn it OR run a thin spatula underneath the dough, to ensure it is not glueing itself to the surface you are rolling it out on. If needed, sprinkle more flour underneath.

  • To easily see if you’ve rolled the pie crust out into a large enough circle, flip your pie plate upside down and hover it over the dough. You should be able to see about 2 inches / 5cm extending beyond the edges of your pie plate in all directions.

Oil Pie Crust
Yield 8
Author
Prep time
15 Min
Total time
15 Min

Oil Pie Crust

A 100% oil pie crust that is flaky, tender, and simple to make. Learn how to make one of the trickiest, yet healthiest pie crusts out there with this recipe, following the tips and tricks!
Cook modePrevent screen from turning off

Ingredients

Instructions

  1. In a large bowl, whisk together flour and salt.
  2. Stir in oil until flour is evenly moistened. It should look like wet sand with very little to no dry flour in the bottom of the bowl.
  3. Take your ice water and start by measuring 5 Tbsp / 70g evenly over flour mixture. Gently stir until just moistened. Be very careful not to over mix. If there is still a lot of drier oil mixture at the bottom of the bowl and it can’t be formed into a ball without crumbling, add more water, 1 Tbsp at a time, mixing until just combined.
  4. Divide dough into two equal pieces.
  5. On a generously floured surface, (a silpat makes for easy transfer to pie plate) roll out one half of the dough into a circle about 2 inches / 5cm larger than your pie plate.
  6. Carefully transfer dough to pie plate and press in.
  7. Repeat the rolling out process for the other half of dough. Add your pie filling and transfer top crust over pie. Trim any excess overhang from top and bottom crusts.
  8. Fold edge of top crust under edge of bottom crust, pressing and sealing together. Crimp with fingers or press with a fork. Use a knife or fork to poke some vent holes into the top.
  9. Bake according to pie recipe.

Notes

  • To help ensure you don’t over-mix the dough when you add the water, you can allow the crust to sit for a few minutes after you sprinkle over the 5 Tbsp of water, BEFORE mixing. Optional, but helpful.
  • Another optional, but helpful tip to ensure a tender crust: After the water has been gently mixed in, gently form dough into a ball, then flatten into a disc and wrap in plastic film. Place in refrigerator for anywhere from 10-30+ minutes, even overnight. The more time it sits the more the moisture from the water will evenly distribute throughout the dough, simultaneously allowing any gluten that formed while mixing the dough a chance to “relax”, thus creating a more tender crust.
  • While rolling out the dough, occasionally turn it OR run a thin spatula underneath the dough, to ensure it is not glueing itself to the surface you are rolling it out on. If needed, sprinkle more flour underneath.
  • To easily see if you’ve rolled the pie crust out into a large enough circle, flip your pie plate upside down and hover it over the dough. You should be able to see about 2 inches / 5cm extending beyond the edges of your pie plate in all directions.


Nutrition Facts

Calories

398.92

Fat

21.57 g

Sat. Fat

1.64 g

Carbs

44.71 g

Fiber

1.58 g

Net carbs

43.13 g

Sugar

0.16 g

Protein

6.05 g

Sodium

292.42 mg

Cholesterol

0 mg

Nutritional information is approximate. Based on 8 servings.

homemade oil pie crust recipe
Dessert, Dinner, Breakfast
American
Did you make this recipe?
Tag @jennyblogsandbakes on instagram and hashtag it #jennyblogs

Basic Butter Pie Crust

IMG_4560.jpg

Last updated June 24, 2024

Everybody needs a basic butter pie crust. A recipe that’s easy to make, reliable, and goes with all your baking ideas. Oh, and dinner too! Dinner is important.

Like last night. I decided I wanted to make a quiche for dinner, and it was SO nice to be able to pull up this recipe and be able to whip it out, knowing it would turn out, not shrink, and be flaky but sturdy enough to hold a whopping load of eggs, milk, and veggies.

This crust is your easy buttery friend. If you bake things that need crusts a lot, like quiche, pies, pot pies, homemade poptarts, etc. you’ll have this recipe memorized in no time and can whip it up on command!

I like butter because it tastes the best and is the healthier option when looking at lard and shortening. My mom always uses oil, but oil makes for a finicky and tough crust if you don’t handle it just so. For all the tricks to make a tender, melt-in-your-mouth, oil pie crust, here’s my family’s recipe I’ve spun into a fool-proof recipe!

This butter crust is only flour, salt, butter, and water. If you’ve been burned by crusts in the past (or you’ve burned them, heheh) because they shrink, fall apart, or are tough, despair not, my friend! I think we’ve all been there, maybe on repeat and it can be very frustrating. Along with the recipe I’m also going to share with you all the tips and tricks I’ve learned to get a fool-proof pie crust every time!

Plan Ahead

If you normally eat dinner at 6:30pm and it’s now 6:21pm, I’m sorry but your pie crust will be compromised. Pie crusts need time if they’re going to be the flaky, tasty, shapely vessels for filling that we want them to be!

For this crust you need about 1 hour minimum, plus more if you need to blind-bake it.

It can be made up to 2-3 days ahead of time and kept in the fridge. It also freezes beautifully. Either way, you can store it as a block of dough or even already prepared in the pie dish.

Tips for a Flaky Crust

  • What brand and what kind of flour you use DOES matter. While all-purpose flour is generally all-purpose, it’s helpful to know what the protein content is of the flour that you’re using. For  pie  crusts and other delicate baked goods, you may want to get some pastry flour for the best results.

    For awhile my mom and I were using Good & Gather’s organic all-purpose flour. Gradually, we both noticed our baked goods weren’t turning out like they used to. We kept chalking it up to bad baking days, or this or that. We finally came to the conclusion that the Good & Gather flour was always the common denominator in things turning out…with unusual results. We switched to King Arthur flours and all our recipes suddenly started turning out wonderfully.

    Until the next few  crusts we made. A little crusty. Tough. Then we realized, that’s because King Arthur’s all-purpose flour has a protein content of 11.7%. Some might say, a medium-strength  bread flour. Bread flour’s have a higher protein content, which helps to develop gluten for  bread. This is why bread’s are kneaded, to help develop that gluten. But you do NOT want gluten developing in a  pie  crust, which is why you mix minimally and use a low-protein flour. All-purpose flours are generally seen as well, all-purpose. High enough protein content to make decent breads, low enough to be able to still make cakes, cookies, etc. With King Arthur’s all-purpose flour having a higher than average protein content, this is why our  crusts were turning out tough. For this reason, we now like to use Bob’s Red Mill pastry flour specifically for our  pie crusts and those desserts of the most delicate nature.

  • When cutting up the cold butter, the chunks don’t have to be super small. 1/2” chunks are great, and try to keep them all the same size so smaller chunks don’t melt while you’re still squishing the bigger chunks.

  • When crumbling the butter, less is always more. You may be tempted to really integrate the butter, but this is more likely to cause the butter to melt and result in a tough crust. Leave chunks of butter, really, it’ll turn out great!

  • Make sure your butter is cold and stays cold while you’re making the dough. If your house is warm or even hot like my house in the summertime, then you will probably need to stick your butter back in the fridge or freezer after you cut it into small pieces. If you do this first, you can then weigh your flour, salt, and prepare your ice water while it’s chilling.

  • If your cold butter softens up too much while crumbling it into the flour mixture, it’s best to stick it back into the fridge/freezer for a few minutes before adding the ice water.

  • Another note on the ice water, you can also just stick some water in the freezer, but this requires a bit of planning so it’s cold enough when you go to make the crust. I often do this because I have only one ice tray and don’t always have ice ready…especially in the summer. Sometimes an iced beverage takes preference over a crust, haha.

How to Avoid a Shrinking Crust

If your crust is shrinking, most likely it didn’t rest long enough in the fridge. While you are mixing the dough it is inevitable that a bit of gluten builds up, which is a very elastic-like substance. This is good when making bread, bad when making flaky pie crust. The dough needs to rest so that the gluten strands have time to relax. If the gluten strands didn’t have adequate time to relax they will shrink back on themselves, hence the shrinking crust.

If your crust is still shrinking, try to use a ceramic or metal pie dish instead of slippery glass. I LOVE my Emile Henry ceramic pie dish. French baking ware like Emile Henry and Le Creuset are pricey but so worth it!

You can also try using pie weights if you are blind-baking, or dry beans if you have those on hand. Simply line the inside of your prepared crust with parchment paper and add the pie weights or dry beans. Bake as directed.

Still shrinking? Bake at low temperatures, like 325°F - 350°F / 163°C - 177°C.

Freeze the prepared crust for at least one hour or even overnight.

Make sure your crust reaches high enough that it rests on the lip of the pie dish, not beyond or too short, but just resting on the edge. It also helps to cut off the extra pie crust while leaving an overhang of about 1/2” all the way around. Tuck this overhang under and crimp the edge, or use a fork. The thicker crust edge not only gives you more to work with while crimping, it is also less likely to shrink down.

This post may contain affiliate links. If you make a purchase using these links, Jennyblogs may receive a small commission, at no extra cost to you. This helps to support Jennyblogs. Where possible, links are prioritized to small businesses, and American companies and products made in the USA for American readers. For further information see the privacy policy. Grazie!


Basic Butter Pie Crust

Makes 1 bottom pie crust. For a bottom and top crust, double this recipe.

Ingredients:

IMG_4558.JPG
  • 1 1/3 cup / 160g all-purpose flour

  • 1/2 tsp / 2.5g salt

  • 4 Tbsp / 56g butter, cold, cut into equally-sized 1/2” chunks

  • 4-6 Tbsp / 59 - 89g ice water

Directions:

Oven 425°F / 220°C. Ungreased 8 - 9in / 20 - 23cm pie dish.

  1. In a medium bowl whisk together flour and salt.  Blend in cold butter using a pastry cutter, fork, or your hands.  You want the butter to end up in pieces, no smaller than peas. 

  2. Add the ice water, starting with 4 Tbsp / 59g, mixing as little as possible.  The dough should be able to hold together in a ball, without being too dry or too wet, but still a bit shaggy looking.  Add more water if necessary, 1 tablespoon at a time.  

  3. Place dough on a piece of plastic wrap, shape into a disc, and wrap tightly.  Place in fridge for 1 - 48 hours.  

  4. After the crust has rested, roll into a circle on a lightly floured surface or silpat.  Roll a few times with your rolling pin in one direction before turning the crust 45° (quarter turn) and continuing with a few more rolls.  Periodically check under the crust to make sure it isn’t sticking and sprinkling more flour if needed. Continue like this until your crust is nicely round and roughly 2in / 5cm larger than your pie dish.

  5. Carefully transfer crust to pie dish (this is easier if using a silpat), trim the excess overhang to within about 1/2” of the edge of pie dish if necessary, and fold the ends under. Crimp as desired, or press with a fork.  Prick the bottom of the crust with a fork.  The crust can also be refrigerated or even frozen at this point, if needed.  

  6. If blind baking, bake in preheated oven for 10-12 minutes, or until crust is lightly golden-brown.  Cool completely.  Otherwise fill and proceed according to your recipe.


Jenny’s Notes:

  • You can also use a food processor, pulsing in the butter until it has the desired consistency.  Just be sure to remove the dough from the food processor and mix in the water with a fork or pastry cutter so you don't overwork the dough.  You want to work it as little as possible once you add the water. The liquid helps to awaken the gluten, and the more you work it and the gluten strands develop, the tougher your crust will be.  The minimum of 1 hour rest in the fridge allows what gluten inevitably developed to relax.  

  • If you are having problems with a shrinking crust, try using a metal or ceramic pie dish and allowing the crust more time to rest before baking.  You can also try using pie weights and baking at a lower temperature.

  • I have made this pie several times over the past year, and have always needed all 6 tablespoons of water, possibly because it was always during the dry winter.  If you live in a really dry climate, you might need up to 7.  Just be aware, an overly wet crust is more likely to glue itself to the pan during baking.   

Basic Butter Pie Crust
Yield 8 Servings
Author
Prep time
15 Min
Inactive time
1 Hour
Total time
1 H & 15 M

Basic Butter Pie Crust

An everyday all-butter pie crust that is easy, flaky, reliable, and can be made ahead. Great for all your pie crust needs.

Ingredients

Instructions

  1. Oven 425°F / 220°C. Ungreased 8 - 9in / 20 - 23cm pie dish.
  2. In a medium bowl whisk together flour and salt. Blend in cold butter using a pastry cutter, fork, or your hands. You want the butter to end up in pieces, no smaller than peas.
  3. Add the ice water, starting with 4 Tbsp / 59g, mixing as little as possible. The dough should be able to hold together in a ball, without being too dry or too wet, but still a bit shaggy looking. Add more water if necessary, 1 tablespoon at a time.
  4. Place dough on a piece of plastic wrap, shape into a disc, and wrap tightly. Place in fridge for 1 - 48 hours.
  5. After the crust has rested, roll into a circle on a lightly floured surface or silpat. Roll a few times with your rolling pin in one direction before turning the crust 45° (quarter turn) and continuing with a few more rolls. Periodically check under the crust to make sure it isn’t sticking and sprinkling more flour if needed. Continue like this until your crust is nicely round and roughly 2in / 5cm larger than your pie dish.
  6. Carefully transfer crust to pie dish (this is easier if using a silpat), trim the excess overhang to within about 1/2” of the edge of pie dish if necessary, and fold the ends under. Crimp as desired, or press with a fork. Prick the bottom of the crust with a fork. The crust can also be refrigerated or even frozen at this point, if needed.
  7. If blind baking, bake in preheated oven for 10-12 minutes, or until crust is lightly golden-brown. Cool completely. Otherwise fill and proceed according to your recipe.

Notes

You can also use a food processor, pulsing in the butter until it has the desired consistency. Just be sure to remove the dough from the food processor and mix in the water with a fork or pastry cutter so you don't overwork the dough. You want to work it as little as possible once you add the water. The liquid helps to awaken the gluten, and the more you work it and the gluten strands develop, the tougher your crust will be. The minimum of 1 hour rest in the fridge allows what gluten inevitably developed to relax. If you are having problems with a shrinking crust, try using a metal or ceramic pie dish and allowing the crust more time to rest before baking. You can also try using pie weights and baking at a lower temperature. I have made this pie several times over the past year, and have always needed all 6 tablespoons of water, possibly because it was always during the dry winter. If you live in a really dry climate, you might need up to 7. Just be aware, an overly wet crust is more likely to glue itself to the pan during baking.

Nutrition Facts

Calories

122.99

Fat

5.87 g

Sat. Fat

3.63 g

Carbs

15.27 g

Fiber

0.54 g

Net carbs

14.73 g

Sugar

0.06 g

Protein

2.13 g

Sodium

192.78 mg

Cholesterol

15.05 mg

Nutritional information is approximate and based on 8 servings.

easy crust, best crust recipe, all-butter crust, pie crust, crust for quiche, flaky crust, tender crust, butter
dessert, dinner
American
Did you make this recipe?
Tag @jennyblogsandbakes on instagram and hashtag it #jennyblogs
IMG_4555.JPG

Ganache Coconut Cream Pie Bars

Not mashed potatoes...:)

Not mashed potatoes...:)

Last Updated August 13, 2024

Oh my gosh! Ganache. Yes, coconut cream pie is delicious.  So are Almond Joys and Mounds.  So why not put them together, add a shortbread crust, put them in the slightly less formidable to cut bar form instead of pie, and voila: Ganache Coconut Cream Pie Bars. 

These bars are slightly involved, but the end product is very worthwhile.  Not to mention, you can make an 8x8 pan worth of bars, or 9x13!  I almost always go the 9x13 route.  This has become a favorite for Christmas, my mom's birthday, and just about any occasion that a little creamy coconut and chocolate is welcome.  As what seems to be turning into a trend, I failed to get any kind of decent photo of the inside, so for now, (or maybe forever...once these are cut into you'll understand why photos never get taken) please enjoy the photos of the whipped cream and toasted coconut topping.  If you'd like an idea of what bliss you're getting in to, take a peak over at Willow Bird Baking, from whom I adapted the recipe, and see her beautiful photos! 


Ganache Coconut Cream Pie Bars

Makes about 20 servings

Ingredients:

For the Shortbread Crust

  • 1 cup (2 sticks) / 226g cold butter

  • 2 cups / 240g all-purpose flour

  • 1/2 cup / 100g sugar

For the Ganache

  • 1/4 cup + 2 Tbsp / 87g heavy whipping cream

  • 6 oz (1 cup) / 175g bittersweet or semisweet chocolate, chopped, or chips

For the Coconut Cream Filling

  • 6 cups / 1,422g unsweetened coconut milk or milk of choice

  • 4 eggs

  • 1 1/2 cups / 300g sugar

  • 2/3 cup / 73g cornstarch

  • 1/2 tsp / 2.5g salt

  • 1 1/2 cups / 150g flaked unsweetened coconut

  • 1/2 tsp / 2.5g coconut extract

  • 1/2 tsp / 2.5g vanilla extract

For the Whipped Cream Topping

  • 2 cups / 464g heavy whipping cream

  • 1/2 cup / 100g sugar

  • 1 tsp / 5g vanilla extract

  • 1/2 cup / 50g flaked unsweetened coconut, toasted (see below)

Directions:

Oven 350°F / 177°C.  Ungreased 9x13in / 23x33cm baking dish.

Make the Shortbread Crust

  1. Cut the butter into flour and sugar using a fork, pastry cutter, or in a food processor.  Once the mixture resembles coarse sand and the butter chunks are no larger than small peas, press mixture evenly into bottom prepared pan. 

  2. Bake for 18-22 minutes until lightly golden-brown.  Set aside to cool.  Leave oven on for toasting the coconut.

Make the Ganache

  1. While the crust is baking, prepare the ganache.  Place the chocolate in a medium bowl and the cream in a small saucepan.  Over medium-low heat, bring the cream to a simmer.  You can also use the microwave, 30 seconds-1 minute or until cream is just simmering, but not boiling.  

  2. Pour the cream over the chocolate and let sit for 1-2 minutes to melt the chocolate.  Whisk until completely smooth.  

  3. Once the crust is finished and partly cooled, pour ganache evenly over crust.  Place in fridge to set.   

Toast the Coconut

Place the 1/2 cup coconut for the topping in a shallow baking dish.  Place in oven and stir every 1-2 minutes, making sure it doesn't over-brown, for a total of 5-10 minutes.  Remove and let cool.

Make the Coconut Cream Filling

  1. Combine milk, eggs, sugar, cornstarch, and salt in a large saucepan. 

  2. Place over medium heat, whisking constantly, until mixture begins to thicken and comes to a boil.  This can take anywhere from 15-35 minutes, depending on your stove.

  3. Once thickened, remove from heat and stir in coconut and vanilla extracts.  

  4. Remove crust from fridge and pour filling over crust.  Place back in fridge to set, 2-4 hours.  

Make the Whipped Cream Topping

  1. Whip the cream and sugar in the bowl of a stand mixer or with a handheld mixer until stiff peaks form.

  2. Spoon over chilled bars, or pipe.  Finish with toasted coconut.  Store in fridge.  

Jenny's Notes:

  • Because the ganache in this recipe is not decorative, you can easily substitute coconut milk or another kind for the heavy whipping cream. I prefer using coconut milk, reducing the amount of fat/calories. Save those for when you need the high-shine perfect ganache!

  • If you only have sweetened coconut milk or sweetened flaked coconut on hand, go ahead and use those. Simply reduce the sugar by about 1/4-1/2 cup / 50-100g in the filling, if you wish. I prefer to have unsweetened coconut on hand so I can control how much sugar I'm adding to breakfasts, desserts, etc., plus I like the smaller size of flaked and grated coconut vs. shredded.

  • For toasting coconut, and every use really, I highly recommend Le Creuset pans. My toasted coconut used to always come out in various shades, but since using Le Creuset it always turns out a beautiful even, golden-brown. They conduct heat evenly and beautifully.

  • If a 9x13 pan of cream coconut heaven seems daunting to you, it's super easy to halve this recipe for a 8x8 or 9x9in pan!

  • These bars should ideally be eaten within 3-4 days. Otherwise the whipped cream starts to separate and the crust gets soggy.

Ganache Coconut Cream Pie Bars
Yield 20
Author
Prep time
1 H & 45 M
Cook time
32 Min
Total time
2 H & 17 M

Ganache Coconut Cream Pie Bars

Shortbread crust, a thin layer of ganache, classic coconut cream pie filling, all topped with fresh whipped cream and toasted coconut.
Cook modePrevent screen from turning off

Ingredients

For the Shortbread Crust
For the Ganache
For the Coconut Cream Filling
For the Whipped Cream Topping

Instructions

Make the Shortbread Crust
  1. Oven 350°F / 177°C. Ungreased 9x13in / 23x33cm baking dish.
  2. Cut the butter into flour and sugar using a fork, pastry cutter, or in a food processor. Once the mixture resembles coarse sand and the butter chunks are no larger than small peas, press mixture evenly into bottom prepared pan.
  3. Bake for 18-22 minutes until lightly golden-brown. Set aside to cool. Leave oven on for toasting the coconut.
Make the Ganache
  1. While the crust is baking, prepare the ganache. Place the chocolate in a medium bowl and the cream in a small saucepan. Over medium-low heat, bring the cream to a simmer. You can also use the microwave, 30 seconds-1 minute or until cream is just simmering, but not boiling.
  2. Pour the cream over the chocolate and let sit for 1-2 minutes to melt the chocolate. Whisk until completely smooth.
  3. Once the crust is finished and partly cooled, pour ganache evenly over crust. Place in fridge to set.
Toast the Coconut
  1. Place the 1/2 cup coconut for the topping in a shallow baking dish. Place in oven and stir every 1-2 minutes, making sure it doesn't over-brown, for a total of 5-10 minutes. Remove and let cool.
Make the Coconut Cream Filling
  1. Combine milk, eggs, sugar, cornstarch, and salt in a large saucepan.
  2. Place over medium heat, whisking constantly, until mixture begins to thicken and comes to a boil. This can take anywhere from 15-35 minutes, depending on your stove.
  3. Once thickened, remove from heat and stir in coconut and vanilla extracts.
  4. Remove crust from fridge and pour filling over crust. Place back in fridge to set, 2-4 hours.
Make the Whipped Cream Topping
  1. Whip the cream and sugar in the bowl of a stand mixer or with a handheld mixer until stiff peaks form.
  2. Spoon over chilled bars, or pipe. Finish with toasted coconut. Store in fridge.

Notes

Because the ganache in this recipe is not decorative, you can easily substitute coconut milk or another kind for the heavy whipping cream. I prefer using coconut milk, reducing the amount of fat/calories. Save those for when you need the high-shine perfect ganache!If you only have sweetened coconut milk or sweetened flaked coconut on hand, go ahead and use those. Simply reduce the sugar by about 1/4-1/2 cup / 50-100g in the filling, if you wish. I prefer to have unsweetened coconut on hand so I can control how much sugar I'm adding to breakfasts, desserts, etc., plus I like the smaller size of flaked and grated coconut vs. shredded.For toasting coconut, and every use really, I highly recommend Le Creuset pans. My toasted coconut used to always come out in various shades, but since using Le Creuset it always turns out a beautiful even, golden-brown. They conduct heat evenly and beautifully.If a 9x13 pan of cream coconut heaven seems daunting to you, it's super easy to halve this recipe for an 8x8 or 9x9in pan!These bars should ideally be eaten within 3-4 days. Otherwise the whipped cream starts to separate and the crust gets soggy.

Nutrition Facts

Calories

446.04

Fat

30.59 g

Sat. Fat

21.07 g

Carbs

41.54 g

Fiber

2.52 g

Net carbs

39.02 g

Sugar

26.41 g

Protein

4.58 g

Sodium

152.00 mg

Cholesterol

92.63 mg

Nutritional information is approximate. Based on 20 servings.

Coconut Cream pie, bars, shortbread, chocolate ganache, fresh whipped cream, toasted coconut
Dessert, Pie, bars
American
Did you make this recipe?
Tag @jennyblogsandbakes on instagram and hashtag it #jennyblogs
2017-12-23 15.25.10.jpg

Blueberry Icebox Pie

Serves 10-12

A day late and a dollar short on pi day, I know.  But hear me out! If 3/14 is pi day, do you know what comes after the .14? That's right.  .1415.  Emphasis on the 15, because that's today.  Pie the food is so great it should get two days of recognition anyway. There, there, pie, I didn't forget about you.  But you didn't come here to listen to me ramble, you're probably here because you love pie, or blueberries, or math, or all of the above.  Moving on, before this post accidentally ends up on 3/16.

This is a simple recipe, fairly quick and delicious to eat!  The only baking required is for the crust.  Great for summer time, especially when blueberries are in season.

Blueberry Icebox Pie

Ingredients:

  • 1 sleeve graham crackers

  • 4 Tbsp butter, melted

  • 2 cups fresh blueberries (or frozen and thawed)

  • 2 Tbsp lemon juice

  • 2 tsp unflavored powdered gelatin, or 1 1/4-oz packet

  • 16 oz. cream cheese (2 blocks), room temperature

  • 14 oz can sweetened condensed milk

Directions:

Preheat oven to 350 F.

In a food processor, process graham crackers until fine.  Alternately, you can always crush them with a rolling pin on a cutting board or in a seal-able plastic bag. Add melted butter and pulse until graham cracker crumbs hold together some.  Press into a 9 in. spring form pan or pie plate.

Bake for 10 minutes.

Purée 1 1/2 cups of the blueberries in a food processor or blender.  Add lemon juice. 

Transfer to a small saucepan and sprinkle gelatin over the surface.  Let sit for 10 minutes.

Place blueberry mixture on the stove over medium-low, heating until gelatin has just dissolved. Remove from heat.

In a bowl with electric beaters or with a stand mixer, beat cream cheese for about a minute.  Add condensed milk.  On low speed, slowly add blueberry mixture.  Increase speed and beat until smooth.

Pour over baked crust, top with remaining blueberries, and chill until set. 

To serve, garnish with fresh mint, if desired.

Jenny's Note:  This can also be frozen, perfect for the hottest of summer days.  Just let set at room temperature for about 10 minutes before slicing.

Disclaimer on the ahem, er, photography.  It can only get better from here, right?

Disclaimer on the ahem, er, photography.  It can only get better from here, right?

And do you know what number comes after 3.1415? Yep. 926.  And guess what? I was writing this post at 9:26.  Oh yes, I went there.  Enjoy your pi. I mean, pie.

And here is a pie chart to go with your pie on the day after pi.  Sincerely, Jenny Leslie Knope Morris.

Recipes Currently Waiting to be Made

Recipe adapted from Self