Snickers Bars

Last Updated August 1, 2024

Let’s make Snickers! 

If you just thought, "Why would I want to make Snickers when I can just buy them and save a whole lot of time?" I'm actually with you on that one. While I (and my famiy) are known for making just about anything homemade, I'm not normally the first one to jump on making things homemade that have already been perfected. Homemade Reese's?  Samoas? Oreos? Nah, I'll let Nabisco and the Girl Scout Foundation of America do that. I did make homemade Oreos once, but after a couple hours of work and ending up with less cookies than a package of Oreos that didn't even taste like an Oreo, I decided to be more discerning with such recipes in the future. They tasted good...but they were saving neither time nor money. The exception is, if you can make something that tastes like the original or better, even if it takes longer, because homemade means less chemicals and preservatives! Yay. 

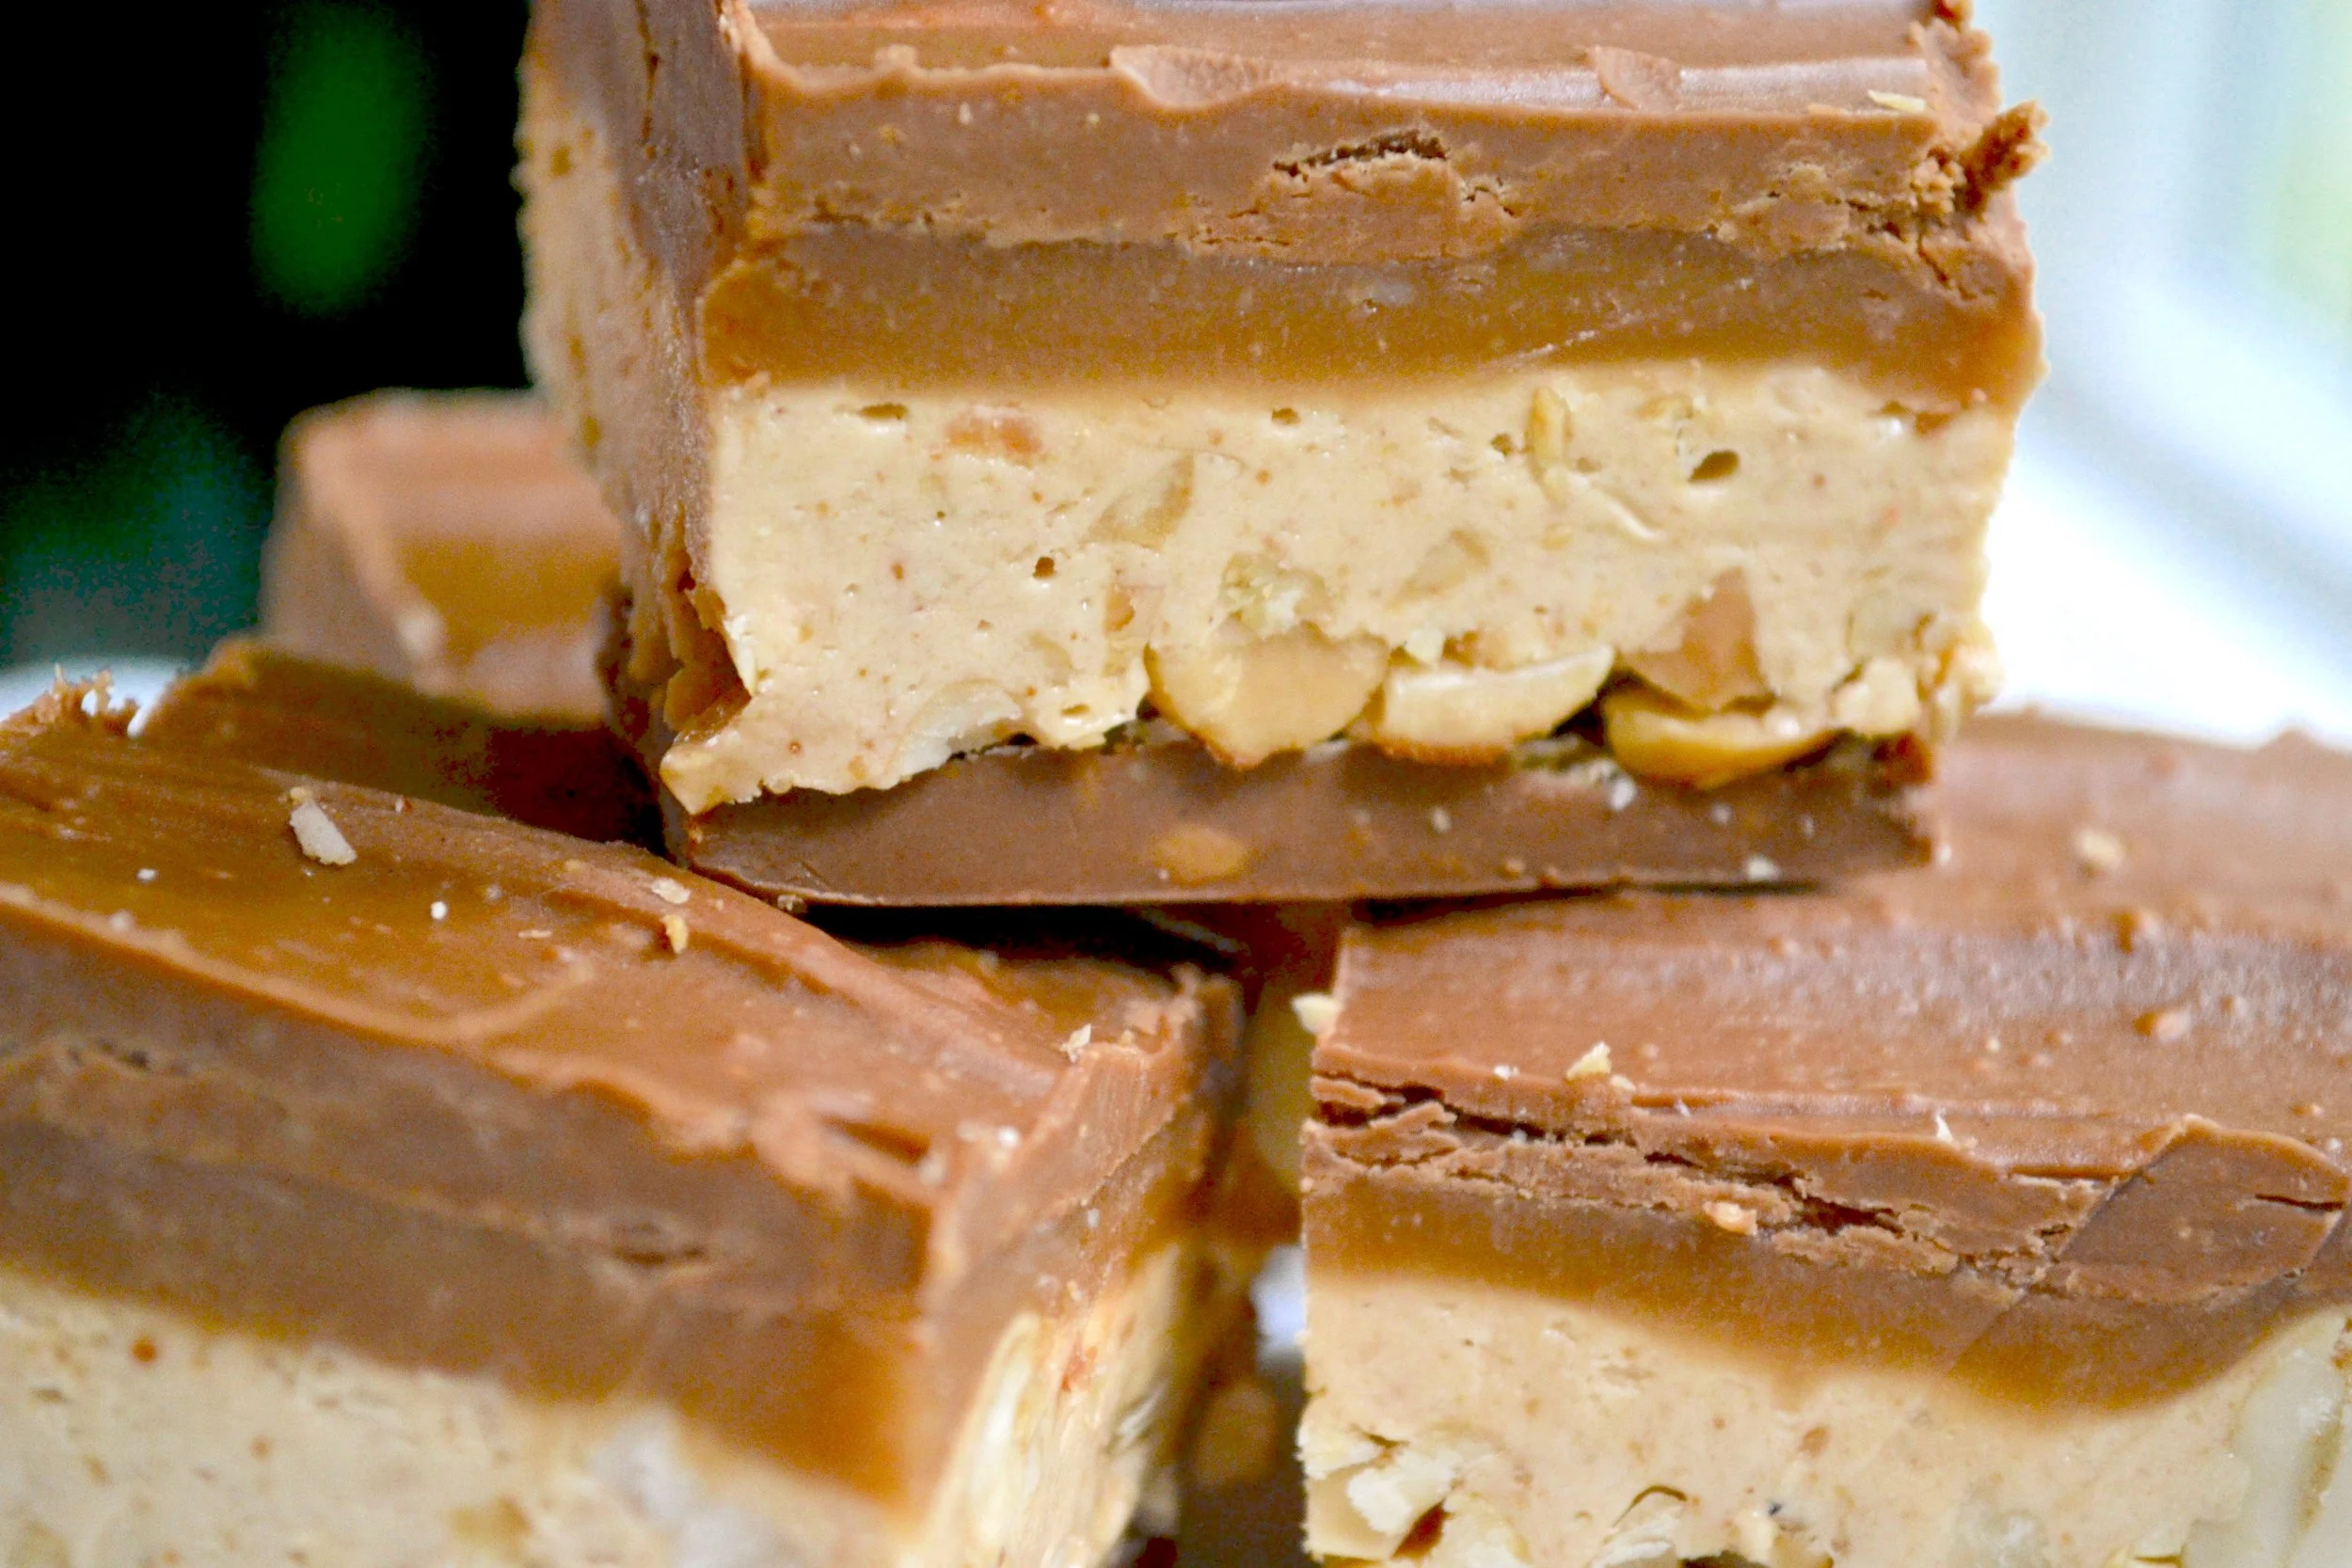
That's where these Snickers come in. Delicious layers of milk chocolate, homemade nougat with marshmallow fluff, salty peanuts, and that decadent caramel layer.

And you know what? They’re not even as hard to make as you might think.

You can melt some chocolate in a pan? Yes you can. Boil a few ingredients together for a few minutes, without even needing a candy thermometer? Sure. Chop up some peanuts? Yep, just watch your fingers! And for the caramel layer, you have your pick between making a homemade caramel (also linked in the recipe), or simply unwrapping a bag of caramel squares and melting them with a bit of heavy cream. Then melt more chocolate, at which you will already be a pro. There you have it, homemade, can’t-keep-your-hands-off-of-them, Snickers bars.

This post may contain affiliate links. If you make a purchase using these links, Jennyblogs may receive a small commission, at no extra cost to you. This helps to support Jennyblogs. Where possible, links are prioritized to mall businesses and ethically and responsibly made items. For further information see the privacy policy. Grazie!

Recipe adapted from Brown Eyed Baker


Snickers Bars

Makes 42-48 small bars

Ingredients:

For the Top and Bottom Chocolate Layer

  • 2 1/2 cups / 425g milk chocolate chips (about 1 1/4 bags or 15oz)

For the Nougat Layer

  • 1/4 cup / 56g butter

  • 3/4 cup / 150g sugar

  • 1/4 cup / 59g milk

  • 1 1/2 cups / 128g marshmallow fluff

  • 1/4 cup / 65g creamy peanut butter

  • 1 tsp vanilla extract

  • 1 1/2 cups / 233g salted peanuts, roughly chopped

For the Caramel Layer

  • 1/2 batch caramel sauce, recipe found here

or

  • 14 oz / 396g caramel squares, unwrapped

  • 1/4 cup / 59g heavy whipping cream

Directions:

Lightly grease a 9x13in / 23x33cm pan and line with parchment paper.  Grease the parchment paper. 

Make the Bottom Chocolate Layer

  1. Place 1 1/4 cups / 213g of the milk chocolate chips in a small saucepan over low heat, stirring until melted.  Spread evenly in the bottom of the 9x13 pan.  Place in fridge or freezer to set until next layer is ready.

Make the Nougat Layer

  1. Melt butter in a medium saucepan over medium-low heat.  Add sugar and milk, stirring until dissolved.  Bring to a boil.  Reduce heat to low and simmer for 5 minutes, stirring occasionally. 

  2. Remove from heat and stir in marshmallow fluff, peanut butter, and vanilla until smooth.  Fold in peanuts.  Spread evenly over cooled chocolate in pan and return to fridge or freezer. 

Make the Caramel Layer

  1. Make a half batch of the caramel sauce as directed. 

or

  1. Melt caramel squares with heavy cream in a medium saucepan over low heat, stirring occasionally, until melted and smooth.  Once melted, cook for 4 more minutes, stirring frequently. 

  2. Pour caramel over cooled nougat layer and return to fridge or freezer.

Make the Top Chocolate Layer

  1. Melt the remaining 1 1/4 cups / 212g of milk chocolate chips in a small saucepan over low heat, stirring often.  Spread evenly over cooled caramel layer. 

  2. Place back in fridge or freezer until completely set, 10-30 minutes.

  3. Keep in pan or remove using parchment paper; slice and serve.

  4. Can be stored at room temperature for up to a week, two weeks in the fridge, or three months in the freezer. 

Jenny's Notes:

  • Really like peanut butter?  You can add 1/4 cup / 65g smooth peanut butter to each the top and bottom chocolate layer after melting the chocolate.  Or, use part peanut butter chips instead of all milk chocolate chips.  

  • Don't need a whole 9x13 pan of Snickers?  You can always halve this recipe and put everything in an 8x8 pan.  But since you're putting the time in, I would recommend making the whole 9x13 pan and simply freezing whatever you won't eat right away.   

  • The first greasing of the pan before you put in the parchment paper may seem redundant, but it helps the paper to stick to the pan and not move all over while you are trying to spread chocolate and such.  Ironic, though, isn't it?  Usually you grease something to help it move, not keep it in place.

Snickers Bars
Yield 42-48 small bars
Author
Prep time
30 Min
Cook time
45 Min
Total time
1 H & 15 M

Snickers Bars

Possibly better than the real thing, these homemade Snickers Bars are made with glorious layers of caramel, marshmallow-y nougat, and salty peanuts sandwiched between two layers of milk chocolate.
Cook modePrevent screen from turning off

Ingredients

For the Top and Bottom Chocolate Layer
For the Nougat Layer
For the Caramel Layer

Instructions

Make the Bottom Chocolate Layer
  1. Lightly grease a 9x13in / 23x33cm pan and line with parchment paper. Grease the parchment paper.
  2. Place 1 1/4 cups / 213g of the milk chocolate chips in a small saucepan over low heat, stirring until melted. Spread evenly in the bottom of the 9x13 pan. Place in fridge or freezer to set until next layer is ready.
Make the Nougat Layer
  1. Melt butter in a medium saucepan over medium-low heat. Add sugar and milk, stirring until dissolved. Bring to a boil. Reduce heat to low and simmer for 5 minutes, stirring occasionally.
  2. Remove from heat and stir in marshmallow fluff, peanut butter, and vanilla until smooth. Fold in peanuts. Spread evenly over cooled chocolate in pan and return to fridge or freezer.
Make the Caramel Layer
  1. Combine sugar, corn syrup, and water in a medium sauce over high heat. Allow to cook without stirring until the mixture turns a beautiful amber color. (If it turns an ugly amber color, I can't help ya. Just kidding. Proceed.) This could take anywhere from 10-20 minutes, depending on how hot your stove top cooks. Keep a watchful eye on it, as it goes fast from light golden, perfectly amber, to burnt.
  2. Remove from heat and carefully pour in cream, a little at a time, as it will bubble up and spatter at you. Stir until all the cream is mixed in.
  3. Attach a candy thermometer to the pan and return to the heat. Cook until mixture reaches 238 degrees Fahrenheit, about 2-5 minutes.
  4. Remove from heat and stir in salt. Stir in butter, one tablespoon at a time, until completely smooth. Transfer to a bowl and allow to cool completely before using. Spread over cooled nougat layer and return to fridge or freezer.
  5. OR
  6. Melt caramel squares with heavy cream in a medium saucepan over low heat, stirring occasionally, until melted and smooth. Once melted, cook for 4 more minutes, stirring frequently.
  7. Pour caramel over cooled nougat layer and return to fridge or freezer.
Make the Top Chocolate Layer
  1. Melt the remaining 1 1/4 cups / 212g of milk chocolate chips in a small saucepan over low heat, stirring often. Spread evenly over cooled caramel layer.
  2. Place back in fridge or freezer until completely set, 10-30 minutes.
  3. Keep in pan or remove using parchment paper; slice and serve.
  4. Can be stored at room temperature for up to a week, two weeks in the fridge, or three months in the freezer.

Notes

Really like peanut butter? You can add 1/4 cup / 65g smooth peanut butter to each the top and bottom chocolate layer after melting the chocolate. Or, use part peanut butter chips instead of all milk chocolate chips. Don't need a whole 9x13 pan of Snickers? You can always halve this recipe and put everything in an 8x8 pan. But since you're putting the time in, I would recommend making the whole 9x13 pan and simply freezing whatever you won't eat right away. The first greasing of the pan before you put in the parchment paper may seem redundant, but it helps the paper to stick to the pan and not move all over while you are trying to spread chocolate and such. Ironic, though, isn't it? Usually you grease something to help it move, not keep it in place.

Nutrition Facts

Calories

169.11

Fat

9.76 g

Sat. Fat

4.49 g

Carbs

18.93 g

Fiber

0.90 g

Net carbs

18.03 g

Sugar

16.15 g

Protein

2.67 g

Sodium

57.84 mg

Cholesterol

11.41 mg

Nutritional information is approximate. Based on 42 servings using the homemade caramel recipe.

homemade Snickers bars, nougat, homemade caramel, peanuts, Snickers
dessert, cookies and bars
American
Did you make this recipe?
Tag @jennyblogsandbakes on instagram and hashtag it #jennyblogs

Pumpkin Sticky-Bun Muffins

In the midst of all the political upheaval, here is a little reprieve from the chaos to focus on the important things in life: pumpkin and autumn.  This is all I am going to write today, you have plenty of other lengthy essays from one political stand point or another to read at your leisure, you don't need another one from me.  You're welcome.  Go and make these Pumpkin Sticky-Bun Muffins in peace.

On another note, today’s recipe features nuts, namely, pecans and walnuts. If you’d like to get your mind off of politics and instead learn all about walnuts and how nutritious they are, click here!

Montreal, Canada

Montreal, Canada

This post may contain affiliate links. If you make a purchase using these links, Jennyblogs may receive a small commission, at no extra cost to you. This helps to support Jennyblogs. For further information see the privacy policy. Grazie!

Recipe adapted from Southern Living


Pumpkin Sticky Buns

Makes 24 + a few extra

Ingredients:

I used walnuts in this batch

I used walnuts in this batch

  • 2 cups / 250g pecans or walnuts, or a mixture

  • 1/2 cup / 113g butter (1 stick), melted

  • 1/2 cup / 100g brown sugar

  • 2 Tbsp / 40g maple syrup

  • 2 cups / 256g whole wheat flour

  • 1 1/2 cups / 180g all-purpose flour

  • 2 1/2 cups / 500g sugar

  • 1 tsp cinnamon

  • 3/4 tsp cloves

  • 3/4 tsp nutmeg

  • 1/2 tsp ginger

  • 1 tsp baking soda

  • 1 tsp salt

  • 1 15 oz / 425g can pumpkin purée

  • 3/4 cup / 168g oil

  • 4 eggs

Directions:

Oven 350°F / 170°C.  Grease 2 12-cup muffin tins.

  1. Arrange pecans or walnuts evenly on a baking sheet.  Bake for about 10 minutes or until fragrant and slightly darker in color. 

  2. In a small bowl combine butter, brown sugar, and maple syrup.  Evenly distribute among the 24 muffin cups, putting about a tsp of the mixture in each.  Sprinkle evenly with toasted pecans and set aside.

  3. In a large bowl combine flours, sugar, spices, baking soda, and salt.  Make a well in the center of the dry ingredients.

  4. In another medium bowl beat together pumpkin, oil, eggs.  Pour this mixture into the well in the dry ingredients, stirring just until moistened and combined.  Spoon batter over pecans in muffin tins, filling about 2/3 full. 

  5. Bake for 20-25 minutes, or until toothpick inserted in the center comes out clean.

  6. Immediately run a knife around the edge of the muffins to loosen and invert pan onto a wire rack or counter to remove muffins.  If you wait too long the muffins will stick to your pans.  

Jenny's Notes:

  • This recipe makes extra batter, you may choose to make more pumpkin muffins, or grease a bread pan and make pumpkin bread.  Extras muffins or bread can always be frozen for a later date. 

  • I don't recommend using paper liners for this recipe.  However, to help with the clean up, be sure to immediately remove muffins from pans and soak pans in hot soapy water.

Pumpkin Sticky-Bun Muffins
Yield 26-28
Author
Prep time
40 Min
Cook time
35 Min
Total time
1 H & 15 M

Pumpkin Sticky-Bun Muffins

Whole wheat pumpkin muffins made with a sticky, gooey caramel and nut topping.
Cook modePrevent screen from turning off

Ingredients

Instructions

  1. Oven 350°F / 170°C. Grease 2 12-cup muffin tins.
  2. Arrange pecans or walnuts evenly on a baking sheet. Bake for about 10 minutes or until fragrant and slightly darker in color.
  3. In a small bowl combine butter, brown sugar, and maple syrup. Evenly distribute among the 24 muffin cups, putting about a tsp of the mixture in each. Sprinkle evenly with toasted pecans and set aside.
  4. In a large bowl combine flours, sugar, spices, baking soda, and salt. Make a well in the center of the dry ingredients.
  5. In another medium bowl beat together pumpkin, oil, eggs. Pour this mixture into the well in the dry ingredients, stirring just until moistened and combined. Spoon batter over pecans in muffin tins, filling about 2/3 full.
  6. Bake for 20-25 minutes, or until toothpick inserted in the center comes out clean.
  7. Immediately run a knife around the edge of the muffins to loosen and invert pan onto a wire rack or counter to remove muffins. If you wait too long the muffins will stick to your pans.

Notes

This recipe makes extra batter, you may choose to make more pumpkin muffins, or grease a bread pan and make pumpkin bread. Extras muffins or bread can always be frozen for a later date. I don't recommend using paper liners for this recipe. However, to help with the clean up, be sure to immediately remove muffins from pans and soak pans in hot soapy water.

Nutrition Facts

Calories

323.77

Fat

18.03 g

Sat. Fat

3.58 g

Carbs

39.27 g

Fiber

2.73 g

Net carbs

36.55 g

Sugar

24.87 g

Protein

4.10 g

Sodium

179.52 mg

Cholesterol

37.96 mg

Nutritional information is approximate. Based on 26 servings.

pumpkin sticky buns, cinnamon, pumpkin spice, nutmeg, cloves, pecans, walnuts, caramel, fall recipe, whole wheat pumpkin muffins
breakfast, brunch, snack, dessert
American
Did you make this recipe?
Tag @jenevamorris on instagram and hashtag it #jennyblogs