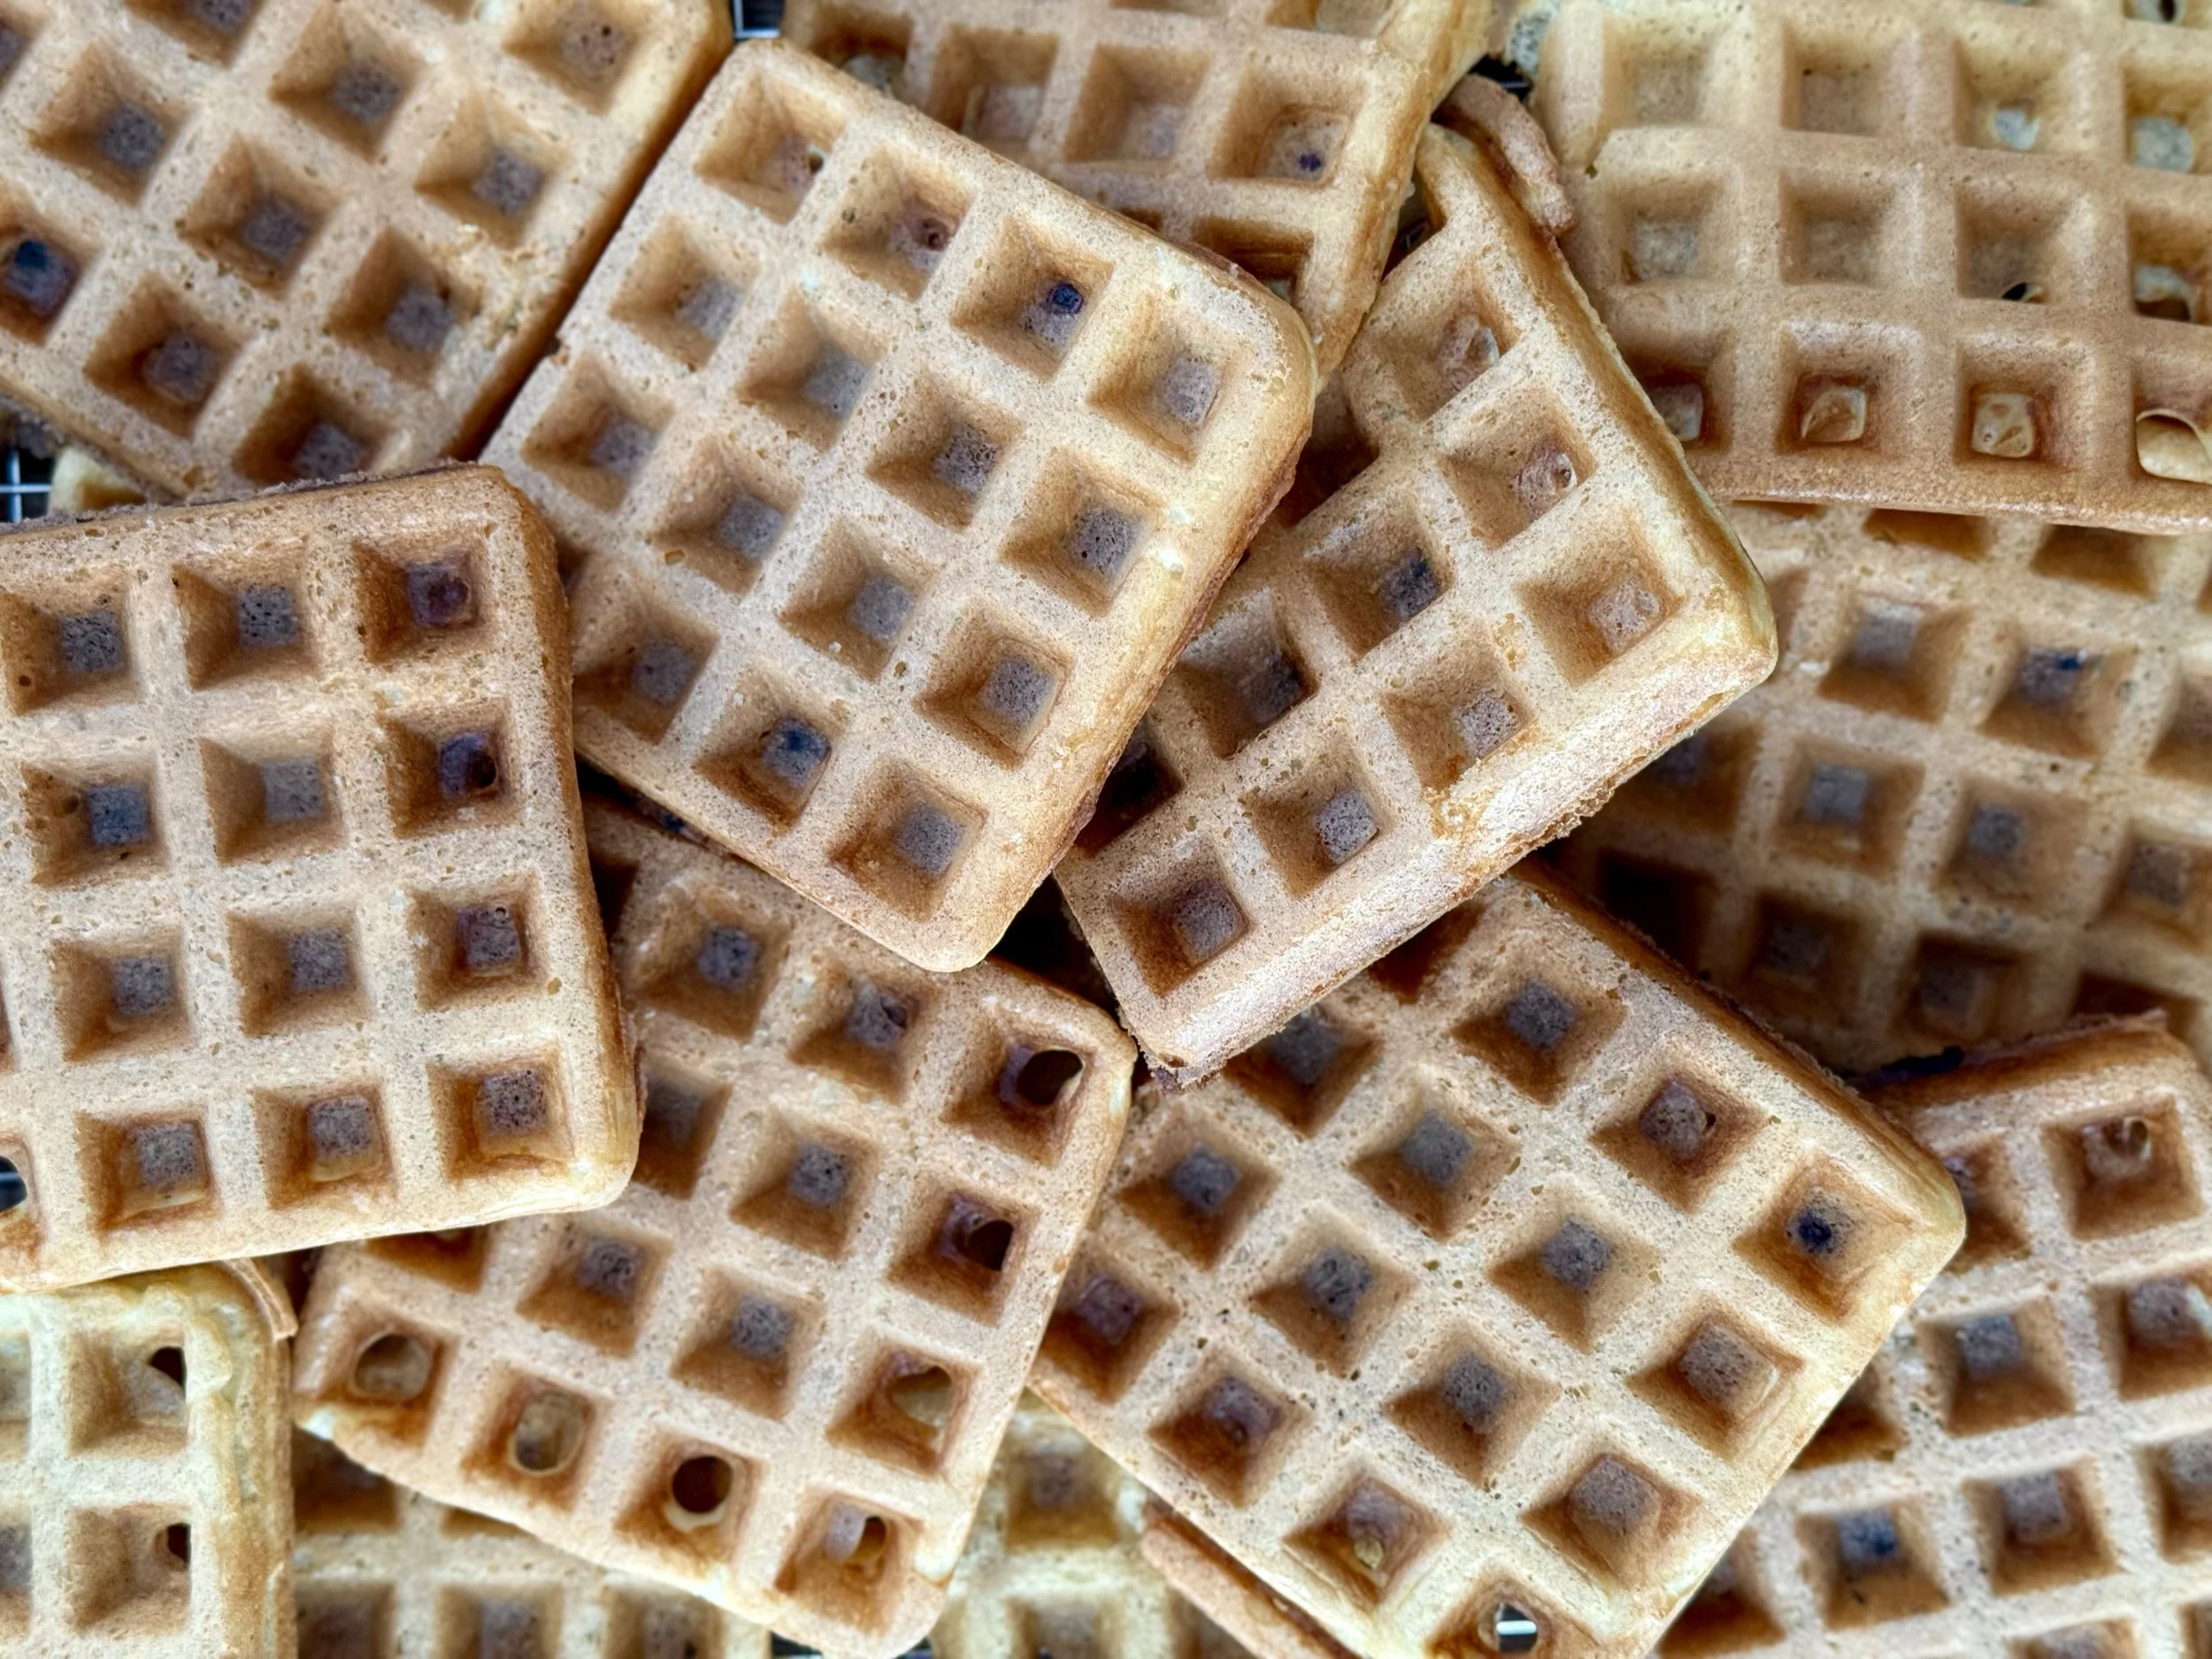
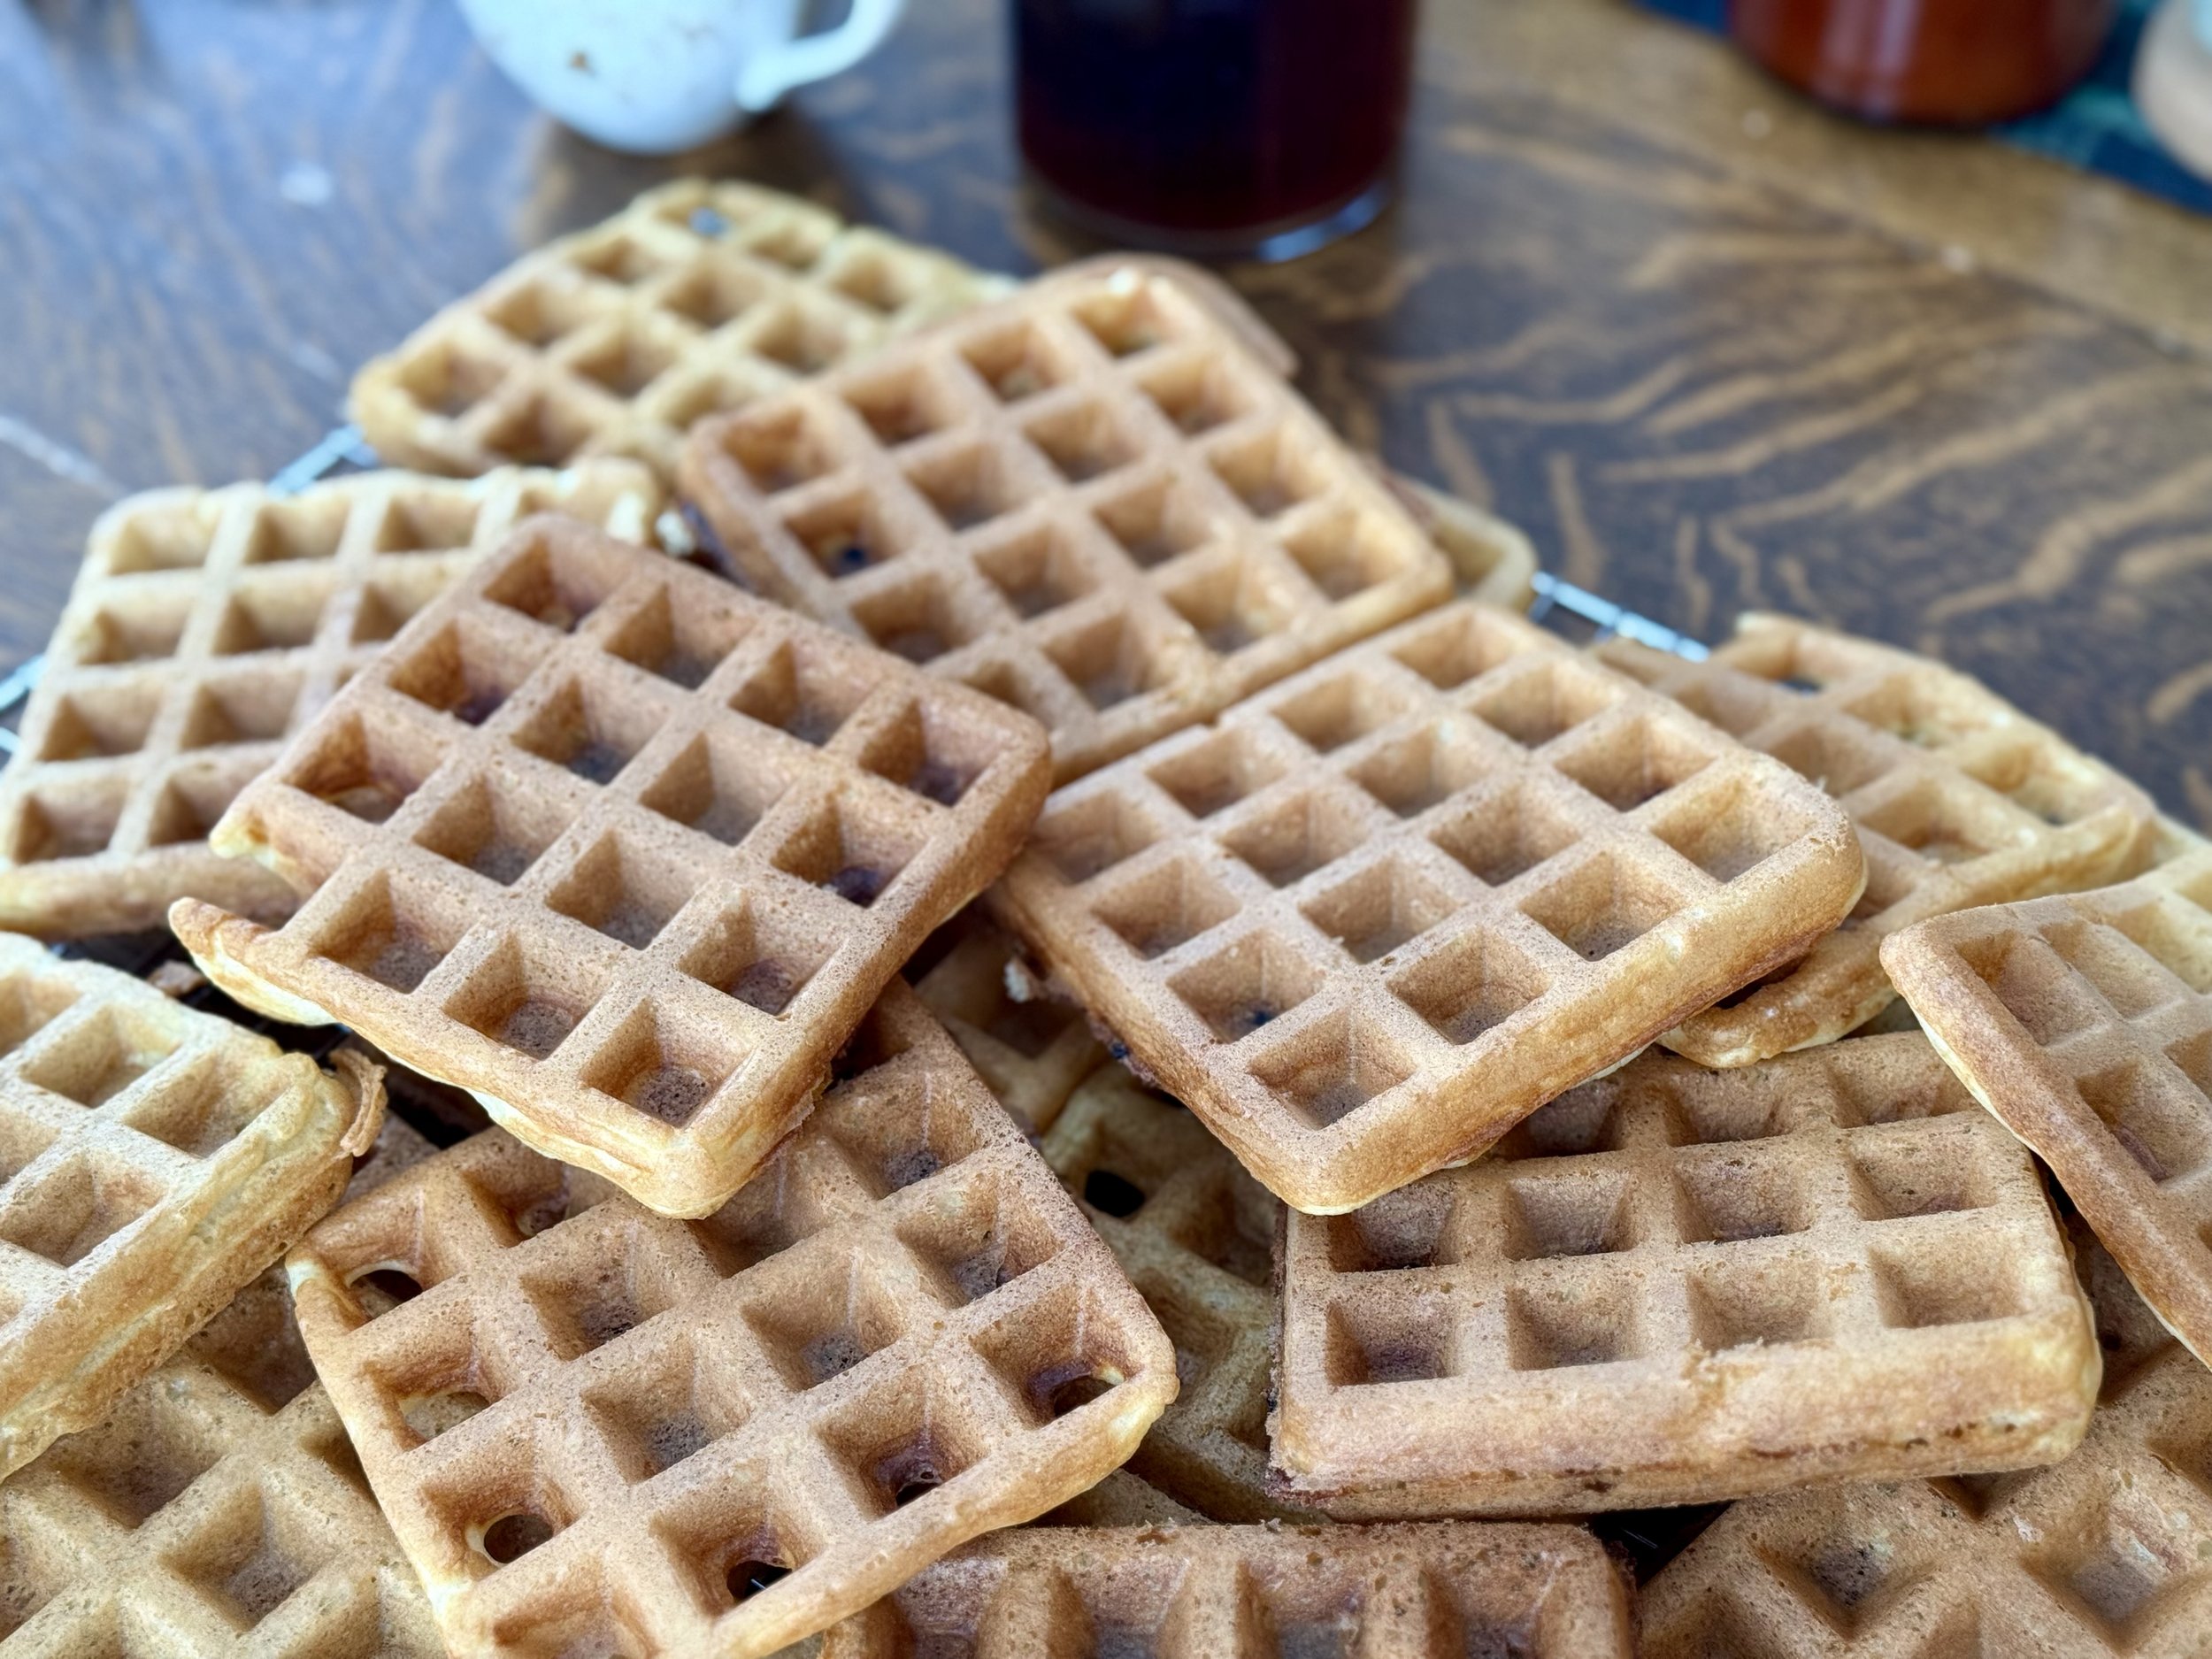
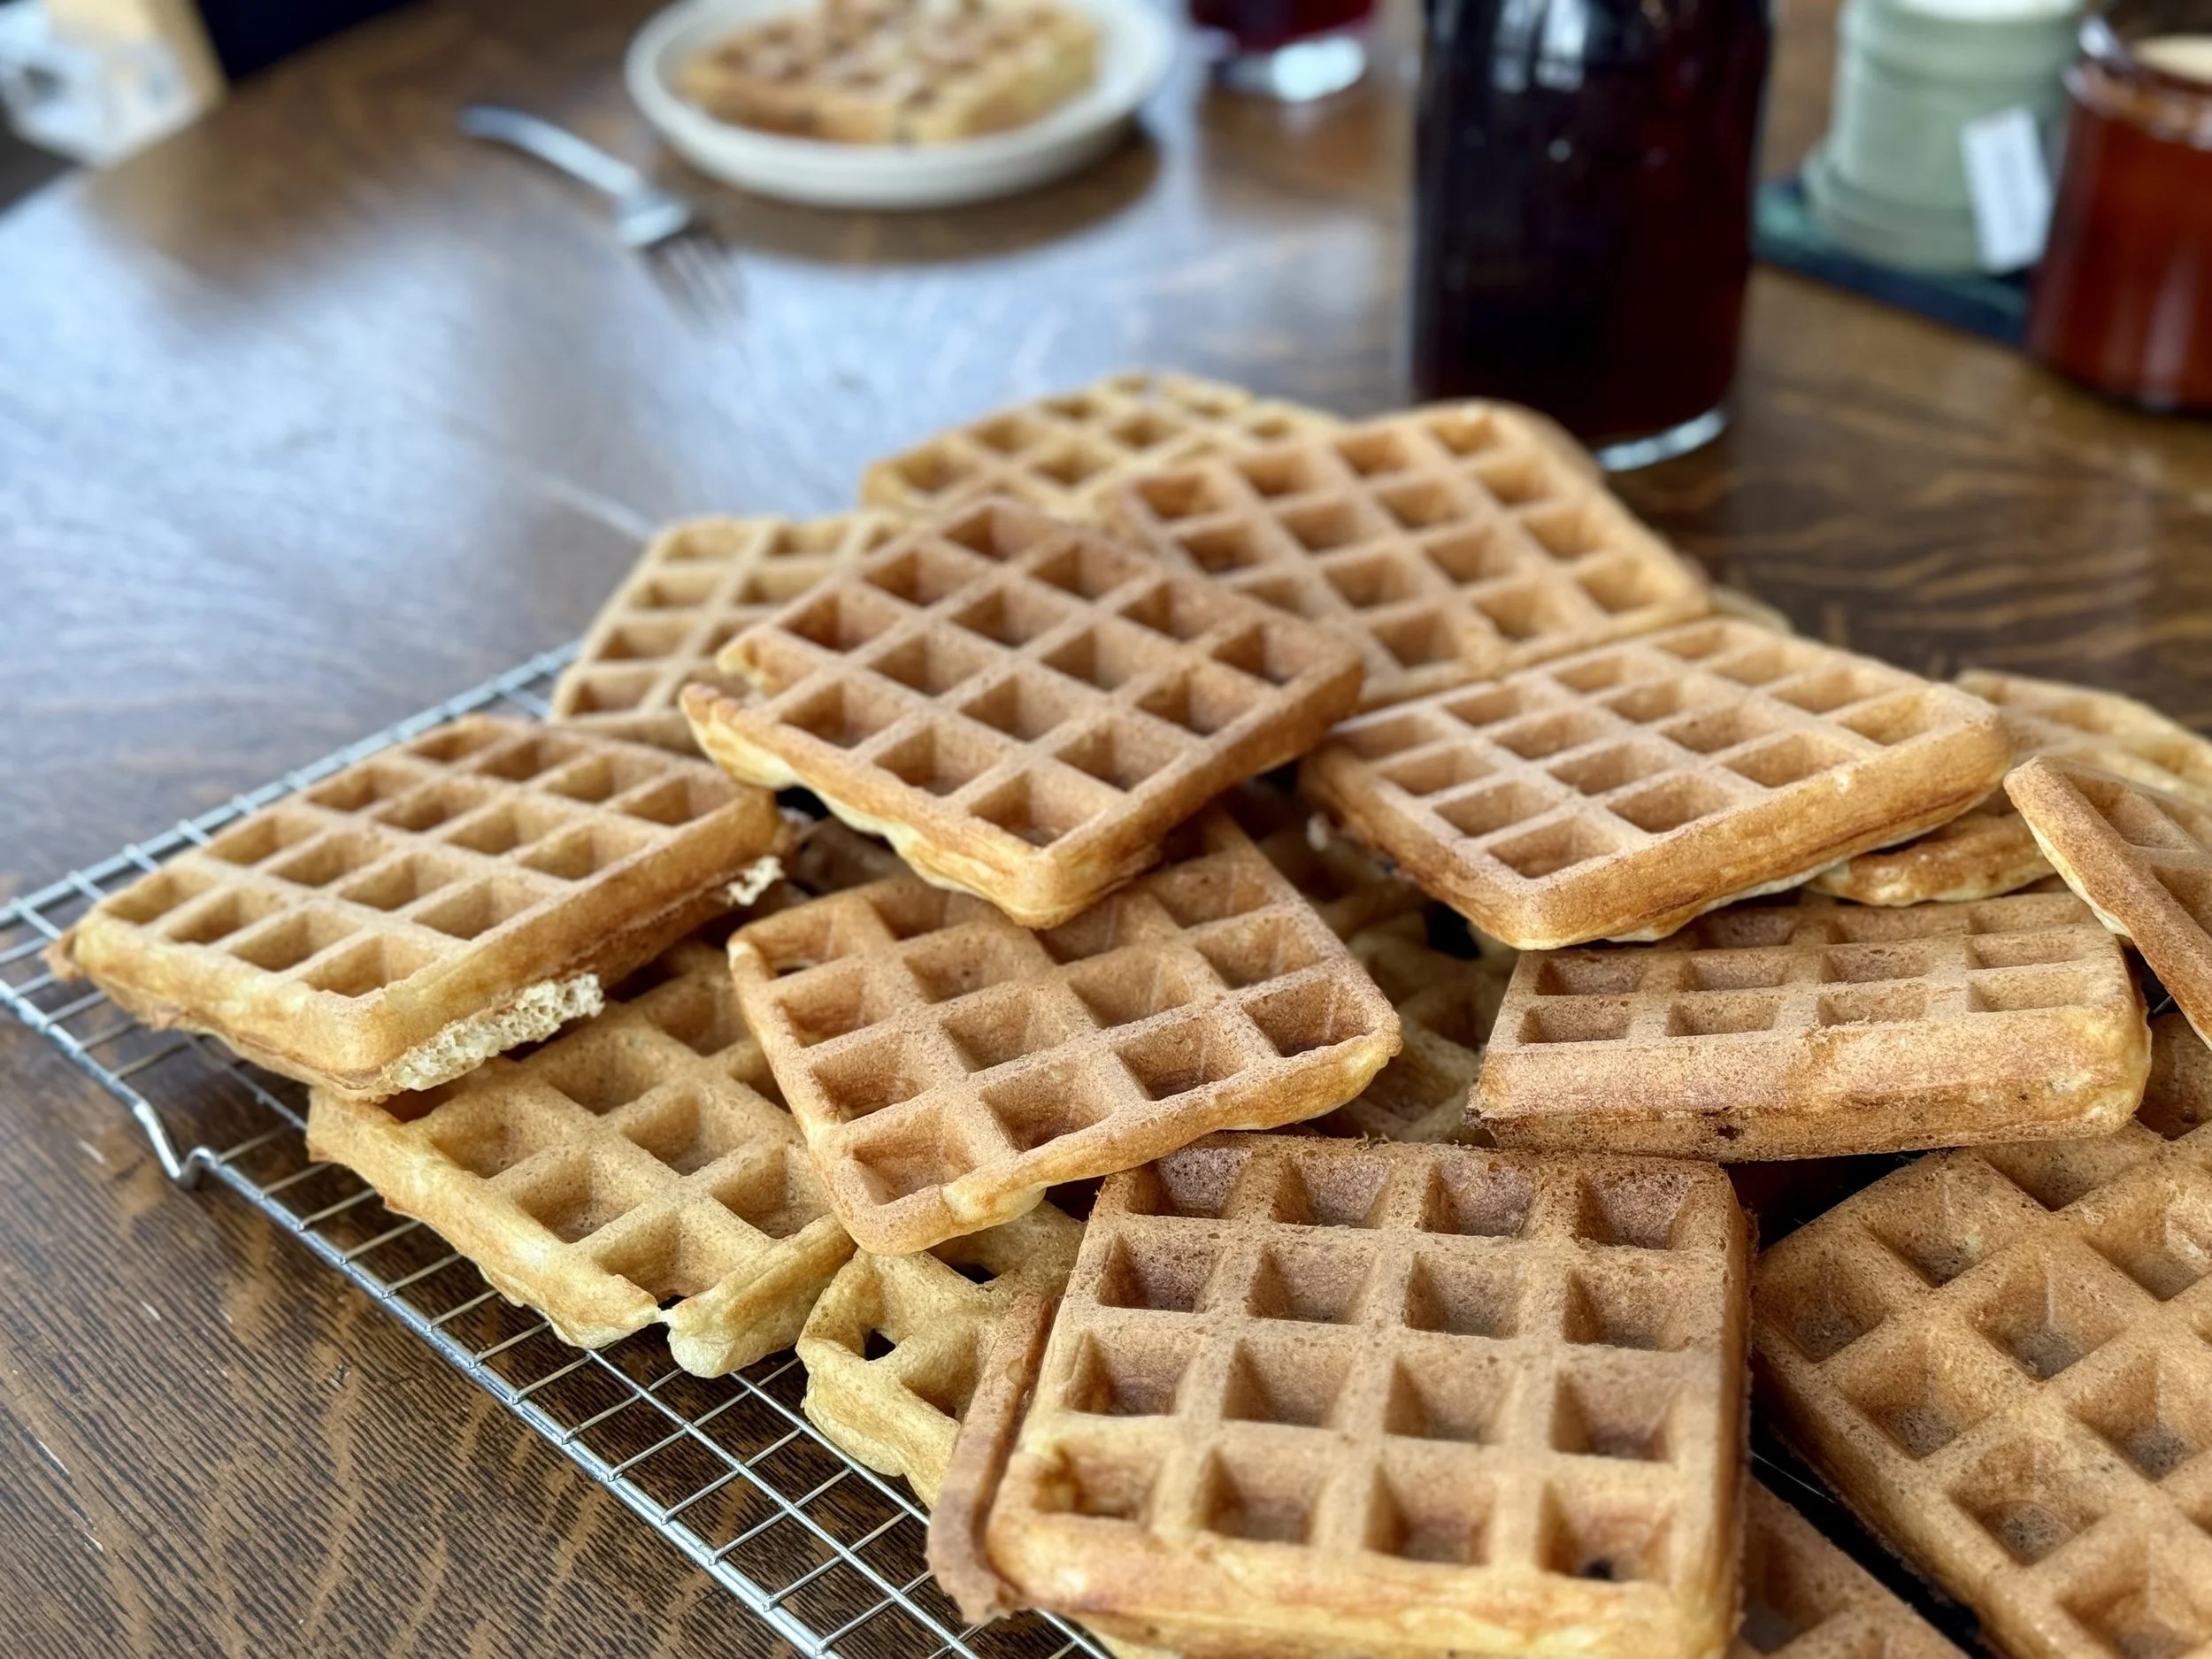
Morris House Rolls (Parker House Rolls)

Soft and fluffy, these rolls have become a staple for holiday dinners and everyday dinners. There are hardly ever any leftovers, no matter how many batches we make! It’s hard to resist delicious, buttery, homemade bread.

Originally called Parker House Rolls, we’ve since changed the name of these to Morris House Rolls since, well, we make them so pretty and slightly changed the method of Parker House Rolls. Their origin has something to do with some rolls made at a hotel, where any angry baker threw some unfinished rolls into the oven. Apparently these were the rather delicious result that stuck and became famous. The method nowadays involves rolls that are dipped in butter and folded in half before they’re baked. This all seems rather fussy and messy, so we’ve adapted these into a more classic dinner roll shape. Just as delicious without all the fuss.

These are wonderful as is, or sliced and used for sliders or other small sandwiches. These freeze beautifully, so you can always pull some out for an impromptu dinner side!

Sourdough Discard Friendly

This is a great recipe to use up some sourdough discard. Add up to 100g of discard and a bit more flour as needed.

Why Heat the Milk First?

Heating milk, often known as “scalding”, is a technique often found in older recipes. It involves heating the milk to at least 181°F / 83°C. It has a few different purposes, depending on what you’re making.

  • Kill Bacteria: Before milk was widely pasteurized, scalding milk helped to kill bacteria.

  • Enhance Flavor: Milk takes on flavors really well when heated, so scalding works well with recipes that use vanilla, spices, herbs, etc., such as ice creams and custards.

  • Help Bread Rise: Milk contains whey protein, which can weaken gluten. If gluten isn’t strong, bread won’t rise properly. Scalding milk deactivates the whey protein, for an optimal rise.

The final reason is the reason why milk is scalded in this recipe.

This post may contain affiliate links. If you make a purchase using these links, Jennyblogs may receive a small commission, at no extra cost to you. This helps to support Jennyblogs. For further information see the privacy policy. Grazie!

Recipe adapted from Food Network


Morris House Rolls

Ingredients:

  • 1 1/2 cups / 356g milk

  • 1/2 cup / 113g butter, plus more for brushing

  • 1/2 cup / 100g sugar

  • 2 1/4 tsp / 7g instant yeast

  • 1/2 cup / 119g warm water

  • 3 eggs

  • 1 1/2 tsp salt

  • 6 cups / 720g all-purpose flour

Directions:

Oven 350°F / 177°C. 1 baking sheet lined with parchment paper or silpat.

  1. In a small pan, bring milk to a simmer. Remove from heat and stir in butter and sugar until melted. Allow to cool.

  2. In a large mixing bowl or bowl of a stand mixer fitted with the dough hook, combine yeast, water, eggs, salt, half of the flour, and cooled milk mixture until smooth. Add remaining flour, 1/2 cup at a time, until a soft, smooth dough forms. Knead for a few minutes with the dough hook.

  3. Transfer dough to floured surface and knead about 5 more minutes by hand.

  4. Place dough in a lightly oiled bowl, flip once to coat in oil, cover, and let rest for about 1 hour at room temperature, or until doubled in size.

  5. Punch dough down and divide dough into about 30 pieces. This will work out to be about 55g per piece if you have a scale to weigh them. Roll each piece into a tight ball and place on prepared baking sheet.

  6. Cover and let rest at room temperature for about 30-45 minutes, or until dough balls are puffed and almost doubled in size.

  7. Bake in preheated oven for 18-20 minutes or until golden brown. Remove from oven and brush with melted butter, if desired.

Jenny’s Notes:

  • If using instant dry yeast, you will want to active it before adding it in with the other dough ingredients. Add active dry yeast and the warm water to a small bowl and let sit for 5-10 minutes or until bubbly and active, before proceeding by adding them in with the rest of the dough ingredients.

  • This is a great recipe to use up some sourdough discard. Add up to 100g of discard and a bit more flour as needed.

  • These are so good, we don’t usually brush them with the extra butter!


Whole Wheat Garlic Knots

IMG_3863.jpeg

These whole wheat garlic knots are like your favorite garlic knots, but slightly healthified by adding whole wheat flour. You’re welcome.

I once spent two summers in NYC when I was a teenager, training with the American Ballet Theatre. My mom and I had great fun roaming around the streets of New York, trying NY bagels and pizza and walking miles for the free Lindt samples at the Lindt store. #dessert. We quickly discovered that NY pizza lives up to its name, and also that it is not the only star. You must get the garlic knots. And the best ones are at Ray’s Pizza, on 11th street. Buddy the Elf knows it. Except I may have read they closed. I’m really torn up about that. Such good memories, and guys, Buddy the Elf talks about it. How could they close?? How could they do that to me? I haven’t been able to support their business since 2008 but….such good memories. And if I had gone back to NYC since I would’ve eaten so many garlic knots! Alas. The world keeps turning, and there is this homemade recipe which is pretty durn good.

These knots are as good as any, and while the whole wheat flour might not be a part of the classic, I think it adds a wonderful nutty depth to the knots, as whole wheat flour does so well.

Want to lessen the garlic breath? Try Roasted Garlic Knots!

If there was a fault with garlic knots, it would be, well, the garlic. It’s what makes them. It’s also what makes them so dangerous. Fresh garlic, and so much. So good. So….smelly for the next 24 hours. But I discovered a trick to make these rolls a little less lethal. Normally you would bake the rolls, then slather them in the garlic butter. Instead, you can slather them with the garlic butter before baking, so they become roasted garlic knots. Also delicious, and may save your social interactions the next day. Somewhat.

The amount of garlic butter you use is also customizable. Really good, garlicky knots like you get in restaurants would probably be doused in a similar amount of garlic butter as the recipe below calls for, but if you want to lighten the load, you absolutely can. I often halve the garlic topping to keep it a bit lighter. Or, because of masks, social distancing, and generally staying home, you could also up the garlic…

Use up sourdough discard

If you are an avid sourdough baker, or at least, sourdough feeder, this recipe makes an excellent vessel for using up sourdough discard. Simply add discard to other ingredients before kneading (think 50-100g of starter) and continue as normal. Depending on how much starter you use, you will probably need to add a bit extra flour to the dough to ensure it’s not overly sticky.

So, an ode to Ray’s Pizza on 11th, that may no longer be in existence. May it Ray in Pizza. I mean, rest in peace.

This post may contain affiliate links. If you make a purchase using these links, Jennyblogs may receive a small commission, at no extra cost to you. This helps to support Jennyblogs. For further information see the privacy policy. Grazie!

Recipe adapted from Joy the Baker


Whole Wheat Garlic Knots

Makes 10 knots

IMG_3856.jpeg

Ingredients:

For the knots

  • 2 1/4 tsp / 7g active dry yeast

  • 2 tsp / 10g sugar

  • 1 cup / 237g warm water (about 100°F / 38°C)

  • 1 1/4 - 1 1/2 cups / 150-180g bread or all-purpose flour

  • 1 cup / 130g whole wheat flour

  • 2 Tbsp / 28g oil

  • 1 tsp / 5g salt

For the Garlic Butter Mixture

  • 4 cloves garlic, minced

  • 1/4 cup / 56g melted butter, olive oil, or a mixture of both

  • 1/4 cup chopped fresh parsley, optional

  • 1 /2 tsp salt

Directions:

Make the Knots

Oven preheated to 400°F / 205°C. Line 1 or 2 baking sheets with parchment paper or silpat.

  1. In a small bowl, combine yeast, sugar, and warm water; swirl to dissolve yeast and sugar. Let sit until frothy, about 5-10 minutes.

  2. In a large bowl or bowl of a stand mixer fitted with the dough hook, mix 1 1/4 cups bread flour, whole wheat flour, oil, salt, and yeast mixture until combined. Dough should be pliable, not too stiff but also not sticky. Add remaining 1/4 cup bread flour if necessary.

  3. Knead dough with bread hook for about 7 minutes or by hand for 10 minutes until dough is smooth and elastic.

  4. Grease a large bowl (can be the same bowl) and place dough in the bowl, flipping once to coat in oil. Cover with a kitchen towel or plastic wrap and allow to rise at room temperature for 1 hour, or until doubled in size.

  5. On a lightly floured surface, roll dough out into a square, roughly 10x10in / 25x25cm. Slice into ten 1in / 2.5cm strips.

  6. Take each strip and tie loosely in a knot; tuck the ends under. Place evenly spaced on baking sheet(s) and loosely cover with a kitchen towel or plastic wrap. Let rise in a warm place for about 30 minutes.

  7. Bake in preheated oven for 15 to 18 minutes or until golden.

Make the Garlic Butter Mixture

  1. Mix together all ingredients for garlic butter mixture.

  2. As soon as rolls are done baking, either toss in garlic butter or brush over the rolls with a pastry brush.

    Best if served warm.

Jenny’s Notes:

  • For Roasted Garlic Knots, brush rolls with garlic butter mixture before baking instead of after. Helps a bit with the garlic breath!

  • For a lighter, less garlicky roll, cut the garlic butter mixture in half. For extra garlicky rolls, use up to 6 garlic cloves!

  • The dough can be made a day ahead. Make and knead dough according to directions, and after placing dough in oiled bowl, place covered in fridge and allow to rise overnight. Bring dough to room temperature (or at least close) before rolling out.

  • You can use sourdough discard in this recipe. Add in with the flour and continue as in recipe, a bit more flour may be necessary to ensure your dough isn’t too sticky.

  • The above recipe can also be used as pizza dough. Likewise, you can also use your favorite pizza dough recipe (my mom used to buy pre-made pizza dough from Sam’s club to make easy breads and pizzas) and simply follow the recipe above for shaping and making the garlic butter.

Ray's Pizza Garlic Knots, Garlic Knots, Garlic Butter, Garlic Rolls
Bread
American
Yield: 10
Author:
Whole Wheat Garlic Knots

Whole Wheat Garlic Knots

Buttery, garlicky knots like the best pizzerias, made at home with whole wheat flour.
Prep time: 35 MinCook time: 18 Mininactive time: 1 H & 30 MTotal time: 2 H & 23 M

Ingredients

For the Knots
For the Garlic Butter Mixture

Instructions

Make the Knots
  1. Oven preheated to 400°F / 205°C. Line 1 or 2 baking sheets with parchment paper or silpat.
  2. In a small bowl, combine yeast, sugar, and warm water; swirl to dissolve yeast and sugar. Let sit until frothy, about 5-10 minutes.
  3. In a large bowl or bowl of a stand mixer fitted with the dough hook, mix 1 1/4 cups bread flour, whole wheat flour, oil, salt, and yeast mixture until combined. Dough should be pliable, not too stiff but also not sticky. Add remaining 1/4 cup bread flour if necessary.
  4. Knead dough with bread hook for about 7 minutes or by hand for 10 minutes until dough is smooth and elastic.
  5. Grease a large bowl (can be the same bowl) and place dough in the bowl, flipping once to coat in oil. Cover with a kitchen towel or plastic wrap and allow to rise at room temperature for 1 hour, or until doubled in size.
  6. On a lightly floured surface, roll dough out into a square, roughly 10x10in / 25x25cm. Slice into ten 1in / 2.5cm strips.
  7. Take each strip and tie loosely in a knot; tuck the ends under. Place evenly spaced on baking sheet(s) and loosely cover with a kitchen towel or plastic wrap. Let rise in a warm place for about 30 minutes.
  8. Bake in preheated oven for 15 to 18 minutes or until golden.
Make the Garlic Butter Mixture
  1. Mix together all ingredients for garlic butter mixture.
  2. As soon as rolls are done baking, either toss in garlic butter or brush over the rolls with a pastry brush.
  3. Best if served warm.

Notes:

  • For Roasted Garlic Knots, brush rolls with garlic butter mixture before baking instead of after. Helps a bit with the garlic breath!
  • For a lighter, less garlicky roll, cut the garlic butter mixture in half. For extra garlicky rolls, use up to 6 garlic cloves!
  • The dough can be made a day ahead. Make and knead dough according to directions, and after placing dough in oiled bowl, place covered in fridge and allow to rise overnight. Bring dough to room temperature (or at least close) before rolling out.
  • You can use sourdough discard in this recipe. Add in with the flour and continue as in recipe, a bit more flour may be necessary to ensure your dough isn’t too sticky.
  • The above recipe can also be used as pizza dough. Likewise, you can also use your favorite pizza dough recipe (my mom used to buy pre-made pizza dough from Sam’s club to make easy breads and pizzas) and simply follow the recipe above for shaping and making the garlic butter.


Calories

185.79

Fat (grams)

7.93

Sat. Fat (grams)

3.14

Carbs (grams)

20.38

Fiber (grams)

2.13

Net carbs

22.21

Sugar (grams)

1.10

Protein (grams)

4.01

Sodium (milligrams)

232.51

Cholesterol (grams)

12.04

Nutritional information is approximate. Based on 1 knot.

Did you make this recipe?
Tag @jennyblogsandbakes on instagram and hashtag it #jennyblogs
Created using The Recipes Generator
IMG_3868.jpeg

Double Chocolate Zucchini Bread

IMG_3532.jpg

It’s zucchini season!

Don’t ask me why, but I am always surprised when summer rolls around and so do all the mountains of ripe zucchini…I associate zucchini with fall and winter dishes. Why? No idea. Especially when I look back over my childhood, and my mom almost always had zucchini growing in her garden (they would get huge and there would be so many, who wants zucchini???) Ah, the things we take for granted! Summer dinners would often see zucchini battered in flour and fried up over the griddle.

Now that I live in Italy, I always see the zucchini blossoms battered and fried. It’s a favorite appetizer in restaurants come summer. In fact, more often than not zucchini are sold with the blossoms still attached. Or you can buy just the blossoms. I rarely batter and fry things at home and haven’t bothered to discover other ways of using them, so I have to be careful because the blossoms go moldy much quicker than the zucchini itself! The zucchini are also quite small and light in color, at least compared to the monster dark green baseball bats that used to grow in my mom’s garden.

With the abundance of zucchini around, or any produce, I tend to start looking for new ways to cook them or improving current recipes. While I love zucchini in a stir-fry, with pasta, in risotto, pan-fried like my mama’s, etc., I wanted something different. Zucchini bread came to mind. But not just classic zucchini bread. I wanted chocolate zucchini bread. Double chocolate zucchini bread.

Thus this recipe was born, and if you’re at the point where you’re getting sick of all the zucchini, this is the recipe for you. You won’t even know there is zucchini in it. It’s chocolatey, fudgy, not overly sweet, and just exactly what I was wanting.

Aside from having vegetables in it, it doesn’t have much oil, using half yogurt or applesauce instead, keeping the calories and fat content down. If you’re concerned about cholesterol, you can also use egg whites instead of the whole egg! See notes below recipe for more ideas to customize this bread to your tastes and needs.

Use up sourdough discard

Another great thing about this recipe? You can use up some sourdough discard that may be lurking in your fridge. No need to feed it or for it to be active at all, just make sure it hasn’t gone bad! Sometimes my discard sits up to 2-3 weeks in my fridge before I get to it. The longer it sits the more sour it will taste/smell, but even using a 3 week old discard I couldn’t have told you there was any in this zucchini bread! It can help bulk up recipes like this and add a little fermented nutrition!

This post may contain affiliate links. If you make a purchase using these links, Jennyblogs may receive a small commission, at no extra cost to you. This helps to support Jennyblogs. For further information see the privacy policy. Grazie!

Recipe adapted from my mama’s classic zucchini bread


Double Chocolate Zucchini Bread

Makes 1 loaf

IMG_3541.jpg

Ingredients:

  • 1/2 cup / 100g sugar

  • 1/4 cup / 56g oil

  • 1/4 cup / 60g plain yogurt or applesauce

  • 1 egg or 2 egg whites

  • 1 tsp / 5g vanilla extract

  • about 1/2 cup / 100g sourdough discard, optional

  • 1 1/2 cups / 250g grated zucchini (about 2 medium)

  • 1 cup / 120g all-purpose flour

  • 1/2 cup / 50g cocoa powder

  • 1 tsp baking soda

  • 1/2 tsp salt

  • 1/4 tsp baking powder

  • 1 cup / 170g chocolate chips

Directions:

Preheat oven to 350°F / 177°C. Grease 1 9x5inch / 23x13cm bread pan or line with parchment paper.

  1. In a large bowl, beat together sugar, oil, yogurt, egg, vanilla, and sourdough discard, if using. Stir in zucchini.

  2. In a separate bowl, whisk together flour, cocoa, baking soda, salt, and baking powder.

  3. Fold dry ingredients and chocolate chips into wet ingredients until just combined. Reserve a handful of chocolate chips for sprinkling on top, if you wish.

  4. Pour into prepared bread pan, sprinkle with remaining chocolate chips, and bake in preheated oven for 40-45 minutes or until toothpick inserted in the center comes out mostly clean. A few moist crumbs clinging to the toothpick is a good sign the bread is done but still moist! Allow to bread to cool before removing from pan and serving.

Jenny’s Notes:

  • If you desire a sweeter bread, you can up the sugar to 1 cup / 200g.

  • I know not everyone has plain yogurt on hand, so if you have French Vanilla or another flavor you wouldn’t mind mixing with chocolate, use that! Flavored yogurt has added sugar, so if that is important to you to keep the sugar down, simply reduce the sugar from 1/2 cup / 100g to a scant 1/2 cup / 80-90g.

  • Zucchini quantity can be played with! My mom’s original recipe calls for 1 cup, but here I’ve increased it to 1 1/2 cups. If you can’t detect the veggies, why not add more so you get maximum nutrition? On that note, measuring grated, sliced, or cubed veggies by weight is always a bit tricky. From my research, the average medium zucchini weighs about 5oz or 140g, so if you’re buying zucchini specifically for this recipe, you’ll probably want to get 2, making a bit more than 1 1/2 cups, but that’s ok! I would use it all. Or just get one zucchini that’s a bit bigger. However you please, as I said it’s flexible! And I just way over-analyzed that for you. You’re welcome.

zucchini bread, quick bread, sourdough discard, low fat recipe, double chocolate zucchini bread
bread, dessert
American
Yield: 1 loaf
Author:
Double Chocolate Zucchini Bread

Double Chocolate Zucchini Bread

Fudgy, chocolatey zucchini bread loaded with chocolate chips. A sneaky way to get in more vegetables and you can even use up some sourdough discard with this recipe!
Prep time: 20 MinCook time: 45 MinTotal time: 1 H & 4 M

Ingredients

Instructions

  1. Preheat oven to 350°F / 177°C. Grease 1 9x5inch / 23x13cm bread pan or line with parchment paper.
  2. In a large bowl, beat together sugar, oil, yogurt, egg, vanilla, and sourdough discard, if using. Stir in zucchini.
  3. In a separate bowl, whisk together flour, cocoa, baking soda, salt, and baking powder.
  4. Fold dry ingredients and chocolate chips into wet ingredients until just combined. Reserve a handful of chocolate chips for sprinkling on top, if you wish.
  5. Pour into prepared bread pan, sprinkle with remaining chocolate chips, and bake in preheated oven for 40-45 minutes or until toothpick inserted in the center comes out mostly clean. A few moist crumbs clinging to the toothpick is a good sign the bread is done but still moist! Allow to bread to cool before removing from pan and serving.

Notes:

If you desire a sweeter bread, you can up the sugar to 1 cup / 200g. I know not everyone has plain yogurt on hand, so if you have French Vanilla or another flavor you wouldn’t mind mixing with chocolate, use that! Flavored yogurt has added sugar, so if that is important to you to keep the sugar down, simply reduce the sugar from 1/2 cup / 100g to a scant 1/2 cup / 80-90g. Zucchini quantity can be played with! My mom’s original recipe calls for 1 cup, but here I’ve increased it to 1 1/2 cups. If you can’t detect the veggies, why not add more so you get maximum nutrition? On that note, measuring grated, sliced, or cubed veggies by weight is always a bit tricky. From my research, the average medium zucchini weighs about 5oz or 140g, so if you’re buying zucchini specifically for this recipe, you’ll probably want to get 2, making a bit more than 1 1/2 cups, but that’s ok! I would use it all. Or just get one zucchini that’s a bit bigger. However you please, as I said it’s flexible! And I just way over-analyzed that for you. You’re welcome.

Calories

277.93

Fat (grams)

13.31

Sat. Fat (grams)

4.04

Carbs (grams)

38.03

Fiber (grams)

2.86

Net carbs

35.17

Sugar (grams)

22.45

Protein (grams)

4.65

Sodium (milligrams)

291.43

Cholesterol (grams)

21.07
Nutritional information is approximate; based on roughly 9 slices from 1 loaf. Does not include using sourdough discard.
Did you make this recipe?
Tag @jennyblogsandbakes on instagram and hashtag it #jennyblogs
A zucchini lurking in the background, for proof there truly is zucchini in this bread

A zucchini lurking in the background, for proof there truly is zucchini in this bread